
Overview
Quota Kontrol is a powerful behavior monitoring tool that allows the operator to take “automated actions” based on measured usage for a defined period.
-
Usage can be measured from across LAN Access networks, any combination of WAN sources or a Starlink Service Line (requires the Starlink Cloud service).
-
A Quota can be applied to any Edge SD-WAN device; the quota period can be defined as Monthly, Weekly, Daily, or can span a Custom time period.
-
Multiple Quota Actions can be set for the Edge SD-WAN device, including:
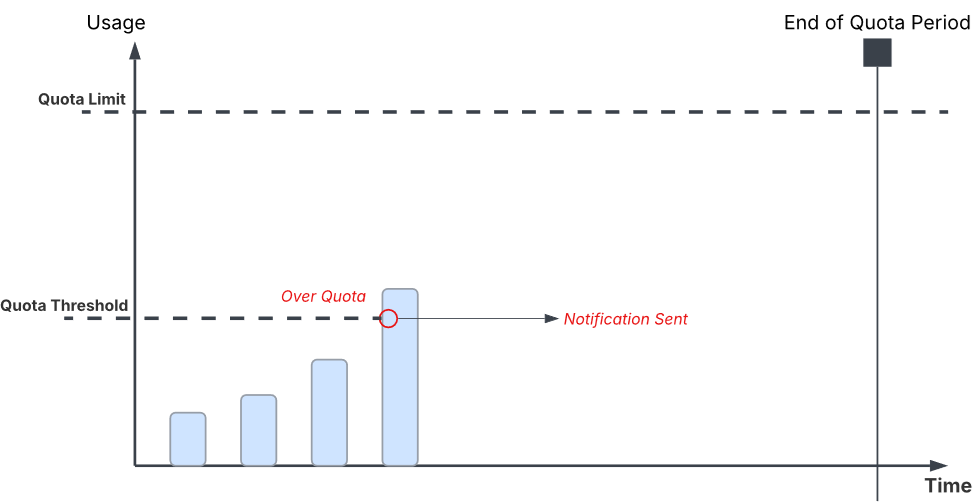
Send Notification: when over usage % threshold, send email notification
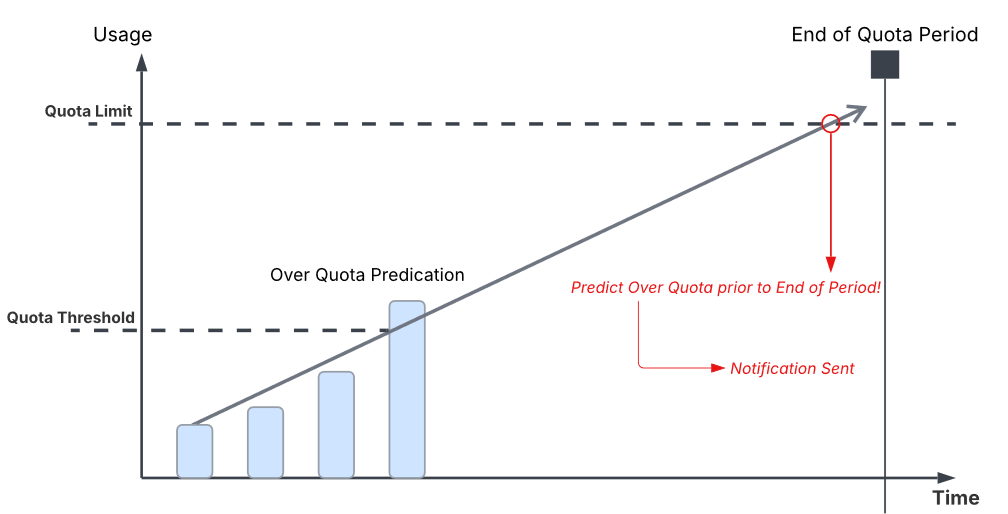
Predict Overage Notification: when over usage % threshold, and the usage at that period is trending to exceed “Quota Limit” for the defined period, send email notification
Assign WAN Profile: when over usage % threshold, set SDWAN Profile and send email notification.
Assign Traffic Policy: when over usage % threshold, set Network Traffic Policy and send email notification.
Disable Interfaces: when over usage % threshold, disable WAN interface and send email notification.

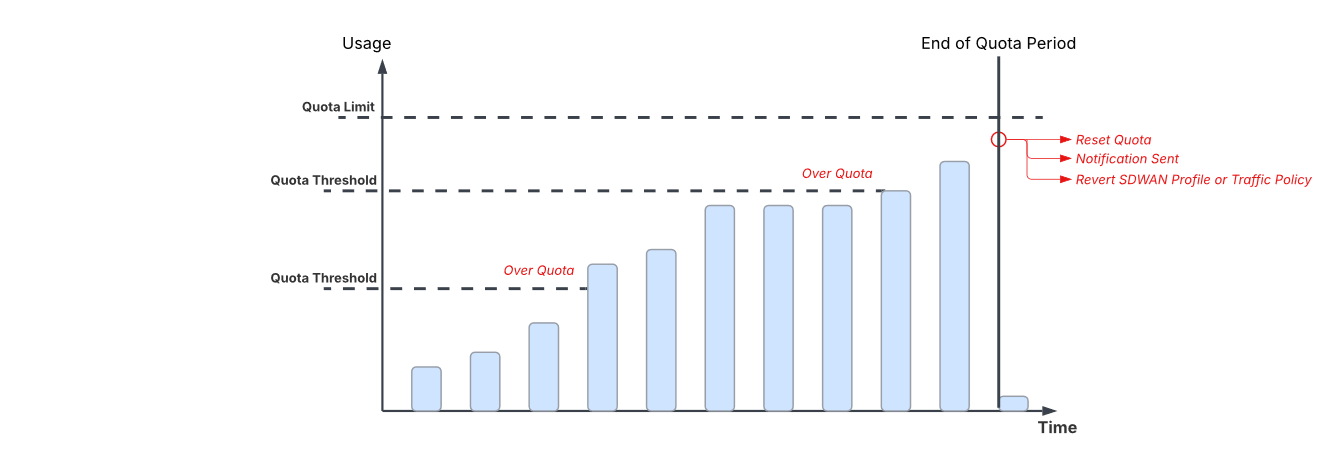
When the Quota Kontrol period has expired (e.g. at the end of the month), the Quota Kontrol Usage monitor renews - the period usage is reset to zero, the WAN Profile and Traffic Policy / Interface settings are reverted to their defaults / original settings.
Example
Multiple Quota Kontrol Rules can be set for a single device, as in this example.
An operator needs to monitor bandwidth usage on two WAN interfaces (WAN1 and WAN2) for an Edge SD-WAN device. The goals are:
-
To provide early and escalating notifications as WAN1 usage increases.
-
To enforce a traffic policy when WAN1 approaches its limit.
-
To separately track WAN2 and notify at a basic threshold.
Rules Used
-
Rule 1 (WAN1, Monthly):
-
Notify at 10%, 50%, and 90%
-
At 95%, apply a Traffic Policy to stop WAN1 usage for selected Access Networks
-
-
Rule 2 (WAN2, Monthly):
-
Notify at 50%
-
Rule Interaction
Each rule monitors a different interface with its own thresholds and actions. They run in parallel on the same device.
When the monthly period ends, both rules reset: usage counters are cleared, and any applied profiles or policies revert to default.
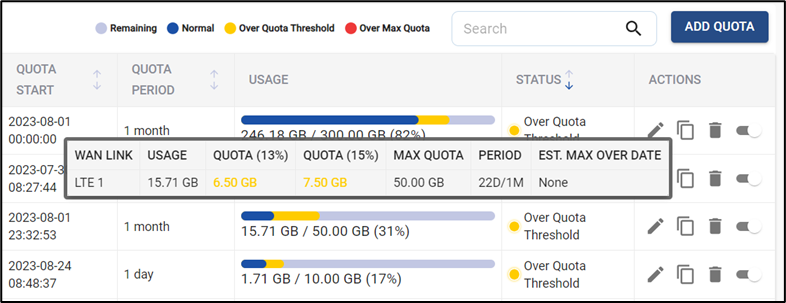
Quota Kontrol Data Table
The Quota tab contains the Quota Kontrol Data Table, which lists the currently configured Quotas and displays the up to date Usage status.
-
The Quota tab is selected by default.
-20250115-191225.png?cb=4d0ceef85534bd709b493cb3db8c4fc1)
-
The table shows the list of devices deployed in the selected site of the user and their data consumption.
-
It shows the below information:
-
Site – Name of the site.
-
Device – Name of the device.
-
Data Source – WAN Links selected for the device.
-
Quota Start – Start date and time of the quota.
-
Quota Period – Time period of the quota.
-
Usage – Breakdown of data usage. The color codes for different levels of data usage are explained below. Refer Figure Color Codes for Usage.
-
Remaining – The amount of data remaining in the quota.
-
Normal – The amount of data consumed by the user.
-
Over Quota Threshold – The amount of data consumed after reaching the threshold amount.
-
Over Max Quota - The amount of data consumed after reaching the maximum quota limit.
-
Hover the cursor on the progress bar to open the pop-up that shows additional information explained below. Refer Figure Usage Column Pop-up.
-
WAN Link – The WAN Links selected for the device.
-
Usage – Amount of data consumed.
-
Quota percentages – The different thresholds limits set for the Quota.
-
Max Quota – The maximum amount data allocated for the Quota.
-
Period – The number of days elapsed / Total number of days for the quota.
-
Est. Max Over Date – The estimated date by which the Quota data would get completely used up.
-
-
-
Status – Status of data usage.
-
Actions:
-
Edit - Click Pencil icon to edit the quota.
-
Copy – Click Copy icon to copy the quota.
-
Delete – Click Delete icon to delete the quota.
-
Enable/Disable – Click Toggle button to enable or disable the Quota. When a quota is disabled, all the actions that are configured to happen will not be executed. Only when the quota is enabled again, the actions will get executed.
-
-
-
The Search field can be used to search for the device based on the Site Name/Device Name/WAN Link.
-
Click Download to download the table data in CSV format.

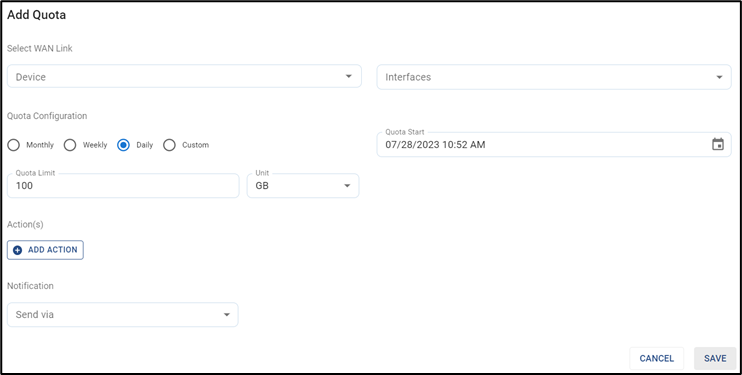
Add Quota
-
Click Add Quota to create a new Quota. The Add Quota dialog box opens.
-
In the Device field, select the required device from the dropdown menu. The device list in the dropdown will be shown according to the selected site.
-
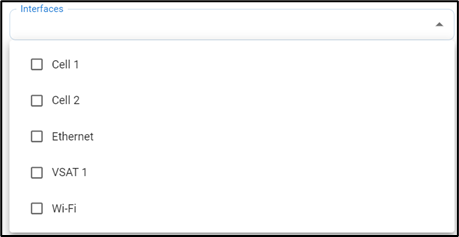
In the Interfaces field, select the required Interfaces from the dropdown menu. The Interface list in the dropdown will be shown according to the selected device.
-
Select the Quota Configuration. The user can select any option between Monthly/Weekly/Daily/Custom.
-
If the user selects Custom, enter the Quota Period.
-
Select the Unit from the dropdown menu.
-
-
Enter the Quota Start date and time from the date picker and clock.
-
Enter the Quota Limit.
-
Select the Unit from the dropdown menu. The user can select any option between MB/GB/TB.
Actions
-
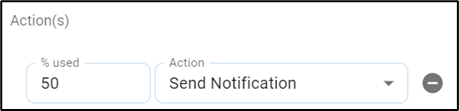
Click + Add Action to specify the actions to be done when the data usage reaches a specific percentage of total quota.
-
In the % used field, enter the target percentage at which the action should be done.
-
There are four types of actions that the user can configure.
Send Notification
-
The user can configure to send a notification about the data usage when the data usage reaches a specific percentage of the total quota.
-
In the Action field, select Send Notification from the dropdown menu.
-
In the Notification field, select the checkbox of medium to send the notification. The options available are Email and Microsoft Teams.
-
In the Send To (Via Email) field, select the Email address from the dropdown menu or enter a new email address.
-
Click Save.
-
Now when the usage reaches the given percentage, a notification will be sent to the given Email address and the Teams channel stating details about the data consumption.
Assign WAN Profile
-
The user can configure to assign particular WAN Profiles to the network when the data usage reaches a specific percentage of the total quota. The new WAN profiles can have different priorities for the WAN Interfaces.
-
In the Action field, select Assign WAN Profile from the dropdown menu.

-
In the WAN Profile field, select the required WAN Profile from the dropdown menu.
-
These new WAN profiles have to be set up in the Edge Portal.
-
In the Access Networks field, Select the Access Networks from the dropdown menu.
-
Click Save.
-
Now when the usage reaches the given percentage, the new WAN Profile will be applied to the network and a notification will be sent to the user.
Assign Traffic Policy
-
The user can configure to assign particular Traffic Policies to the network when the data usage reaches a specific percentage of the total quota.
-
In the Action field, select Assign Traffic Policy from the dropdown menu.

-
In the Traffic Policy field, select the required Traffic Policy from the dropdown menu.
-
These new Traffic Policies have to be set up in the Edge Portal.
-
In the Access Networks field, Select the Access Networks from the dropdown menu.
-
Click Save.
-
Now when the usage reaches the given percentage, the new Traffic Policies will be applied to the network and a notification will be sent to the user.
Disable Interface
-
The user can also configure to disable specific interfaces or all interfaces when the data usage reaches a given percentage of the total quota.
-
In the Action field, select Disable Interfaces from the dropdown menu.

-
In the Interfaces field, select the required Interfaces from the dropdown menu. The Interface list in the dropdown will be shown according to the selected device.
-
Click Save.
-
Now when the usage reaches the given percentage, the internet connectivity will be disabled to the selected interfaces and a notification will be sent to the user.
-
Click Cancel icon to cancel.
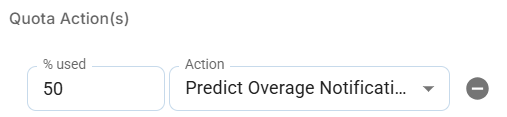
Predict Overage Notification
-
When data usage reaches a defined percentage and the trend indicates potential quota exhaustion within the set period, a notification can be triggered to alert the user and provide an estimated exhaustion date.
-
In the Action field, select Predict Overage Notification from the dropdown menu.
-
In the Notification field, select the checkbox of medium to send the notification. The options available are Email and Microsoft Teams.
-
In the Send To (Via Email) field, select the Email address from the dropdown menu or enter a new email address.
-
Click Save.
-
Now, when usage reaches the specified percentage, a notification will be sent to the configured email address and Teams channel, including details about the expected data exhaustion date.
Quota Actions on Renewal
Using the Add Actions feature, different configurations can be applied to the quota when the user reaches different percentages of data usage. When the quota refreshes, the user might want to restore the initial configurations and start as new. The Quota Actions on renewal option can be used for that purpose.

-
Click the Pencil icon to enable editing.
-
Select the Action from the dropdown menu. There are three types of actions that the user can configure.
Enable Interfaces
-
The user can configure to enable specific interfaces or all interfaces when the quota.
-
In the Action field, select Enable Interfaces from the dropdown menu.

-
In the Interfaces field, select the required Interfaces from the dropdown menu. The Interface list in the dropdown will be shown according to the selected device.
-
Click Save.
-
Now when the quota refreshes, the internet connectivity will be restored to the selected interfaces and a notification will be sent to the user.
Assign WAN Profile
-
The user can configure to assign particular WAN Profiles to the network when the quota refreshes.
-
In the Action field, select Assign WAN Profile from the dropdown menu.

-
In the WAN Profile field, select the required WAN Profile from the dropdown menu.
-
In the Access Networks field, Select the Access Networks from the dropdown menu.
-
Click Save.
-
Now when the quota refreshes, the selected WAN Profile will be applied to the network and a notification will be sent to the user.
Assign Traffic Policy
-
The user can configure to assign particular Traffic Policies to the network when the quota refreshes.
-
In the Action field, select Assign Traffic Policy from the dropdown menu.

-
In the Traffic Policy field, select the required Traffic Policy from the dropdown menu.
-
In the Access Networks field, Select the Access Networks from the dropdown menu.
-
Click Save.
-
Now when quota refreshes, the selected Traffic Policies will be applied to the network and a notification will be sent to the user.
Viewing Quota Details from Dashboard
-
The users can view the status of the quota from the Dashboard directly.
-
Hover the cursor on the values given in the Quota column from the Dashboard. A pop-up opens to show additional information such as:
-
Usage % – Percentage of data consumed from the total Quota.
-
WAN Alias – The WAN Alias selected for the device.
-
Quota Usage – Amount of data used up.
-
Quota 1 – The different thresholds limits set for the Quota.
-
Quota Max – The maximum amount data allocated for the Quota.
-
Status – Status of data usage.
-
Period – The number of days elapsed / Total number of days for the quota.
-
Est. Max Over Date – The estimated date by which the Quota data would get completely used up.
-
