
The Payment GW tab allows the admin to connect Stripe accounts to an organization or to its sites. Payments made by captive users for Paywall plans are received in these Stripe accounts. Earlier, Stripe invites were sent manually by the Kognitive team. With the Payment GW tab, the admin can send Stripe invites and manage the connected accounts from the Administration Portal. For the complete Paywall setup, from connecting a Stripe account to testing a purchase, see How To: Configure Paywall.
Prerequisites:
-
The Payment GW tab is available only for organizations that have the payment gateway enabled. To enable it, please contact your respective Account Manager.
-
The admin's IAM account in Kognitive Cloud must have the Payment Gateway Access privilege. Refer the CAN Access Privileges page for the access available to each type of admin user.
-
Full access to the Payment GW tab, including sending invites, is available only to admins of the parent organization who have access to all sites. Admins with access to only some sites, and admins of a sub-organization, can only view the list.
Organization-level and Site-level Stripe Accounts
A Stripe account can be connected at two levels:
-
Organization level – The Stripe account belongs to the whole organization. Payments for the plans linked to this account are received in the bank account provided by the organization during the Stripe onboarding.
-
Site level – The Stripe account belongs to a specific site. Payments for the plans linked to this account are received in the bank account provided by the site during the Stripe onboarding.
Organization-level and site-level Stripe accounts are independent and can exist together. A site with its own Stripe account can use it, while the other sites of the organization use the organization-level Stripe account.
Payment GW Tab
Select the Payment GW tab from the CAN Administration Portal. The tab lists the Stripe accounts of the organization selected in the Organization dropdown at the top right, including the accounts of its sub-organizations.

The list displays the below information:
-
Organization – Name of the organization or sub-organization.
-
Site – Name of the site. All Sites indicates an organization-level Stripe account.
-
Stripe Account – The masked Stripe account ID.
-
Contact Email – The email address to which the Stripe invite was sent.
-
Status – Status of the Stripe account. Refer the Account Status section below.
-
Created By – The admin who sent the Stripe invite.
-
Created On – The date on which the Stripe invite was sent.
-
Actions – The Resend, Lock and Delete icons. Refer the Actions section below.
Use the Per Page dropdown to set the number of connections displayed per page, and the arrows to move between pages. The total number of connections is shown next to the Per Page field (for example, 1 to 5 of 5 Connections).
Send a Stripe Invite
-
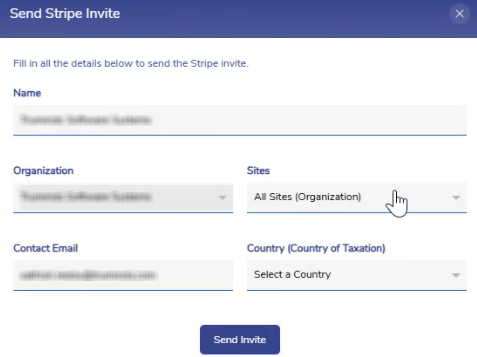
Click the Send Stripe Invite button. The Send Stripe Invite dialog box opens.
-
Enter the Name of the business that will own the Stripe account. By default, this is the name of the selected organization.
-
Select the Organization from the dropdown menu. The organization selected in the header and its sub-organizations are listed.
-
In the Sites field, select All Sites (Organization) to create an organization-level Stripe account, or select a specific site to create a site-level Stripe account for that site.
-
Enter the Contact Email. The Stripe onboarding link is sent to this email address.
-
Select the Country (Country of Taxation) of the business. Stripe sets the country when the account is created, and it cannot be changed later.
-
Click the Send Invite button. The Stripe account is added to the list with the Pending status.
Stripe Onboarding
-
The invitee receives an email with the onboarding link. The link redirects the invitee to Stripe to complete the onboarding, including the business and bank account details.
-
The onboarding link is valid for 30 days, or until the account is ready to use, whichever is earlier.
-
Once the onboarding is complete and Stripe enables the account for payments and payouts, the status changes to Connected. The account can then be used for Paywall plans and portal configurations.
For the onboarding steps to be followed by the invitee, refer the Guide: Paywall - Partner Onboarding and Payment Setup page.
The Kognitive Operations Team manages the Stripe settings of the connected accounts, such as the branding of the checkout page and receipts, the payout schedule and view-only Stripe access for the business. Refer the Guide: Paywall - Payment Gateway (Stripe) Configurations page.
Account Status
|
Status |
Description |
|---|---|
|
Pending |
The invite has been sent, but the onboarding is not complete. |
|
Action required |
The details have been submitted, but Stripe requires more information, such as identity documents. |
|
Connected |
The account can accept payments and receive payouts. Only Stripe accounts in this state can be used for plans and portal configurations. |
|
Restricted |
The account was connected earlier, but Stripe has disabled payments on it, usually because required information was not provided in time. Purchases of plans linked to this account fail at checkout. |
|
Expired |
The onboarding link has expired. Resend the invite to send a new link. |
Actions
-
Resend (arrow icon) – Sends a new onboarding link to the contact email. This is available only for accounts that have not completed the onboarding; the icon is disabled for Connected accounts. When resending, the site cannot be changed and only the Contact Email can be edited. The previous link stops working once the new link is sent.
-
Lock (lock icon) – Keeps the Stripe account in the list, but the account is not used.
-
Delete (bin icon) – Deletes the Stripe account from the list.
Refunds
Refunds for Paywall purchases are issued in Stripe, from the transactions of the connected account that received the payment. Find the Purchase ID in the user's Purchase History in the Users tab. Refer the Guide: Paywall - Subscriber Refunds page.
Next Steps
After the Stripe account is connected:
-
Create the Payable plans in the Plans tab and select the Stripe account in the Stripe Account field. Refer the Plans page.
-
Enable Paywall and add the plans to the portal configuration in the Portal Manager tab. Refer the Paywall Configuration page.