
-
Click the Vouchers tab from the Captive Access Network Homepage to open the Vouchers screen. This screen allows administrators to generate bulk access codes that can be distributed to end users. These codes act as one-time login credentials, which upon first use, create a user account automatically.
-
This feature enables the creating multiple user access accounts in bulk. This helps the admin control access via plans, expiry, sites, and networks.
-
This tab will be available to all users. The users with Read-only access can view the vouchers. But cannot create or manage vouchers (The Add button will be disabled).

Create Voucher
-
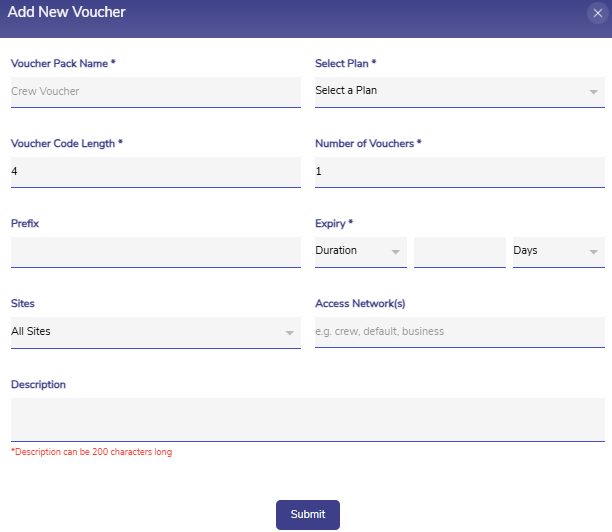
Click the Add Voucher Pack button to create a new voucher batch.
-
Enter the following details:
-
Voucher Pack Name - Name of the voucher pack
-
Select Plan - Plan applied to all user accounts created using the voucher
-
Voucher Code Length - Length of each voucher code
-
Number of Vouchers - Total codes to generate
-
Prefix - Optional prefix added to each code
-
Expiry - Expiry Duration of the voucher. Expiry can be set either in Duration (Number of days/hours) or Date
-
Sites - Restrict usage to these specific sites. Select the Sites to apply.
-
Access Network(s) - Restrict usage to specific Access Networks(s). Enter the access networks to apply. The name of the access networks have to be entered manually.
-
The Sites and Access Network(s) restrictions are optional. If these are not configured, then the vouchers can be used on any sites/access networks within that organization.
-
-
Description - Optional notes
-
-
Click the Submit button. A batch of voucher codes will be created with the specified configurations.
-
All vouchers initially appear in Created state.
Important Notes
-
Sites can be selected from the dropdown list.
-
Access Network(s) must be manually entered.
Vouchers Table
The vouchers table shows the list of vouchers created in the system. It shows the following information:
-
Voucher Pack Name – Name of the voucher pack
-
Plan Name – Assigned plan to the user accounts (e.g., data plan)
-
# Created – Total vouchers generated
-
# Distributed – Marked as shared with users
-
# Active – Redeemed vouchers
-
# Expired – Expired vouchers
-
Expiry Duration / Date
-
Allowed Sites
-
Allowed Access Networks
-
Description - Optional notes
-
Actions – Click the

-
The Search field can be used to search for the vouchers based on the Voucher Name / Plan Name / Voucher Code.
View Details
-
This screen shows the following information:
-
Voucher name
-
Voucher codes
-
Plan name
-
State of each voucher - There are four types of states
-
Created - This is the default state after generation. These vouchers are not yet distributed or used.
-
Distributed - This state is manually marked by the admin. Indicates voucher shared with a user. This is useful to avoid duplicate distribution.
-
Active - This state denotes the Voucher has been used and a user account is created using it. This voucher cannot be reused.
-
Expired - This state denotes the voucher validity period has ended.
-
-
Expiry information
-
Allowed Sites
-
Allowed Access networks
-
-20260401-144620.png?cb=0da987899f494c18ed3b5903ea4c4b6a)
-
Click the Toggle button under the Actions column to change the status of the voucher to Distributed. Mark the vouchers as Distributed after sharing it with the end user. The state can also be moved back to Created by using the same toggle button.
-
Click the Delete icon to delete the voucher. The Delete option will be enabled only if the vouchers are in Created / Distributed state.
-
The Search field can be used to search for the vouchers based on the Code.
-
The Filter button can be used to filter the Vouchers table based on the following categories.
-
Created - Click the Created checkbox and click the Apply Filter button to view only the vouchers in Created state.
-
Distributed - Click the Distributed checkbox and click the Apply Filter button to view only the vouchers in Distributed state.
-
Active - Click the Active checkbox and click the Apply Filter button to view only the vouchers in Active state.
-
Expired - Click the Expired checkbox and click the Apply Filter button to view only the vouchers in Expired state.
-
Important Notes
-
Voucher codes are single-use only. They cannot be reused to create an account once activated.
Bulk Upload Vouchers
-
Click the

-
The Bulk Upload Vouchers dialog box opens.

-
Click Download icon under the Download Template heading to download the template. The Voucher Details template downloads as a CSV file.
-
Refer the below screenshot of the downloaded CSV template with example voucher details.
-20260402-075633.png?cb=5facd2d7272c6c776e4b69363d07ce53)
-
The template has 9 columns, each with different functions.
|
Column Name |
Values |
Remarks |
|
Action |
Update, Delete, No Change |
|
|
Voucher Name |
Name of the Voucher |
|
|
Plan Name |
Name of the Plan assigned to the user accounts created from this voucher |
|
|
Code |
Characters of the voucher |
|
|
State |
Created, Distributed, Active, Expired |
Status of the individual voucher |
|
Expiry Duration |
Expiry Information |
|
|
Sites |
Sites that the user account has access to |
|
|
Access Networks |
Access networks that the user account has access to |
|
|
Description |
<remark> |
Remarks will be stored and can be viewed while downloading the already existing voucher details. |
The function of the Action column are explained below:
-
Update:
-
After the vouchers are created, the state will be shown as “Created”.
-
The admin can change the state of a Voucher to “Distributed” by using the Update action. Vice-versa can also be done.
-
To update this, set action as “Update” and change the State field values. Other fields should be left unchanged or empty.
-
-
Delete:
-
Admin can delete the created vouchers.
-
To delete the user, provide “Delete” as Action.
-
-
No Change:
-
Vouchers with “No Change” as Action will remain unchanged even if the values of the other fields are changed.
-
Important Notes
-
The admin can only update the State of the vouchers between Created and Distributed.
-
The admin can also delete the vouchers.
-
Other than these two, no other changes can be made on the vouchers.
-
Click Upload to upload the voucher details. Select the updated CSV file from the system and upload it.
-
Click Save button to update the uploaded details in Portal.
-
If the uploaded CSV file consists of any errors, the errors are listed in the popup and file cannot be saved. Therefore, make sure to fill the details in the correct format without any errors.
-
The state of the vouchers will be updated as per the entered details and will be shown in the Vouchers table.
-
Click Download icon next to the Download Created Vouchers text to download the actual voucher data.
-
The Voucher Details template downloads as a CSV file.
-
The admin can make the changes required in the State column and upload the file again to apply the changes.
User Portal Workflow
-
Voucher redemption happens via the User Portal.
-
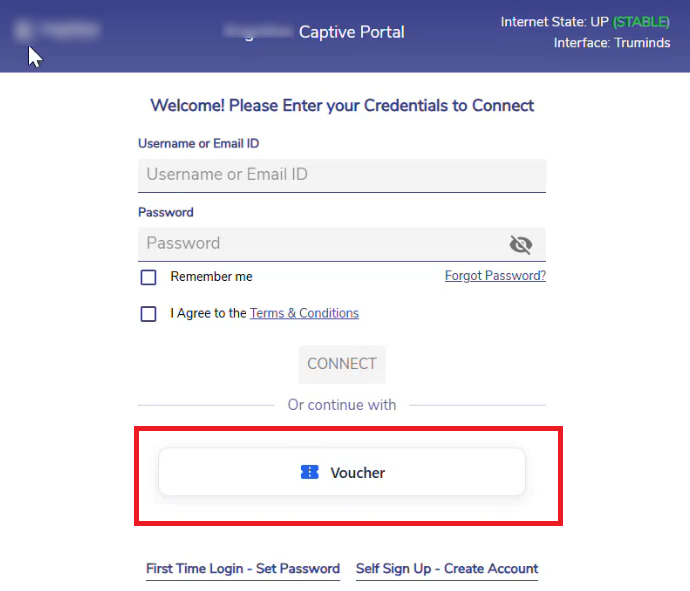
If the Voucher Access is enabled in the Portal Manager screen, users will see the Voucher login option in the User Portal login window.
-
Click the Voucher option.
-
Enter the Voucher Code.
-
Click the Connect button.

-
The Voucher is redeemed and a user account is created.
-
The user will be logged into the CAN User portal.
-
The vouchered users must follow this same method for future logins.