
Aim: let the captive users on your organization's sites buy internet plans by card in the User Portal, with each payment going to the right Stripe account. When you finish, the organization (and any site that is paid separately) has a connected Stripe account, the paid plans are created and linked to those accounts, and users can see and buy the plans in the User Portal.
Applies to: CAN Administration Portal and CAN User Portal (Konnect 8.x).
How Paywall works
-
Stripe accounts – Every payment is received in a connected Stripe account. An organization can have an organization-level account, and any site can have its own site-level account.
-
The plan – Each paid plan is linked to one Stripe Account. The plan decides where the money goes. A plan created for a site can be used only at that site.
-
The portal configuration – A plan is shown to users only after it is selected on the Plans Page of the portal configuration in Portal Manager.
Consider an example: ABC Shipping has two vessels, A1 and B1. A1 is run by a partner who wants A1's payments in their own bank account.
|
Plan |
Site |
Stripe Account |
Who can buy it |
Payment goes to |
|---|---|---|---|---|
|
Fleet 5 GB |
All Sites |
ABC (organization) |
Users on A1 and B1 |
ABC |
|
A1 10 GB |
A1 |
A1 (site) |
Users on A1 only |
A1 |
|
Welcome 200 MB |
All Sites |
Free plan |
Users on A1 and B1 |
No payment |
B1 has no Stripe account of its own, so B1's sales go to ABC's organization-level account.
Pre-requisites
-
The organization has the payment gateway enabled. To enable it, contact your Account Manager.
-
Your IAM account in Kognitive Cloud has the CAN Admin Access and Payment Gateway Access privileges. To send Stripe invites, you also need access to all sites of the organization. See CAN Access Privileges.
-
Captive Access Network is set up on the sites: the Access Network has Captive Access Network enabled and the Device Traffic Policies for the plans exist in the KonnectOS Portal. See CAN KonnectOS Portal Configuration.
-
You have the paywall plan:
-
Who gets paid: the organization only, or also specific sites
-
For each Stripe account: the business name, contact email and country of taxation
-
Each plan: name, quota, duration, price, currency, Device Traffic Policy and the site it is for
-
Setup at a glance
-
Connect a Stripe account
-
Complete the Stripe onboarding
-
Create the plans
-
Enable Paywall in the portal configuration
-
Offer the plans on the Plans Page
-
Assign plans to admin created users and vouchers
-
Test a purchase
Step 1: Connect a Stripe account
Send a Stripe invite to every business that should receive payments: one for the organization, and one for each site that should be paid separately.
-
In the CAN Administration Portal, select the organization in the dropdown at the top right and open the Payment GW tab.

-
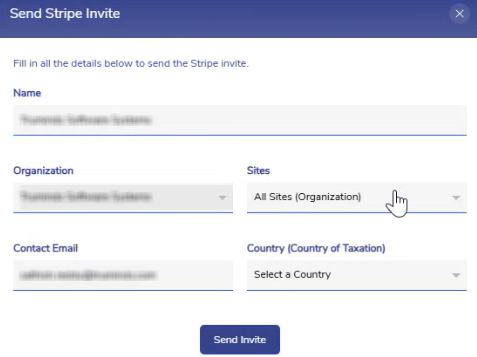
Click Send Stripe Invite.
-
Enter the Name of the business that owns the Stripe account.
-
Select the Organization.
-
In Sites, select All Sites (Organization) for an organization-level account, or select a site for a site-level account.
-
Enter the Contact Email of the person who will complete the onboarding.
-
Select the Country (Country of Taxation). Stripe fixes the country when the account is created, so check it before you send.
-
Click Send Invite. The account appears in the list with the Pending status.
For details of the list, statuses and actions, see Payment GW.
The Kognitive Operations Team manages the Stripe settings of the connected accounts, such as the branding of the checkout page and receipts, the payout schedule and view-only Stripe access for the business. See Guide: Paywall - Payment Gateway (Stripe) Configurations.
Step 2: Complete the Stripe onboarding
The business completes the onboarding in Stripe. Until it is done, the account cannot be used for plans.
-
The contact receives an email with the onboarding link. The link is valid for 30 days.
-
The contact enters the business details, the business owner's personal details for identity verification, the bank account for payouts and the public details shown to customers (statement descriptor and support contact). See Guide: Paywall - Partner Onboarding and Payment Setup for each screen.
-
Watch the Status in the Payment GW tab:
-
Action required – Stripe needs more information, such as identity documents. Ask the contact to complete it.
-
Expired – The link was not used in time. Click the Resend icon to send a new link. You can change the contact email, but not the site.
-
Connected – The account is ready. Continue with Step 3.
-
Step 3: Create the plans
Create every plan that users should be able to choose from. The paid plans are added as products in the selected Stripe account.
-
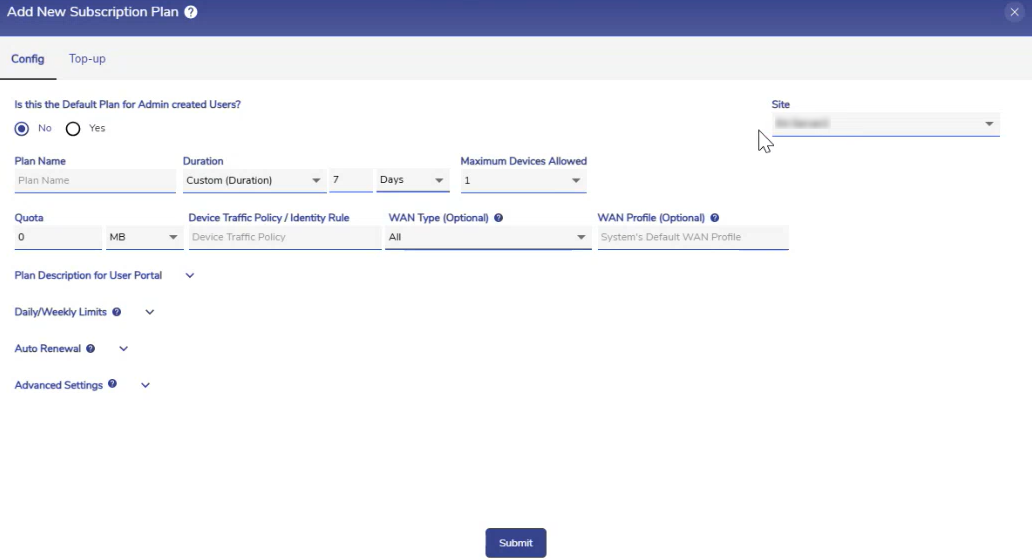
Open the Plans tab and click Add New Plan.
-
In Site field, select All Sites (Organization) for a plan that can be used at every site, or select a site for a plan that can be used only at that site.
-
Enter the plan details, such as Plan Name, Duration, Quota and Device Traffic Policy / Identity Rule. The Device Traffic Policy must match the KonnectOS policy name exactly.
-
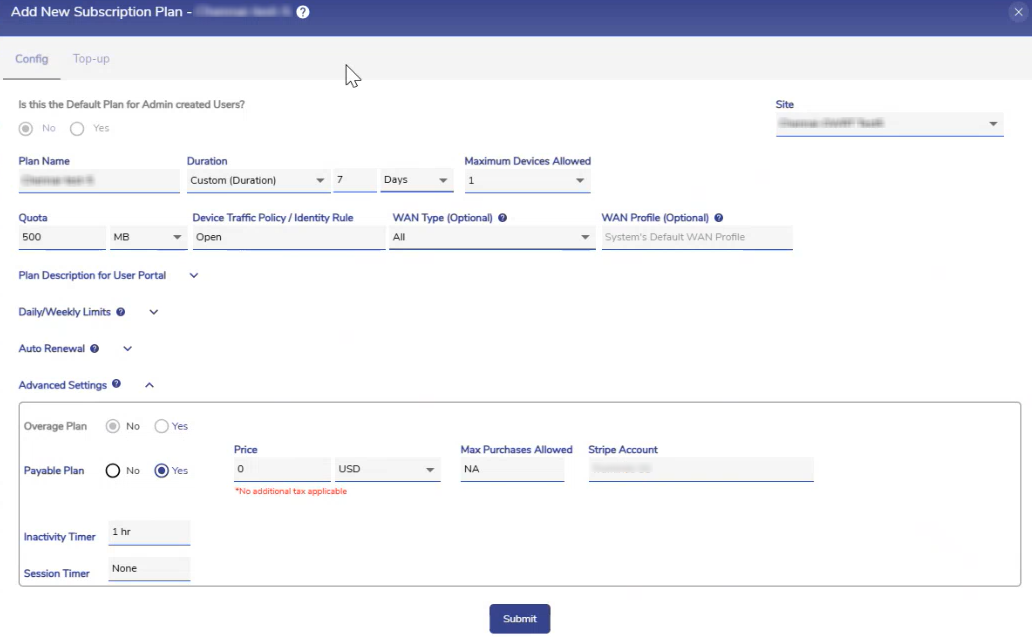
Expand Advanced Settings and set Payable Plan to Yes.
-
In Stripe Account field, select the Stripe account that should receive the payments. For a site plan, only that site's account and the organization's account are listed. If the organization has only one Stripe account, this field is not shown and the plan is linked to that account.
-
Enter the Price and select the currency.
-
Click Submit.
To offer a plan for free, create it with Payable Plan set to No. It is listed under Free Plans in Step 5.
-
For payable plans, Auto Renewal is disabled.
-
The site of a plan cannot be changed after the plan is assigned to users.
-
If you change the Stripe Account later, the plan moves from the old Stripe account's products to the new one.
For all plan fields, see Plans.
Step 4: Enable Paywall in the portal configuration
Paywall is switched on per portal configuration. The global configuration covers every site that has no site configuration of its own.
-
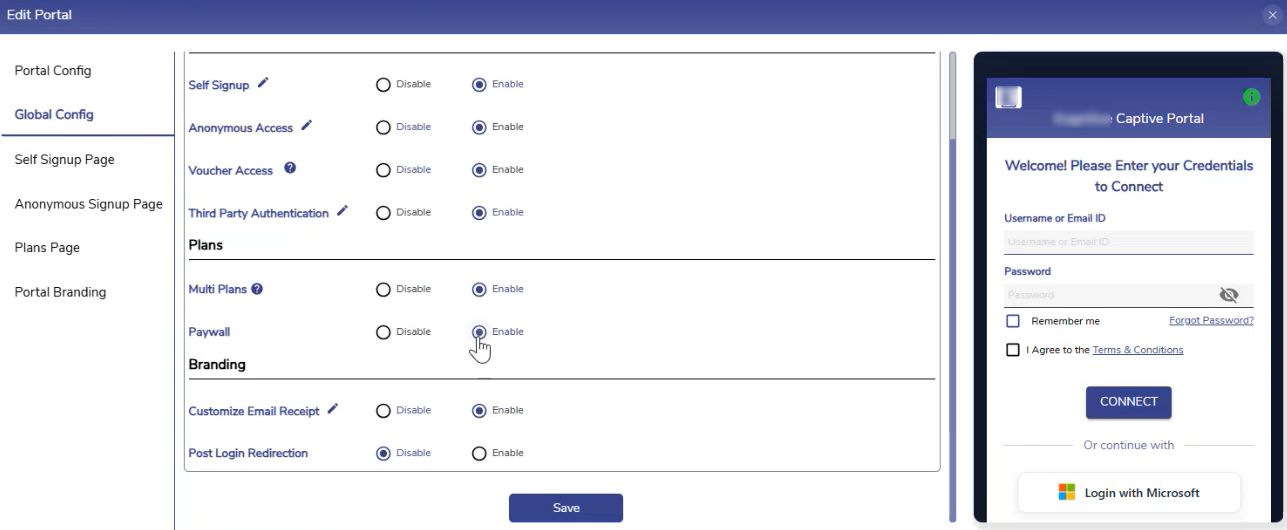
Open the Portal Manager tab and click the Edit Portal icon of the portal configuration: the global configuration, or the site configuration of a site.
-
Select Global Config. Under Plans, set Paywall to Enable.
-
A global configuration uses the organization-level Stripe account.
-
A site configuration uses the site's own Stripe account by default. If both are available, you can choose the site-level or the organization-level account.
-
-
Click Save.
A site configuration always takes priority over the global configuration. In the example, Coral uses its site configuration and Star uses the global configuration.
Step 5: Offer the plans on the Plans Page
A plan is shown in the User Portal only after you select it here. Selecting a site on the plan in Step 3 does not publish it.
-
In the same Edit Portal dialog, select Plans Page.
-
Enter the Welcome Message (shown in the Available Plans tab) and the Post Login Page Message (shown after login).
-
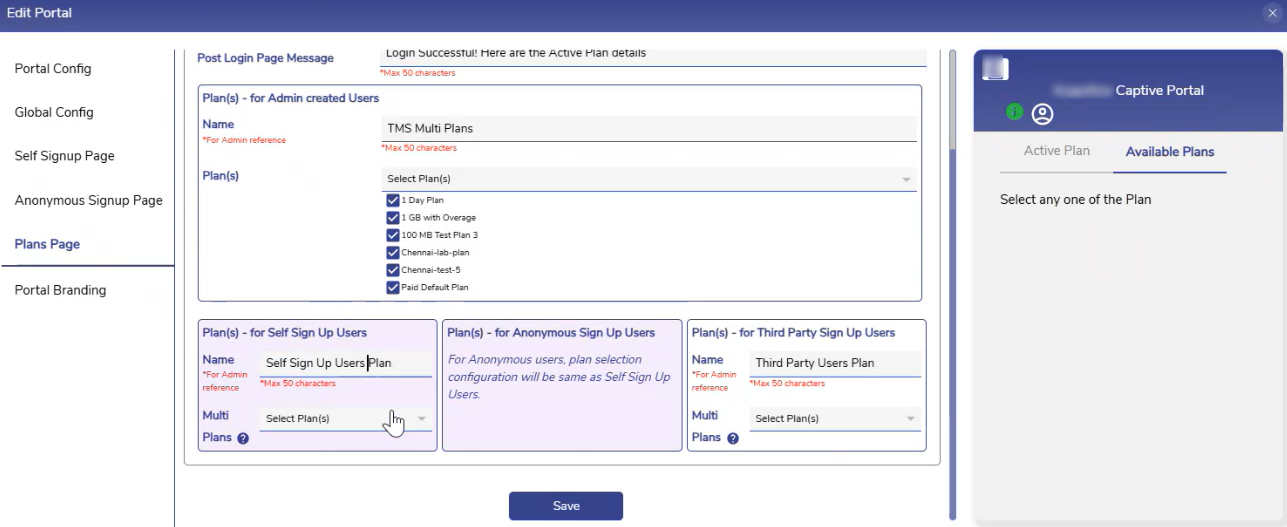
Under Plan(s) - for Admin created Users, enter a Name for the set and select the plans. You assign this set to users in Step 6.
-
Under Plan(s) - for Self Sign Up Users, enter a Name and select the plans. Every user who signs up through this portal gets these plans automatically.
-
Under Plan(s) - for Anonymous Sign Up Users, select the plan for anonymous users, if used. Anonymous users can have only one plan.
-
Click Save.
The plan lists are grouped as follows:
-
Free Plans – plans that are not payable. Users select them without paying.
-
Site Level Plans – paid plans linked to the site's Stripe account.
-
Organization Level Plans – paid plans linked to the organization's Stripe account.
A site configuration lists only the organization's plans and that site's plans. Plans of other sites are never listed.
With Multi-Plan disabled, a user can buy a new plan only after the current plan expires. With Multi-Plan enabled, users can buy several plans and switch between them; one plan is active at a time. See the Multi-Plan Support section of Portal Manager.
Step 6: Assign plans to admin created users and vouchers
Self sign up users already have their plans from Step 5. Admin created users and voucher users need the plans assigned.
-
Open the Users tab and click Add User (or edit an existing user).
-
Select the user's Site(s).
-
In Select Plan, select the set you named in Step 5. Only the plans and sets that apply to the selected sites are listed.
-
Click Submit.
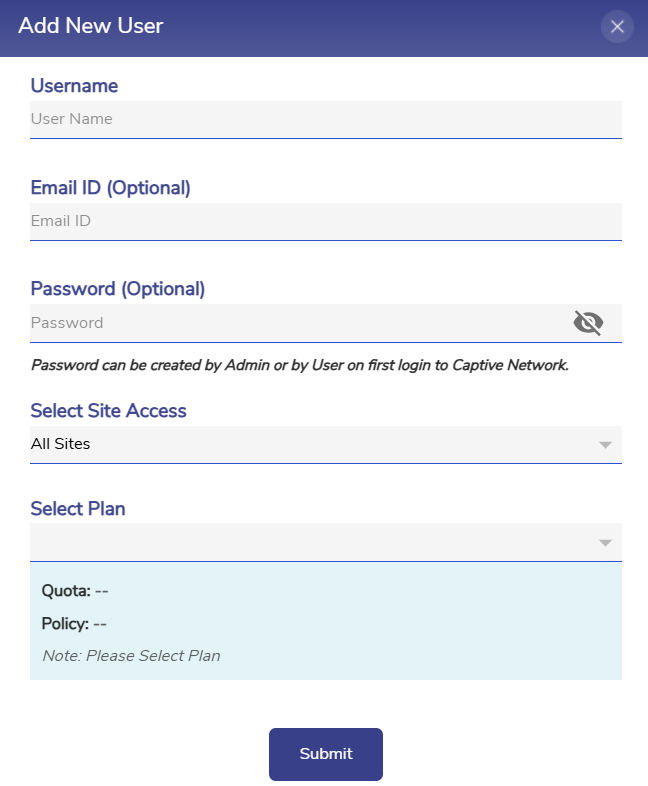
For voucher users, select the plan in Select Plan when you create the voucher pack. If you restrict the pack to sites, only the organization's plans and those sites' plans are listed. See Users and Vouchers.
Step 7: Test a purchase
-
On a device connected to the captive network of the site, log in to the User Portal with a test user.
-
Click Ok on the welcome message and open the Available Plans tab.
-
Click Purchase on a paid plan and complete the payment on the Stripe checkout page.
-
Check that the success message appears and that the plan is listed under Active Plans.
For the user's view, see Paywall.
Check that it worked
-
Each Stripe account shows Connected in the Payment GW tab.
-
The Paywall column shows Enabled for the portal configurations in Portal Manager.
-
A test user at each site sees the expected plans in Available Plans, and no plans of other sites.
-
The test purchase appears in Events > Purchase (use Custom Search to set the time period) and in the user's Purchase History.
-
The payment appears in the Transactions of the Stripe account linked to the plan.
After setup
-
Refund a purchase – Ask the user for the payment details. In the Users tab, open the user's Actions (gear) icon > Purchase History and note the Purchase ID. The refund is issued in Stripe, from the Transactions of the connected account that received the payment. See Guide: Paywall - Subscriber Refunds.
-
Add a site that is paid separately – Send a new Stripe invite for the site (Step 1), then create site plans and select them in the site configuration.
-
Change who gets paid for a plan – Edit the plan and change the Stripe Account.
-
Stop using a Stripe account – Use the Lock icon to keep the account but stop using it, or the Delete icon to remove it, in the Payment GW tab.
Troubleshooting
|
Problem |
Likely cause |
What to do |
|---|---|---|
|
The Payment GW tab is not shown |
The organization does not have the payment gateway enabled, or your IAM account lacks Payment Gateway Access |
Contact your Account Manager, or ask your Kognitive Cloud admin to add the privilege. |
|
You can view the Payment GW tab but cannot send invites |
Your account is limited to some sites, or belongs to a sub-organization |
Ask an admin of the parent organization with all-sites access to send the invite. |
|
The Payable Plan field or the Paywall option is greyed out |
No Stripe account is Connected for the organization or site |
Complete Steps 1 and 2. |
|
The status stays Pending or shows Action required |
The onboarding is not finished, or Stripe needs more information |
Follow up with the contact. Use Resend if they no longer have the link. |
|
The Stripe Account field is not shown |
The organization has only one Stripe account |
No action needed. The plan is linked to that account. |
|
A plan is not shown in Available Plans |
The plan is not selected on the Plans Page, the plan belongs to another site, or the set was not assigned to the admin created user |
Check Steps 5 and 6. |
|
A user can log in but has no internet |
The user's plan was created for another site |
Assign or let the user buy a plan for the current site or an organization-level plan. |
|
Checkout fails |
The Stripe account is Restricted |
Ask the business to provide the information Stripe requests. |
|
A user cannot buy a second plan |
Multi-Plan is disabled |
The user can buy after the current plan expires, or enable Multi-Plan. |