
The Portal tab allows the admin to set the Login page title, Sub title, Background image, Enable/disable Self Signup, upload Terms & conditions, setup the Self Sign up configurations, create Plans to be used by the Paywall enabled users and customize the Email signature for system generated emails.
-
Select the Portal Manager tab from the Captive Access Network Homepage.
-
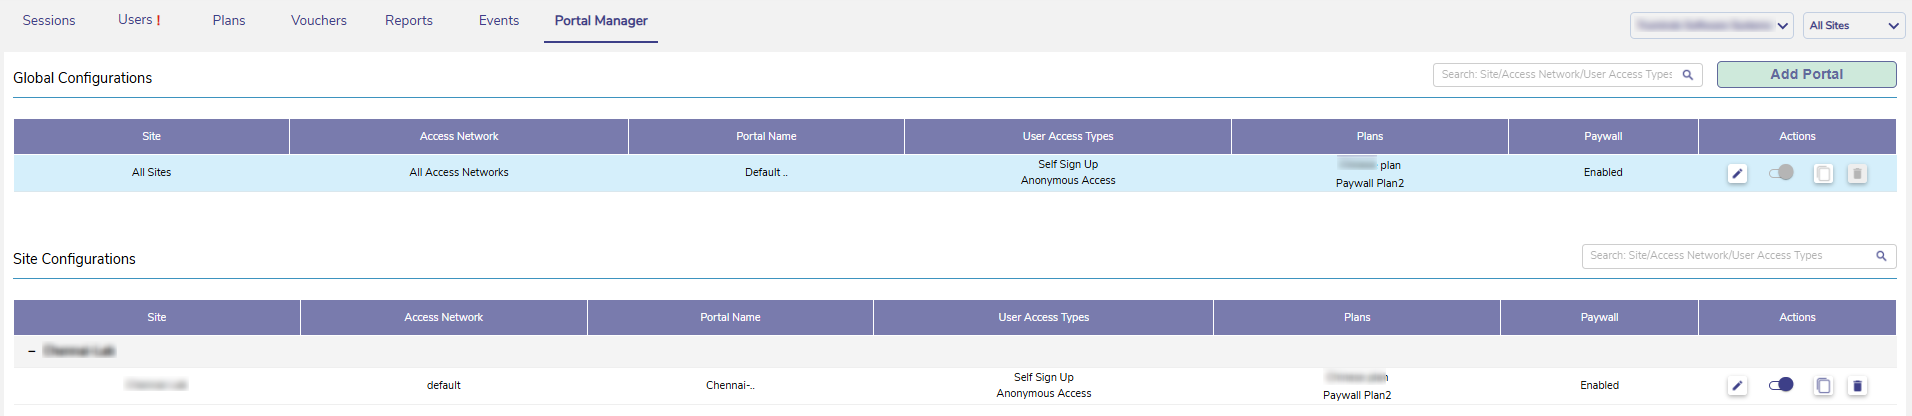
The screen is divided into two sections - Global Configurations and Site Configurations
-
The Global Configurations section enables the admin to set configuration for all the sites and different access networks for the selected organization.
-
The Site Configurations section enables the admin to set specific configurations for each site.
Important notes:
-
The site configurations will take precedence over global configuration.
-
But for the sites / access networks that do not have any site configurations set, the global configuration will be applied.
Global Configurations
-
The Global Configurations section shows the configuration set globally for all the sites and different access networks for the selected organization.
-
The blue-highlighted row indicates the default configuration currently set for the selected organization.
-
This configuration cannot be deleted or disabled.
-
-
Third Party Sign Up page, Email Receipt, Admin Email and Inactivity Timer configurations can be changed from Global Configuration which is highlighted in blue.
-
The table shows the following information:
-
Site - This config is set for All Sites
-
Access Networks - This config is set for all Access networks.
-
Portal Name - The default name set for the global portal.
-
User access types - The types of user types enabled under this global configuration.
-
Plans - The plans that are associated with this global configuration.
-
Paywall - States whether Paywall is enabled/disabled for this global configuration.
-
Actions - Click the

-
The Global Configuration can be edited in the Edit Portal dialog box.
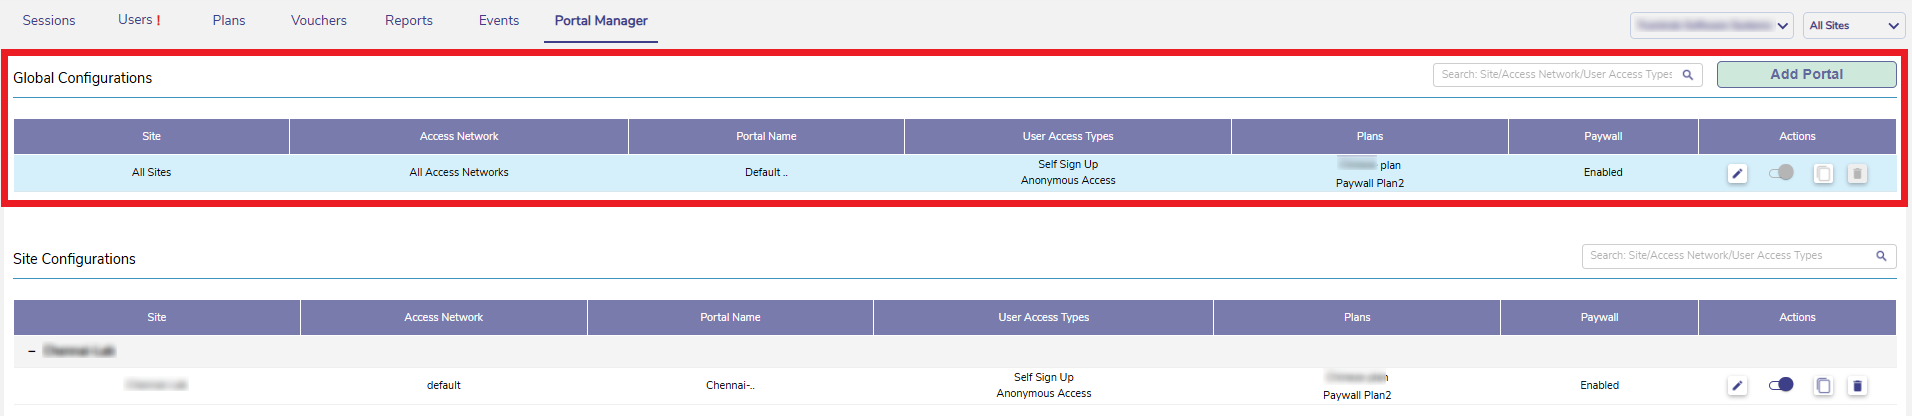
Portal Config
-
The Portal Config option from the left menu bar is selected by default. This section enables the admin to set the default portal configurations.
-
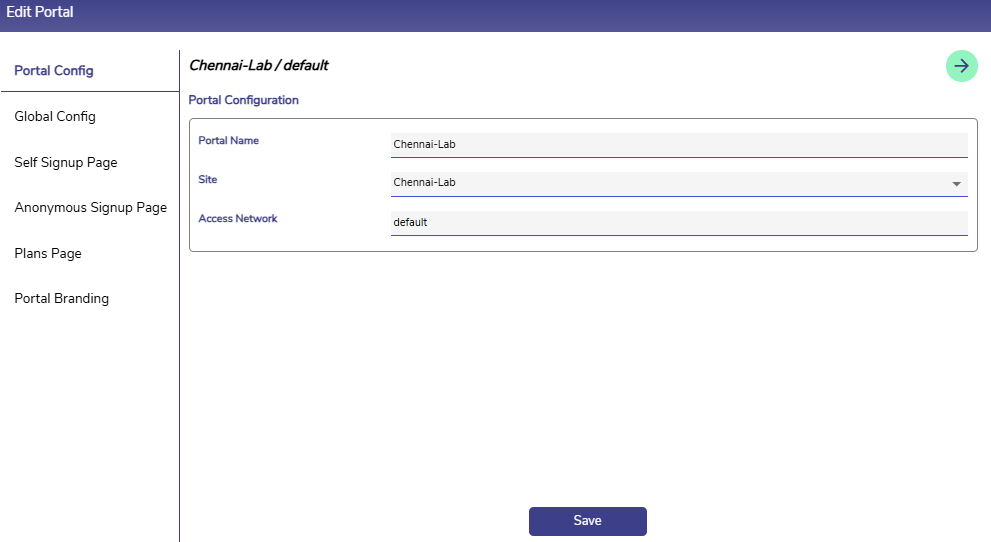
Enter the Portal Name.
-
Select the Sites from the dropdown menu.
-
Enter the Access Networks.
-
Select the Save button to save the changes.
Global Config
-
Select the Global Config option from the left menu bar or click the

-20260702-112310.png?cb=6c660aacdbafcaec87c63cdc78981cf5)
User Type
-
In the Self Signup field, click the Enable radio button to enable Self Signup feature for the Organization. Click the Disable radio button to disable it.
-
In the Anonymous Access field, click the Enable radio button to enable Anonymous access feature for the Organization. Click the Disable radio button to disable it.
-
In the Voucher Access field, click the Enable radio button to enable Voucher access feature for the Organization. Click the Disable radio button to disable it.
-
Vouchers created in the Vouchers screen can be redeemed, and users can log in using vouchers only if this Voucher Access is enabled in the Portal Manager.
-
-
In the Third Party Authentication field, click the Enable radio button to enable Third Party Authentication feature for the Organization. Click the Disable radio button to disable it.
Branding
-
In the Customize Email Receipt field, click the Enable radio button to enable Custom Email Receipt feature for the Organization.
-
This field allows the admin to enable/disable customizing the header and footer of the system generated emails. This option will be available only in the admin accounts of the Parent Organization.
-
After enabling, the customization can be done by selecting the Email Receipt option from the side menu bar.
-
Click the Disable radio button to disable it.
-
-
In the Post Login Redirection field, select the Enable radio button to enable this feature.
-
Select the Disable radio button to not use this redirect feature.
-
-
Click the Edit icon next to the above five fields to move to the respective sections and set additional configurations.
-
In the Account Expiry on Inactivity field, select the time period of inactivity after which User Accounts should be deleted.
-
Enter the Admin Email(s). These email(s) will be used for communication of all important actions required by the administrator(s).
Note: Account Expiry on Inactivity, Admin Email(s) and Email Receipt can be configured only in the default global configuration. These cannot be configured for specific Site or Access Network.
Definitions of the User Types
Please refer the below table to understand the purpose of each user type available:
|
User Type |
Definition |
|---|---|
|
Self Sign Up |
This user type allows users to independently create their own accounts using the Self Sign-Up function. During registration, users are required to provide details such as email address, first name, and last name. The email address can be used as the username for subsequent logins. This method is typically intended for creating accounts meant for long-term use. Use case: If users require long-term access and should be able to create their own accounts by providing their personal details, use Self Sign-Up. |
|
Anonymous |
This user type allows users to access the internet without providing personal details. The system automatically generates the username and password. If an email address is provided, the access credentials can be shared with the end user. This method is typically used for providing internet access for a short duration. Use case: If users need quick internet access for a short duration without providing personal details, use Anonymous. |
|
Vouchered |
This user type allows users to access the internet using a unique voucher code. These codes are generated in bulk from the Admin Portal and provide quick, controlled access without requiring full user registration. Use case: If you want to provide controlled internet access for a large group of users using unique voucher codes generated by the administrator, use Vouchered. |
|
Third Party |
This user type allows users to log in using an external authentication provider, such as a Microsoft account (currently supported). Accounts can either be pre-created by an administrator or generated through the self sign-up process. Use Case: If users should log in using their existing Microsoft account instead of separate portal credentials, use Third Party. |
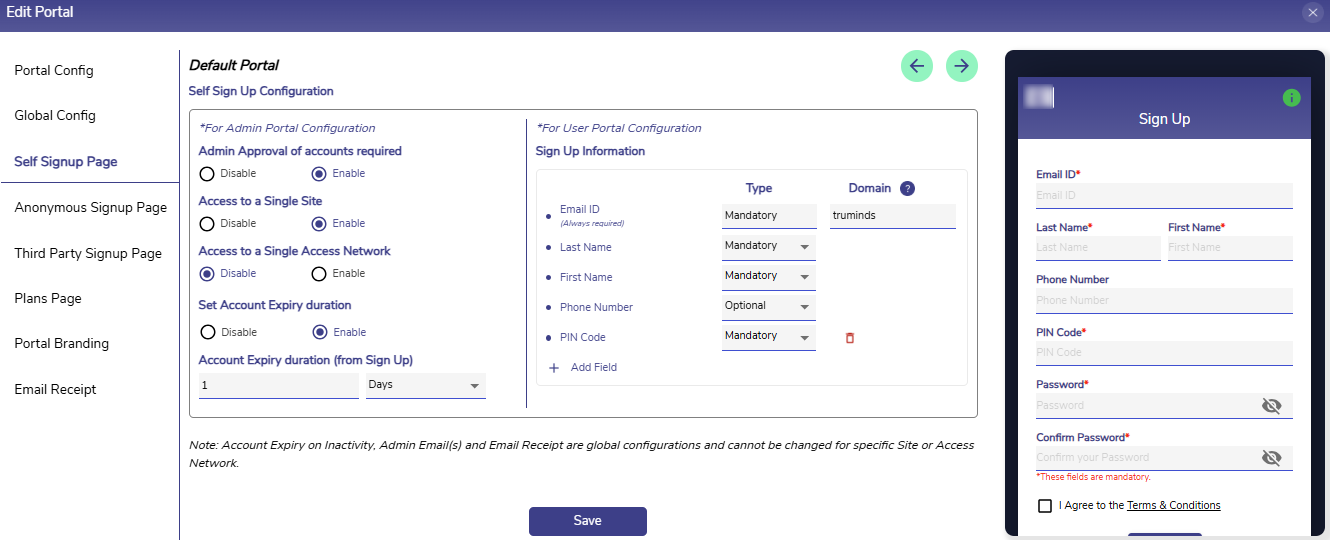
Self Signup Page
-
The users can sign up and create their own accounts by themselves using the Self Sign Up function. Self Sign Up details should be configured in this section in order for the user to perform self sign up from the User Portal.
-
Click the Self Signup Page option from the left menu bar or click the
-
Admin Approval of accounts required? - Select Enable in this field to restrict the signed up users from accessing internet without admin approval. Only when the admin approves, they can login and access internet. Select Disable to allow the user to sign up and access internet without admin’s approval.
-
Access To Single Site? - Select Enable to configure only single site access for the self signed up users. Select Disable to allow the self signed up users access all the sites.
-
Access To Single Access Network? - Select Enable to configure only single site access for the self signed up users. Select Disable to allow the self signed up users access all the sites.
-
Set Account Expiry Duration? – Select Enable to set an account expiry duration. Enter the duration in Account Expiry Duration field. Select the unit from the dropdown menu as Days/Weeks/Months. This field will be disabled if no expiry on user account is chosen.
-
Admin can choose to either provide an account expiry or disable the account expiry on the self signed up user account.
-
Under the Sign Up Information section, add the fields that users are required to fill in during self sign-up. Email Address field is mandatory.
-
Enter the required Domain values in the Domain field. This field is optional. Comma separated values provided in the Domain field are used to validate the email address entered by the user during the Self Sign Up of the user. The email address entered by the user will be considered valid only if it includes the value entered in the domain field.
-
Click Add Field button to add any more fields. For example, Passport Number.
-
Select the Type for that field from the dropdown menu. The type of these fields can be either Mandatory, Optional or Not In Use.
-
Select Mandatory to make that field mandatory during user sign up.
-
Select Optional to make it an optional field.
-
Select Not In Use to not populate that field during user sign up.
-
-
Click Save button to save the Self Sign Up configuration. The saved configuration takes into effect immediately with the subsequent Self Signed Up users. Previously created user accounts will not be affected.
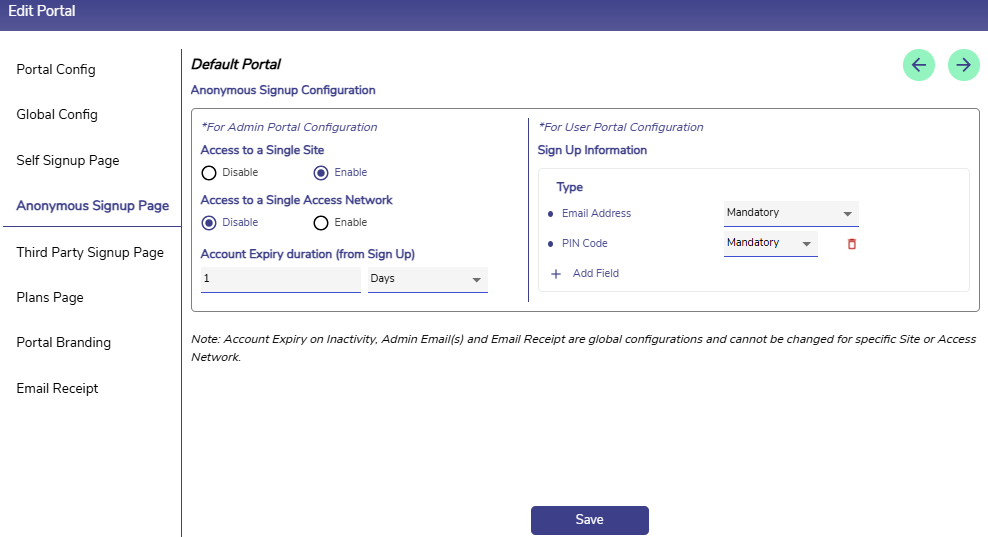
Anonymous Signup Page
-
Click the Anonymous Signup Page option from the left menu bar or click the
-
Access To Single Site? - Select Enable to configure only single site access for the anonymous users. Select Disable to allow the anonymous users access all the sites.
-
Access To Single Access Network? - Select Enable to configure only single site access for the anonymous users. Select Disable to allow the anonymous users access all the sites.
-
Set Account Expiry Duration? – Select Enable to set an account expiry duration. Enter the duration in Account Expiry Duration field. Select the unit from the dropdown menu as Hours/Days. This field will be disabled if no expiry on user account is chosen.
-
Admin can choose to either provide an account expiry or disable the account expiry on the anonymous user account.
-
Under the Sign Up Information section, add the fields that users are required to fill in during self sign-up.
-
Click Add Field button to add any more fields. For example, Passport Number.
-
Select the Type for that field from the dropdown menu. The type of these fields can be either Mandatory, Optional or Not In Use.
-
Select Mandatory to make that field mandatory during user sign up.
-
Select Optional to make it an optional field.
-
Select Not In Use to not populate that field during user sign up.
-
-
Click Save button to save the Anonymous Sign Up configuration. The saved configuration takes into effect immediately with the subsequent Anonymous users. Previously created user accounts will not be affected.
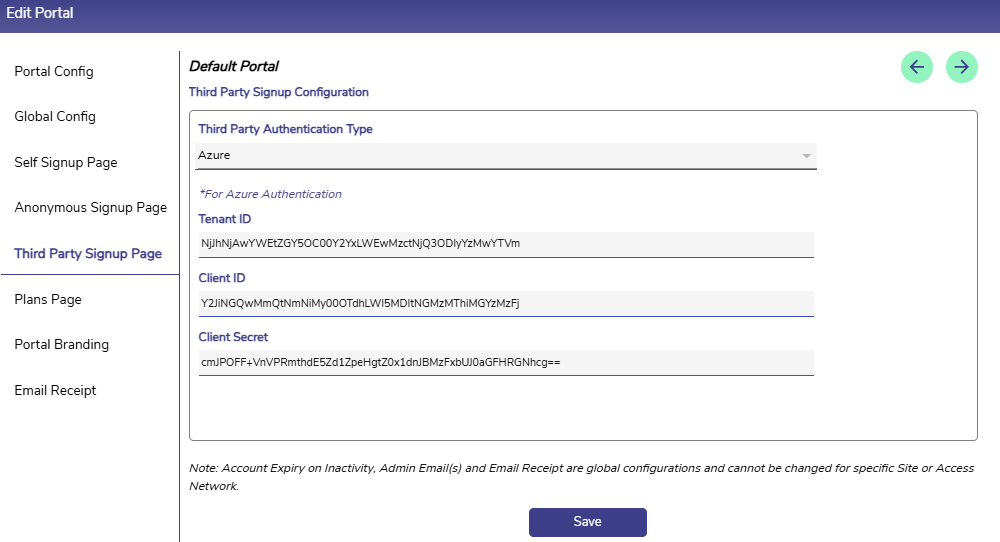
Third Party Signup Page
-
Click the Third Party Signup Page option from the left menu bar or click the
-
Select the Third Party Authentication Type.
-
Enter the Tenant ID.
-
Enter the Client ID.
-
Enter the Client Secret.
-
Click Save button to save the configuration.
Plans Page
-
Click the Plans Page option from the left menu bar or click the
-
Set the Welcome Message. The welcome message will be displayed in the Available Plans tab for the Paywall enabled organizations.
-
Set the Post Login Page Message. This message will be displayed when the user successfully logs in into his account. The admin can view the preview of the setup in real-time in the right panel.
Multi-Plan Support
By default, the Portal operates using a single-plan model, where each user can possess only one ongoing plan at a time. Users can purchase a new plan only after their current plan has expired, and administrators can assign only a single plan to each supported user type. This model is suitable for deployments where users are expected to have only one active service plan throughout its validity period.
Default Plan Assignment (Multi-Plan Disabled)
When Multi-Plan support is disabled, each supported user type can be associated with only a single plan.
-
Admin-Created Users are assigned the selected plan when their user account is created.
-
Self Sign-Up, Anonymous, and Third-Party users are automatically assigned the single plan configured for their respective user type during account creation.
-
Users can have only one ongoing plan at a time. If the organization uses the Paywall feature, users can purchase another plan only after their current plan expires.
-20260714-125242.png?cb=ac87875b42a4c5f34e2c6673e60ae421)
This single-plan model is the default behavior of the Portal when Multi-Plan support is disabled. Enabling Multi-Plan extends this functionality by allowing multiple plans to be configured for supported user types, giving users the flexibility to purchase, own, and switch between multiple plans.
The Multi-Plan feature allows administrators to assign multiple plans to a single user account, enabling users to possess multiple ongoing plans simultaneously. When Multi-Plan support is enabled, administrators can associate multiple plans with supported user types instead of assigning only one plan. These configured plans are displayed in the Available Plans section of the User Portal, where users can purchase (for payable plans) or activate available plans, depending on the deployment configuration.
Although multiple plans can coexist on a user's account, only one plan can be active at any given time. Network sessions are established using the active plan, while all other assigned plans remain in an Idle state. Users can switch between their available plans whenever required, allowing them to use different plans based on their current bandwidth, quota, or access policy requirements.
If Multi-Plan support is not enabled, the Portal continues to operate using the default single-plan behavior.
Note:
-
Admin-Created, Self Sign-Up, and Third-Party user types support Multi-Plan and can be configured with multiple plans. The configured plans are displayed as Available Plans in the User Portal.
-
Anonymous users do not support Multi-Plan and can be assigned only a single plan.
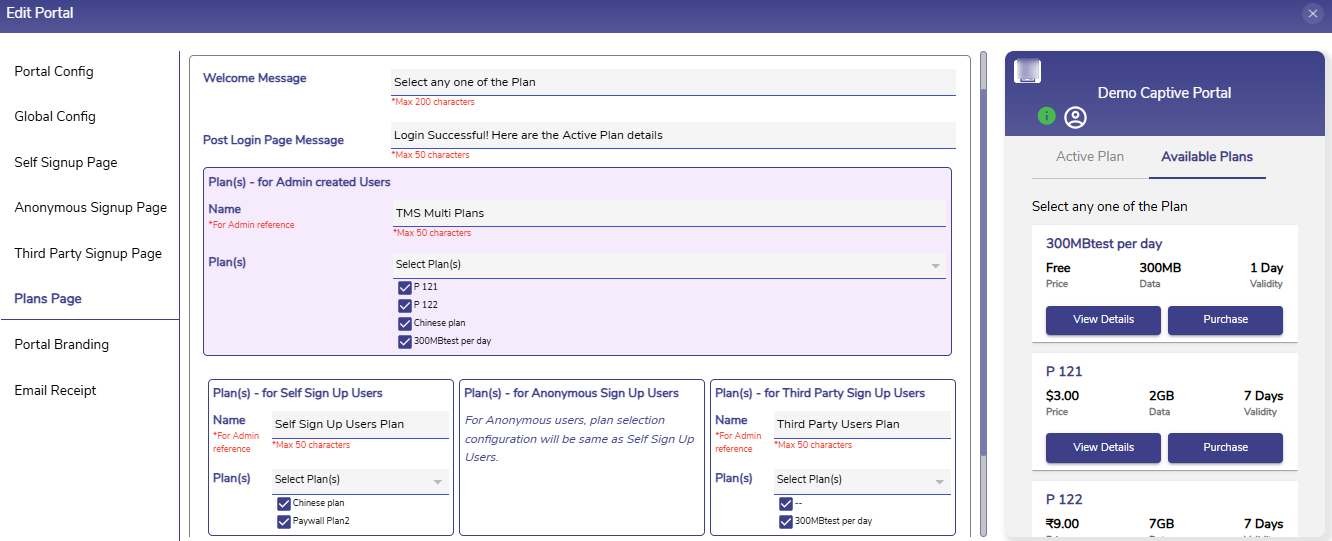
Paywall Enabled Config
-
The Paywall feature enables the end user to buy their plans from the “Available Plans“ tab in the User Portal according to their need.
-
The Plan(s) - for Admin created Users section is used to assign Paywall plans with the Admin Created Users. Once the plans are added, this can be associated with the user account when creating the user in the Users tab.
-
When multiple plans are selected, all the selected plans will be shown to the user while logging in and the user can buy the plan of their choice. The plans will also be listed under the Available Plans tab of the User Portal.
Note: When the Multi Plans feature is disabled, users can purchase a new plan from the Available Plans tab of the User Portal only after their current plan has expired, and they can purchase only one plan at a time.
When the Multi Plans feature is enabled, users can purchase plans from the Available Plans tab even if their current plan is still active. Users can purchase and hold multiple plans simultaneously, with one plan remaining active while the others are available for activation.
-
Enter a Name for the Paywall Plans.
-
In the Plan(s) field, select one or more Paywall plans that should be made available to Admin Created users. Only the plans configured as Payable plans will be allowed to be added in this set of Plans.
-
The Plan(s) - for Self Sign Up Users section is used to associate one or more Paywall plans with users who register themselves using Self Sign Up. The Paywall feature enables the end user to buy the plans from this set according to their need. Once the plans are added, these plans will be associated with all the self sign up users automatically when they sign up.
-
In the Plan(s) field, tick the checkboxes of the plans that should be displayed to the self signed up user as their options to buy. Only the plans configured as Payable plans will be available in the dropdown menu.
-
When multiple plans are selected, all the selected plans will be shown to the user while logging in and the user can buy the plan of their choice.
-
When Multi-Plan support is enabled, the selected plans become available in the User Portal, allowing users to switch between them whenever required.
-
-
Click the Save button to save the configurations.
Non-Paywall Config
-
Click the Plans Page option from the left menu bar or click the
-
Set the Welcome Message. The welcome message will be displayed in the Available Plans tab for the Paywall enabled organizations.
-
Set the Post Login Page Message. This message will be displayed when the user successfully logs in into his account. The admin can view the preview of the setup in real-time in the right panel.
-
Non-paywall users will not have the ability to create Plans for Paywall feature and the users will not be allowed to buy plans of their choice when they login.
-
The Plan(s) - for Admin created Users section is used to associate one or more plans with the Admin Created Users. Once the plans are added, this can be associated with the user account when creating the user in the Users tab.
Note: When the Multi Plans feature is enabled, users can activate any plan from the Available Plans tab even if their current plan is still active. Users can hold multiple plans simultaneously, with one plan remaining active while the others are available for activation.
-
Enter a Name for the Plans.
-
In the Plan(s) field, select one or more plans that should be made available to Admin Created users.
-
The Plan(s) - for Self Sign Up Users section is used to associate one or more plans with users who register themselves using Self Sign Up. Once the plans are added, these plans will be associated with all the self sign up users automatically when they sign up.
-
In the Plan(s) field, tick the checkboxes of the plans that should be displayed to the self signed up user as their options to activate.
-
When multiple plans are selected, all the selected plans will be shown to the user under the Available Plans tab after the user logs in. Users can switch between these plans as required.
-
When Multi-Plan support is enabled, the selected plans become available in the User Portal, allowing users to switch between them whenever required.
-
-
Click the Save button to save the configurations.
Important Notes:
-
Multi-Plan support is available only when enabled for the organization.
-
Only one assigned plan can be Active at any given time.
-
Remaining plans remain in the Idle state.
-
Activating another plan automatically moves the current Active plan to Idle and starts a new session using the newly selected plan.
-
If Multi-Plan support is not enabled, the Portal behaves exactly as previous releases and only one plan can be assigned.
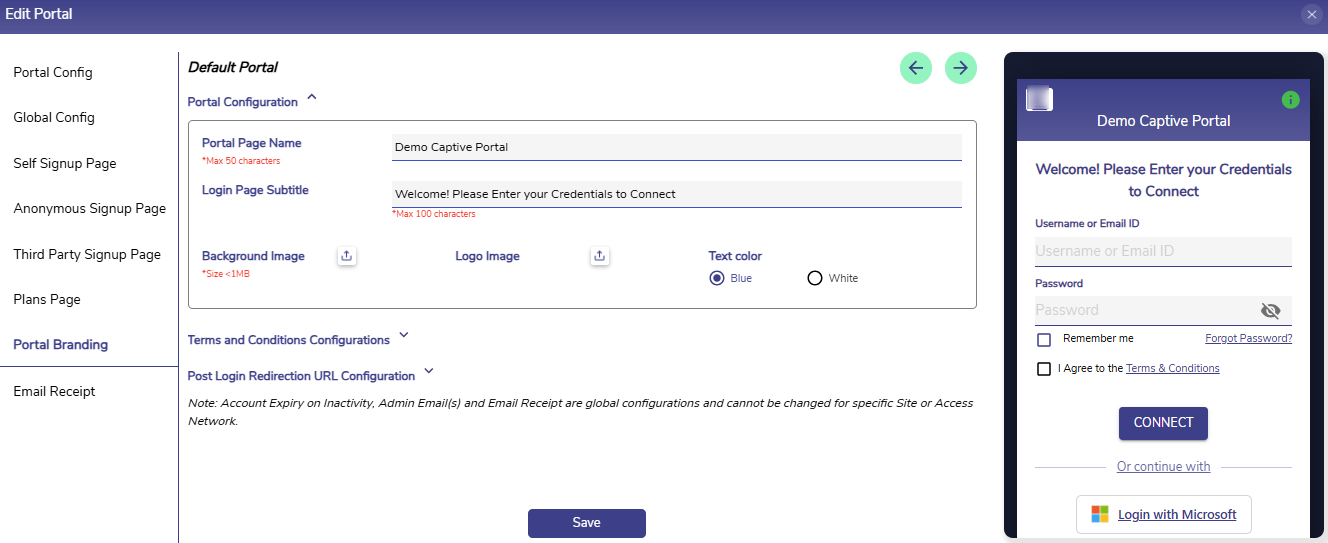
Portal Branding
-
Click the Portal Branding option from the left menu bar or click the
-
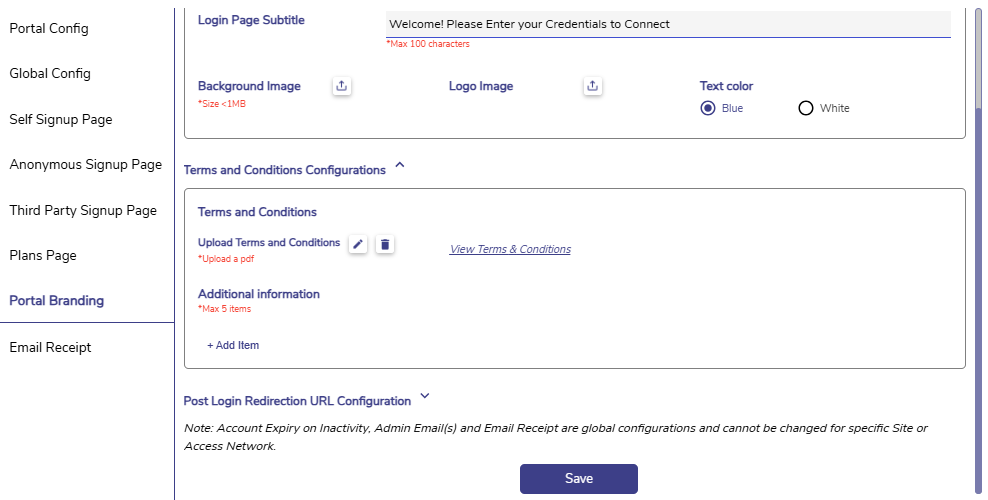
Enter the Portal Page Name. This is the title of the Login page of the User Portal.
-
This is the title of the Login page of the User Portal.
-
Enter the Login Page Subtitle. This is the welcome message displayed to the user in the login screen.
-
The Background Image field can be used to set a customized background image for the User Portal.
-
The Logo Image field can be used to set a customized logo image to be displayed at the top left corner of the User Portal.
-
In the Text Color field, select any option between Blue / White to set the color of the fields in the Login page of the User Portal.
-
In the Terms and Conditions field, select the

-
Click the View Terms & Conditions button to view the terms and conditions pdf.
-
Select the

-
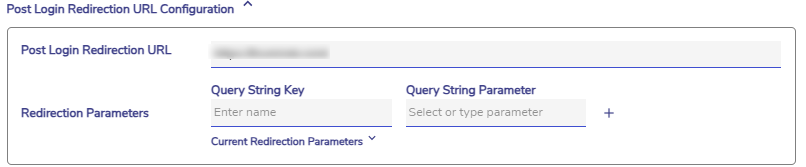
In the Post Login Redirection URL, enter the URL to which the user can be redirected after login.
-
Enter the Redirection Parameters.
-
Click the Save button to apply changes.
Email Receipt
-
Click the Email Receipt option from the left menu bar or click the
-
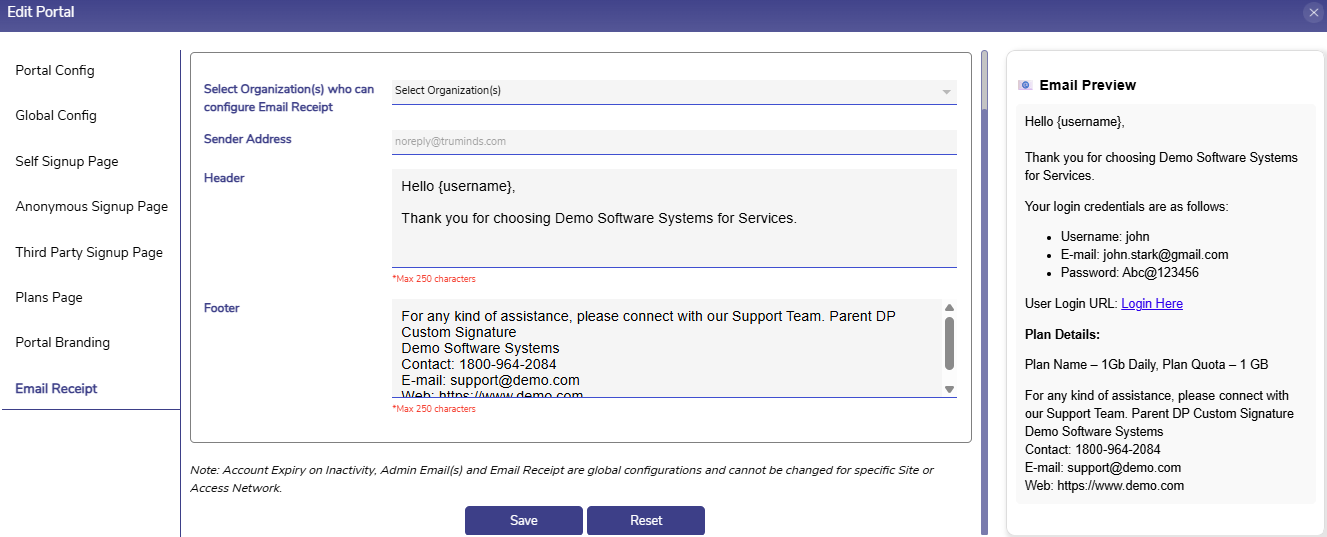
Select the Organization(s) who can configure Email Receipt.
-
Enter the Sender Address.
-
Enter the required Header content.
-
Enter the required Footer content.
-
The preview of the email with the header and footer can be viewed under the Email Preview section on the right side.
-
Select the Save button to save the changes.
-
Select the Reset button to reset the Email Signature - Header & Footer fields to default values.
Site Configurations
-
The Site Configurations section enables the admin to set specific configurations for each site.

-
The Site Configurations table shows all the created site configuration. It table shows the following information:
-
Site - Shows the created Site configurations.
-
Access Networks - Shows the access networks associated with site configurations.
-
Portal Name - The portal name set for the Site configuration.
-
User access types - The types of user types enabled for the Site configuration.
-
Plans - The plans that are associated with the Site configuration.
-
Paywall - States whether Paywall is enabled/disabled for for the Site configuration.
-
Actions -
-
Click the
-
Click the toggle button to enable/disable the site configuration.
-
Click the Copy icon to copy the site configuration.
-
Click the Delete icon to delete the site configuration.
-
-
Create Site Configuration
-
Select the Add Portal button to create a new site configuration.

-
Enter the Portal Name.
-
Select the required Site from the dropdown menu.
-
Enter the Access network name to associate.
-
In the Select Portal Configuration to Copy field, select the configuration to copy and create this new configuration. The admin can select between the existing global configuration or any other site configuration.
-
Select the Add button to create the site configuration.
-
The configuration will be listed in the Site configuration table and the admin can edit it to make further updates.
-
Click the
-
The admin can tailor the configuration specific to the requirements of the selected site.
Portal Config
-
The Portal Config option from the left menu bar is selected by default. This section enables the admin to set the site configurations.
-
Enter the Portal Name.
-
Select the Site from the dropdown menu.
-
Enter the Access Networks.
-
Select the Save button to save the changes.
-
Now this configuration will be specific to the selected site.
-
The steps to configure the Global Config, Self Sign Up Page, Anonymous Sign Up Page, Third Party Sign Up Page, Plans Page, and Portal Branding sections are the same as those described in the previous Global Configurations section.
-
The key difference is that the configurations made here apply only to the user accounts of the selected site for which the configuration is performed.