
-
Click Events tab from the Captive Access Network Homepage to view the Events table.
-
The Generic tab is selected by default.
-
The Events table shows the list of all events done by the Admin and the User between any time interval.
-20241125-201948.png?cb=435992716e3d6b40958fe203ad6d1eec)
-
Select the dropdown menu at the top right corner of the screen to select the required Organization or sub-organization. The logged in admin organization is populated by default here. This is the organization corresponding to the email ID used to login.
-
The dropdown list consists of all the sub-organizations under the logged in admin organization.
-
Select the Last 24 hours radio button to view the Events occurred in the past 24 hours.
-
Select the Custom Search radio button to view the Events occurred between a specific time period.
-
Select the Start Date and Time. Select the End Date and Time.
-
Click Apply button.
-
The table shows the Events occurred during the selected time period.
-
It shows the below information:
-
Event Time - Date and Time of the event
-
Organization - Name of the Organization
-
Site Name - Name of the Site
-
Event Type - There are two types of events (Admin/User)
-
Events that are done by the Admin are called Admin events
-
Events that are done by the User are called User events
-
-
Action - The type of action done by the event. Refer the Actions section below for more information.
-
IP Address - IP address of the system in which the event was done
-
MAC Address - MAC address of the system in which the event was done
-
Username - Name of the user or admin account that did the event
-
Description - A short description of the event. Hover the cursor over the Description to view the metadata.
-
-
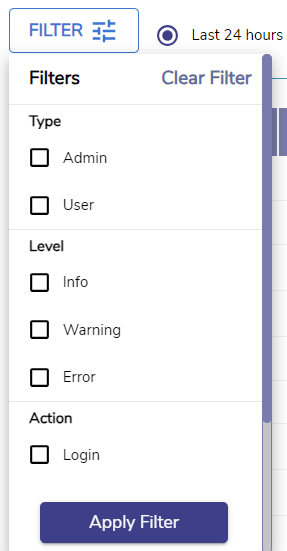
Click the Filter button to filter the Events table based on their Type / Level / Action.
-
Type filters
-
Admin
-
User
-
-
Level filters
-
Info
-
Warning
-
Error
-
-
Action filters
-
Login
-
Logout
-
Password Recovery
-
Adding User
-
Deleting User
-
-
-
Click Apply Filter to filter and view the required Events.
-
The Search field can be used to search for the Events based on the Username/IP Address/MAC Address.
-
The pagination helps the admin navigate to the next page by using the < > buttons.
-
Click the dropdown given next to the Pagination to change the number of sessions displayed in one page. The admin can choose between 10/25/50/100/150/200 from the dropdown menu.
Actions
-
Refer the below table to know about the different Actions that can be done by the Admin.
|
Action |
Description |
Sub description |
|
Adding User |
{Username} added Successfully |
-- |
|
|
Error while adding User |
Error encountered while Error while adding User User already exists |
|
|
|
|
|
Deleting user |
Error while deleting User |
-- |
|
|
{Username} deleted Successfully |
-- |
|
Updating user |
{Username} updated Successfully. |
{Username} updated Successfully. |
|
Adding topup |
Topup Added Successfully |
TopUp plan processed for User |
|
Daily limit reset |
Daily Limit Plan reset successful |
User daily quota limit reset done |
|
Anonymous user configuration |
Anonymous User Configuration updated Successfully |
-- |
|
Plan reset |
Plan Reset Successful |
Plan Reset Successful |
|
Password recovery |
Password Reset Successful |
-- |
|
Enable/disable user account |
User Account enabled Successfully |
-- |
|
|
User Account disabled Successfully |
-- |
|
Adding plan |
{Planame} plan added successfully. |
{Planame} plan added successfully. |
|
Delete plan |
{Planame} plan deleted successfully. |
{Planame} plan deleted successfully. |
|
Generate report |
Report generated successfully |
Report is generating |
-
Refer the below table to know about the different Actions that can be done by the User.
|
Action |
Description |
Sub description |
|
Login |
Login successful for {Username} |
Login successful for {Username} |
|
|
Login failed for {Username} |
DB Connection Error |
|
|
|
Your plan is expired or No plan is associated with this account!\nPlease contact Admin for support. |
|
|
|
Invalid request. Required information is missing. |
|
Logout |
Logout successful for {Username} |
User ${username} logged out successfully |
|
|
Logout failed for {Username} |
Error in updating login status |
|
|
|
Error while logout |
|
|
|
Logout was UserAction |
|
Password Recovery |
Password Recovery successful for ${username} |
-- |
|
|
Error while Password Recovery |
Password is not present |
|
|
|
UserId is not present |
Purchase
-
Select the Purchase tab to view the purchase events.
-20241119-152505.png?cb=56b9431527525993b95d0da01e4723e6)
-
Select the Last 24 hours radio button to view the Purchase Events occurred in the past 24 hours.
-
Select the Custom Search radio button to view the Purchase Events occurred between a specific time period.
-
Select the Start Date and Time. Select the End Date and Time.
-
Click Apply button.
-
The table shows the Purchase Events occurred during the selected time period.
-
It shows the below information:
-
Event Time
-
Organization
-
Site Name
-
Action
-
Username
-
Description
-
-
The Search field can be used to search for the Events based on the Username/Payment ID/Checko ID/Site/Description.
-
The pagination helps the admin navigate to the next page by using the < > buttons.
-
Click the dropdown given next to the Pagination to change the number of sessions displayed in one page. The admin can choose between 25/50/100/150/200 from the dropdown menu.