Skip table of contents

Inventory

Inventory

This manual guides the user through the steps required to use the Inventory screen in Kognitive Cloud. The Inventory screen enables the user to view the list of devices deployed across all the sites, devices yet to be registered, backup configurations and view other important details of the devices.

  • Login to Kognitive Cloud using valid user credentials.

Kognitive Cloud Homepage

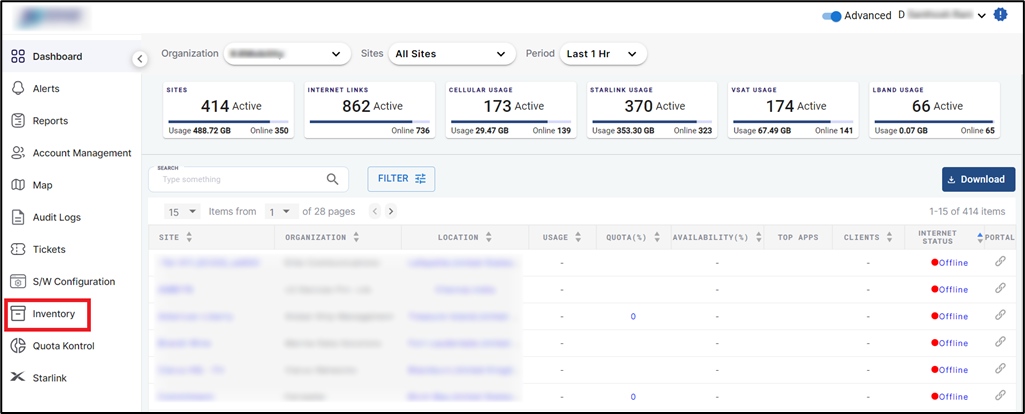
  • In the Organization field, select the Organization or sub-organization from the dropdown menu. The logged in admin Organization is populated by default here. This is the organization corresponding to the email ID used to login.

  • The dropdown list consists of all the sub-organizations under logged in admin organization.

  • Select Inventory option from the left menu bar.

  • The Inventory screen opens as shown in the below figure.

sport-20240208-145700.png

Inventory

  • The Inventory screen contains three tabs namely, Deployed, Warehouse and CM. By default, the Deployed tab is selected.

Deployed

  • The screen shows headers with the following information:

    • Registered – Number of devices registered across all the sites in the selected organization or sub-organization.

    • Warehouse – Number of devices yet to be registered and deployed across all the sites in the selected organization or sub-organization.

image-20240208-145828.png

Headers

  • Below the headers, the table shows the current list of devices that are deployed in the selected organization or sub-organization.

  • The table displays the below information:

    • Site – Name of the Site in which device is deployed.

    • Organization – Name of the Organization to which the site belongs to.

    • Device Name – Name of the device.

    • EOS Version – The software version of EdgeOS when the last backup was taken.

    • S/N – Serial Number of the device.

    • Last Seen – The date on which the device was last online

    • Reg. Date – The date on which the device got registered for the site. This is the date from which the first plan is active for the device.

    • License Exp. Date – The expiry date of the license for the device. This can be monthly or yearly. The connection has to be renewed for the device before this date passes.

    • Uptime Since – The date on which the device was last turned on.

    • Saved Config – The Software configuration running on the device.

  • Action:

  • Move to Warehouse - Click Move to Warehouse icon to move the device back to the warehouse.

    • Click Yes in the pop-up to confirm moving the device to the warehouse.

  • Change Organization – Click Change Organization icon to change the organization of the device and the entire site that the device belongs to.

    o   The Change Organization dialog box opens.

    • In the Set Organization field, select the new organization from the dropdown menu.

    • Click Apply button to the change the organization of the device and its site.

change org-20240208-150343.png

Change Organization

  • Upload Configuration – Click Upload Configuration icon to modify the configuration of the device.

    • The Upload Configuration dialog box opens.

    • It shows the Site name and Device name.

    • In the Select Configuration field, select the required configuration from the dropdown menu.

    • Click Upload Now button to confirm modifying the configuration of the device.

    • Click Cancel to cancel the operation.

upload-20240208-150654.png

Upload Configuration

  • Download Configuration – Click Download Configuration icon to take a backup of the current configuration and save it.

    • The Download Configuration dialog box opens.

    • It shows the Site name and Device name.

    • Enter the Config Name.

    • Click Download Now. The configuration backup will be saved under the Backup Configuration table in the CM tab.

    • Click Cancel to cancel the operation.

Download Configuration-20240208-150853.png

Download Configuration

  • Click EOS Upgrade icon to update the EOS.

  • Click the SEARCH field to search for the device based on the Site/Organization/Device Name/Serial Number.

  • Clicking the Site or S/N of the device directs the user to the Topology page of the device.

  • When there are many devices to be listed in the Deployed table, the pagination helps the user navigate to each page by using the < > buttons.

Pagination

  • Click the dropdown menu given at the left of the pagination buttons to choose the number of devices to be seen in a single page. The user can choose between 10/15/20/25/30/50/75/100 from the dropdown menu.

  • Click Download icon to download the entire deployed device list in PDF format.

Warehouse

The Warehouse screen shows a table that lists the devices that are yet to be registered. These devices are yet to go Live. Once these devices are shipped, received by the user, and the installation is complete, they can assign them to any site and register them.

  • Click the Warehouse tab. The list of all available devices displays in the table below.

WAREHOUSE-20240208-151234.png

Warehouse

  • The table displays the below information:

    • Organization – Name of the Organization to which the site belongs to.

    • S/N – Serial Number of the device.

    • Proposal ID

    • Shipment Date

    • Slip ID

    • Tracking ID

  • Actions:

  • To register a device to an Organization and Site, click the Register icon. The Register Inventory dialog box opens.

register inventory (1)-20240208-143506.png

Register Inventory

  • In the Select Organization field, select the required organization from the dropdown menu.

  • Next the user has to select the site. A Site is a Vessel, Store, Car, Truck, etc. where the Edge System will remain present and can reliably be identified by the management. Multiple Edge nodes can be in a single Site. The options here are to use an existing Site or add a new Site.

  • In the Create/Search Site field, type the name of the required site.

  • Select the site from the list of existing sites in the system.

  • To add a new Site, enter the name of the site and click Add.

  • This will create a new site and assign the device to that site.

  • Select the Term from the dropdown menu.

  • In the Apply Default Config field, select the Yes radio button to apply the default configuration for that site.

  • Select the No radio button to let the device continue in its current configuration.

  • Select the Other radio button to select any configuration from the list of available Backup Configurations taken and stored by the user.

  • In the Select Configuration field, select the required configuration from the dropdown menu.

  • Click Register button to assign the device to the selected site.

  • Once assigned, the device gets moved from the Warehouse tab and is displayed under the Deployed tab.

  • Click Cancel button to cancel registering the device.

  • Click the SEARCH field to search for the device based on the Serial Number.

  • When there are many devices to be listed in the Warehouse table, the pagination helps the user navigate to each page by using the < > buttons.

Pagination

  • Click the dropdown menu given at the left of the pagination buttons to choose the number of devices to be seen in a single page. The user can choose between 10/15/20/25/30/50/75/100 from the dropdown menu.

Configuration Management (CM)

The Configuration Management (CM) screen consists of two tabs namely, Configurations and Backups. By default, the Configurations tab will be selected.

Configurations

The configurations tab consists of two tables namely, Default Configuration and Backup Configuration.

Default Configuration

The Default Configuration table shows the list of all default configurations created by the user. The table shows the following information:

  • Config Name – Name of the configuration.

  • Organization – Name of the organization.

  • Creation Date – Date and time of creation.

  • Status – Status of the configuration (Active/Not Active)

  • Actions:

    • Edit Configuration

    • Delete Configuration.

configs-20240208-151915.png

Configurations

  • Click the Search field to search for the configuration based on the Config Name/Group/Creation Date/Status.

Backup Configuration

The Backup Configuration table shows the list of all the backup configurations taken manually by the user from the Deployed tab and copied from the daily backups. The users can apply these configurations to any of their devices. The table shows the following information:

  • Config Name – Name of the configuration.

  • Site – Name of the site.

  • Device ID – Serial Number of the device.

  • EOS Version - The software version of EdgeOS when the last backup was taken.

  • Creation Time – Date and time of creation.

  • Actions:

    • Delete Configuration.

  • Click the Search field to search for the configuration based on the Config Name/Site/Device ID/EOS Version/Creation Time.

Backups

Click the Backups tab. This tab shows a table that lists all the automatic backups saved in the system. The table shows the following information:

  • Name – Name of the backup.

    • The automatic backups cannot be applied to user devices directly.

    • Click Copy icon to copy this configuration to the Backup Configuration table.

    • Enter the required Name for the backup.

    • Click Tick mark icon.

    • The backup is copied and moved to the Backup Configuration table.

    • Now the backup can be applied to any device as per the user’s needs.

  • Site Name – Name of the site the device belongs to.

  • Device ID – ID of the Device.

  • Software Version - The software version of EdgeOS when the last backup was taken.

  • Creation Time – Date and time of the Software Backup.

backups-20240208-142329.png

Backups

  • Click the Search field to search for the configuration based on the Name/Site Name/Device ID/Software Version/Creation Time.

Inventory – Workflows

Let us take a look at some of the most commonly used workflows in the Inventory screen.

How to a Create Default Configuration

Default configuration for the devices can be created from the CM (Configuration Management) tab of the Inventory screen. The Default Configuration can be applied to any new device added to the Organization. The user can configure a Default Configuration for the specific system type and it can be applied to the device during registration.

Follow the below steps to create a Default Configuration:

  • Select Inventory from the left menu bar in the Kognitive Cloud homepage.

  • Select CM tab.

default config-20240209-084232.png

Configuration Management (CM)

  • Click Create Default Configuration button. The Create Default Configuration pop-up opens.

create default config-20240209-113558.png

Create Default Configuration

  • Enter the Name of the Default Configuration.

  • In the Set Active field, select Yes to apply this configuration by default to the new devices added to the organization.

  • In the Select Product column, select the type of device from the dropdown menu.

  • In the Select Config column, select the required configuration to be set up as Default Configuration. The manual backup configurations saved by the user will be available as options in the dropdown menu.

  • The details of the selected configuration is displayed in the Selected Config Details column.

  • Click Create button to create the Default Configuration.

How To Create Default Configurations for various device types

  • The user can also set up Default Configurations for the various device types available.

  • Click +Add to create another Default Configuration for a different device type.

  • A new row will be created. In the Select Product column, select the next type of device available from the dropdown menu.

  • In the Select Config column, select the required configuration to be set up as Default Configuration from the dropdown menu.

  • Click Create button to create the Default Configurations.

create default config for various types-20240209-113826.png

Create Default Configuration for various device types

  • Click Delete icon from the Actions column to delete the Default Configuration.

  • The created Default Configuration will be shown under the Default Configuration table in the CM screen.

  • These default configurations can be applied to the new devices added to the organization during registration or whenever required by the user.

How to Create a Backup Configuration

Backup Configurations can be created in two ways - Manually or Automatically.

How to Create a Manual Backup Configuration

The Manual Backup Configurations can be created from the Deployed tab of the Inventory screen. The manual backup configurations can be applied to other devices when required. These Configurations can also be used to create the Default Configuration for the devices.

  • Select Inventory screen from the left menu bar in the Kognitive Cloud homepage.

  • The Deployed tab is selected by default. The table shows the current list of devices that are deployed in the selected organization or sub-organization.

  • Click the Download Configuration icon from the Action column to save a manual backup of the current configuration of the selected device.

Deployed-20240208-091211.png

Deployed Tab

  • The Download Configuration pop-up opens.

    • It shows the Site name and Device name.

    • Enter the Config Name.

    • Click Download Now.

    • The backup of the configuration will be saved under the Backup Configuration table in the CM screen.

    • Click Cancel to cancel the operation.

Download Configuration-20240208-091755.png

Download Configuration

How to Save an Automatic Backup Configuration

The configuration backups taken daily are saved in the Backups tab in under the CM screen. The user can copy the required configuration from the automatic backups and save it under the Backup Configuration table.

  • Select Inventory screen from the left menu bar in the Kognitive Cloud homepage.

  • Select CM tab.

  • Select the Backups tab.

backups-20240208-142329.png

Backups

  • The table shows the list all the automatic backups saved in the system. These automatic backups cannot be applied to user devices directly. The user must make a copy of the required configuration and save it under the Backup Configuration table.

  • Click Copy icon to copy the required configuration to the Backup Configuration table.

  • Enter the required Name for the backup.

  • Click Tick mark icon.

copy backup-20240209-114153.png

Copy Backup Configuration

  • The configuration is copied and moved to the Backup Configuration table.

backup config table-20240209-114551.png

Backup Configuration Table

  • Now the backup configuration will be available to be applied to any device as per the user’s needs.

How to Apply the Configuration During Registration

The configurations can be applied to the new devices added to the organization during registration process. The registration of new devices can be done from the Warehouse tab of the Inventory screen.

  • Select Inventory screen from the left menu bar in the Kognitive Cloud homepage.

  • Select Warehouse tab. The list of all available devices is shown in the table.

  • To register a device to an Organization and Site, click the Register button. The Register Inventory dialog box opens.

register inventory-20240208-143136.png

Apply Default Configuration

  • In the Select Organization field, select the required organization from the dropdown menu.

  • In the Create/Search Site field, type the name of the required site.

  • Select the site from the list of existing sites in the system.

  • To add a new Site, enter the name of the site and click Add.

  • This will create a new site and assign the device to that site.

  • Select the Term from the dropdown menu.

  • In the Apply Default Config field, select the Yes radio button to apply the default configuration for that site.

  • Select the No radio button to let the device continue in its current configuration.

  • Select the Other radio button to select any configuration from the list of available Backup Configurations taken and stored by the user.

register inventory (1)-20240208-143506.png

Apply Backup Configuration

  • In the Select Configuration field, select the required configuration from the dropdown menu.

  • Click Register button to assign the device to the selected site.

  • Once assigned, the device gets moved from the Warehouse tab and is displayed under the Deployed tab.

How To Check the Status of Configuration Restoration

Logs

After applying the configuration, the status of the operation can be viewed in the Logs tab of the Inventory screen.

  • Select Inventory from the left menu bar in the Kognitive Cloud homepage.

  • Select the Logs tab. This tab shows the status of configuration restoring operations and also EOS Upgrade operations.

  • The three types of status are:

    • Applied

    • In progress

    • Failed. In case of failed, click Retry icon to retry applying the configuration.

logs-20240208-145007.png

Logs

Events

  • The configuration restoration status can also be viewed in the Events tab.

  • Open the Topology page of the required site.

  • Select the Events tab.

  • The table shows the list of event occurred on the site.

  • The status of configuration restoration will also be shown in the events list.

Events

  • Click the i icon to view more information about the operation.

  • In case of failure to apply the configuration, the reason for failure can be seen using this button.

JavaScript errors detected

Please note, these errors can depend on your browser setup.

If this problem persists, please contact our support.