
Wireguard VPN Server Settings
To do Wireguard VPN Server settings, perform the following steps.
Steps
-
The Wireguard tab is selected by default.
-
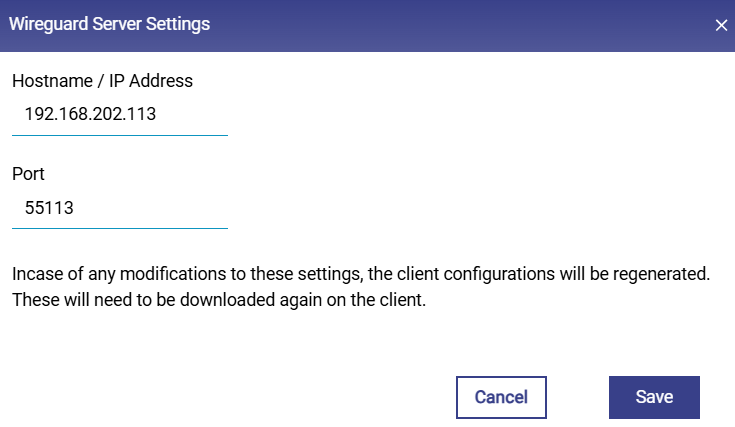
Click Pencil icon next to Wireguard Server. Pop-up as seen Figure Wireguard VPN Server Settings in appears.
-
Enter the IP Address or the Hostname of the Server.
-
Enter the Port for the VPN server.
-
Click Save.
Adding a new Wireguard VPN Client
To add a new Wireguard VPN client, perform the following steps.
Steps
-
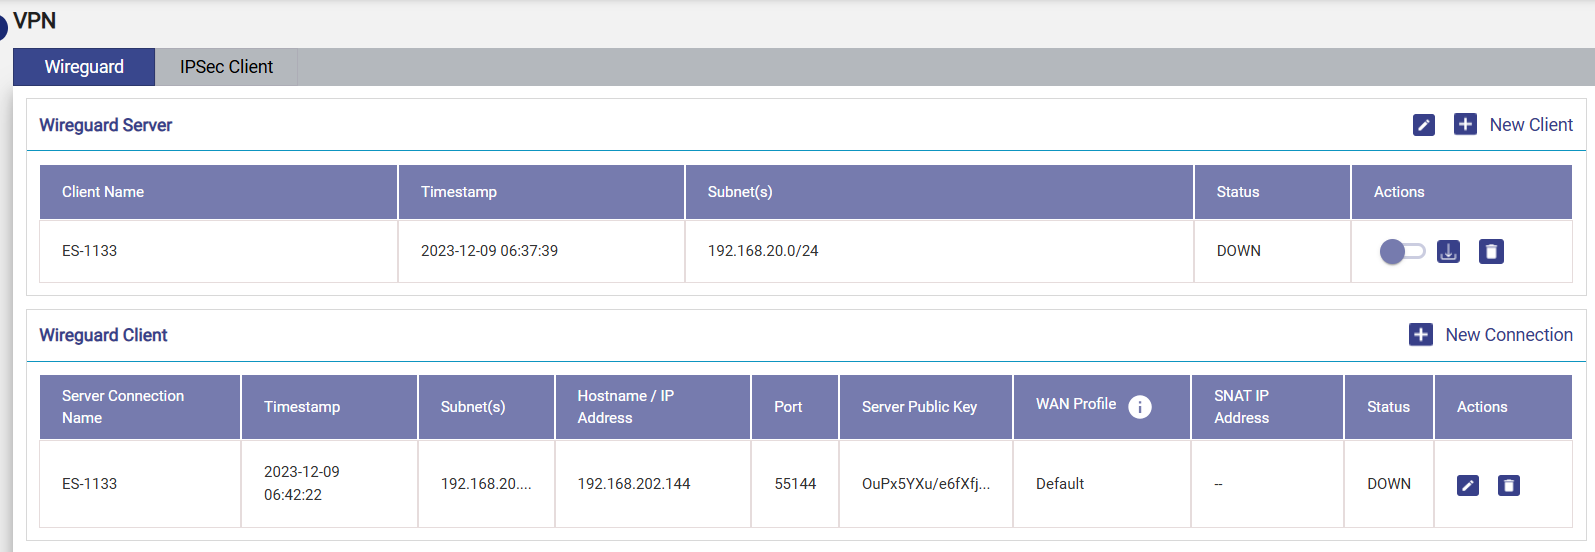
If a Client Configuration were built, the user will see a list of Wireguard VPN client profiles under the Wireguard Server table.
-
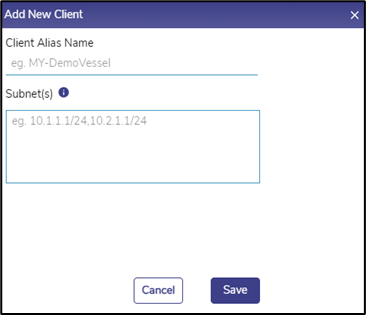
Click + New Client button on the top right, see Figure Wireguard VPN Server. Add New Client Pop-up appears, see Figure Add New Client Pop-up.
-
Enter Client Alias Name, i.e., a name for the new client.
-
Enter the Subnet(s) for the new client. The user can enter one or more subnets, which are comma separated but without spaces. Onboard networks should be used for this purpose.
-
Click Save.
-
The client details appear in the table listing the currently configured clients, see Figure Wireguard VPN Server with each row having details of the Client Name, Creation Timestamp, Subnet(s), and Status.
-
The user can click on Download icon to download the Connection File of each client.
-
The user can click on to Delete icon delete client.
Note: One key pair per remote site. Each remote site (vessel, branch, etc.) must be added as its own separate client entry with its own unique key pair. Never reuse one client's downloaded connection file for a second site. WireGuard tracks one endpoint per peer key — if two sites share a key pair, keep alives from whichever site connected most recently overwrite the session, causing intermittent connectivity loss on the other site (“endpoint-flip”).
Configuring Static Routes for Peer Subnets
After a client has been added under Wireguard Server, the server also needs a static route so it knows to send return traffic for that client's subnet(s) back through the tunnel.
Steps
-
Navigate to Interfaces ® Static Routes.
-
Click + Add New Route.
-
Enter the client's subnet(s) (as entered in the client's Subnet(s) field) as the Destination Address.
-
Enter the client's tunnel gateway IP as the Gateway IP.
-
Click Save.
-
Repeat for each additional client.
Note: Do not remove these routes once the tunnel is up — they are required for traffic to reach the client's LAN, not just for initial setup.
Adding a new Wireguard VPN Connection
To add New Connection, perform the following steps.
Steps
-
Click + New Connection button on the top right of the Wireguard Client table, see Figure Wireguard VPN Client Section.
-
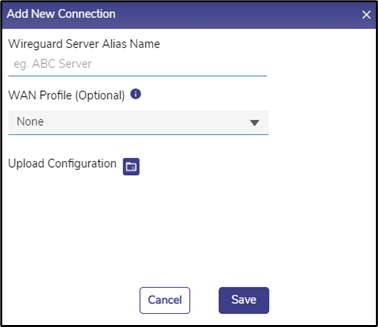
The Add New Connection Pop-up appears. see Figure Add New Connection.
-
Enter the Wireguard Server Alias Name, i.e., a client connection name.
-
Select a WAN Profile to apply this connection to. Note that the selected WAN profile should not have any bonded set.
-
Click the Upload Configuration folder icon to upload the Connection File obtained from the server.
-
Click Save.
-
The configured client connection details appear in the table listing the currently configured client connection table, see Wireguard Client Section with each row having details of the Server Connection Name, Creation Timestamp, Subnet(s), Hostname/IP Address, Port, Server Public Key, WAN Profile and Status.
-
The user can click on Pencil icon to edit the client connection. Only Connection Name and WAN Profile are editable, see Figure Edit Client Connection. Click on Green tick icon to save the changes or X icon to discard them.
-
The user can click on Delete icon to delete client connection.

Configuring a Policy Route for VPN Traffic
By default, a WAN profile's traffic does not automatically route over a Wireguard connection. If you want only traffic destined for the remote site's subnet to use the tunnel — while all other traffic continues over the normal WAN — add a policy route.
Steps
-
Navigate to SD-WAN Policy Routes.
-
Click + Add Policy Route.
-
Enter a Policy Name.
-
For WAN Profile / VPN, select the Wireguard connection created above.
-
Enter the local LAN subnet(s) as Source Network(s).
-
Enter the remote site's subnet as Destination.
-
Click Save.
This keeps general internet traffic on the existing WAN/bonded connection and sends only local-LAN <--> remote-LAN traffic over the tunnel.
Example: Two-Site (Vessel-to-Shore) Configuration
This example applies the sections above to a common deployment: two remote sites (“Vessel1” and “Vessel2”) connecting to a central gateway (“ShoreServer”) over Wireguard, with policy routing so only site <--> shore LAN traffic uses the tunnel and general internet traffic continues via the site's own WAN.
Configuration variables
|
Placeholder |
Description |
Example |
|---|---|---|
|
<SHORE_WAN_IP> |
ShoreServer public WAN IP |
203.0.113.10 |
|
<WG_PORT> |
Wireguard UDP listen port on ShoreServer |
51820 |
|
<SHORE_LAN> |
ShoreServer LAN subnet (CIDR) |
10.0.0.0/24 |
|
<VESSEL1_LAN> |
Vessel1 LAN subnet(s), comma-separated |
10.1.0.0/24 |
|
<VESSEL1_GW> |
Vessel1 tunnel gateway IP |
10.1.0.1 |
|
<VESSEL2_LAN> |
Vessel2 LAN subnet(s), comma-separated |
10.2.0.0/24 |
|
<VESSEL2_GW> |
Vessel2 tunnel gateway IP |
10.2.0.1 |
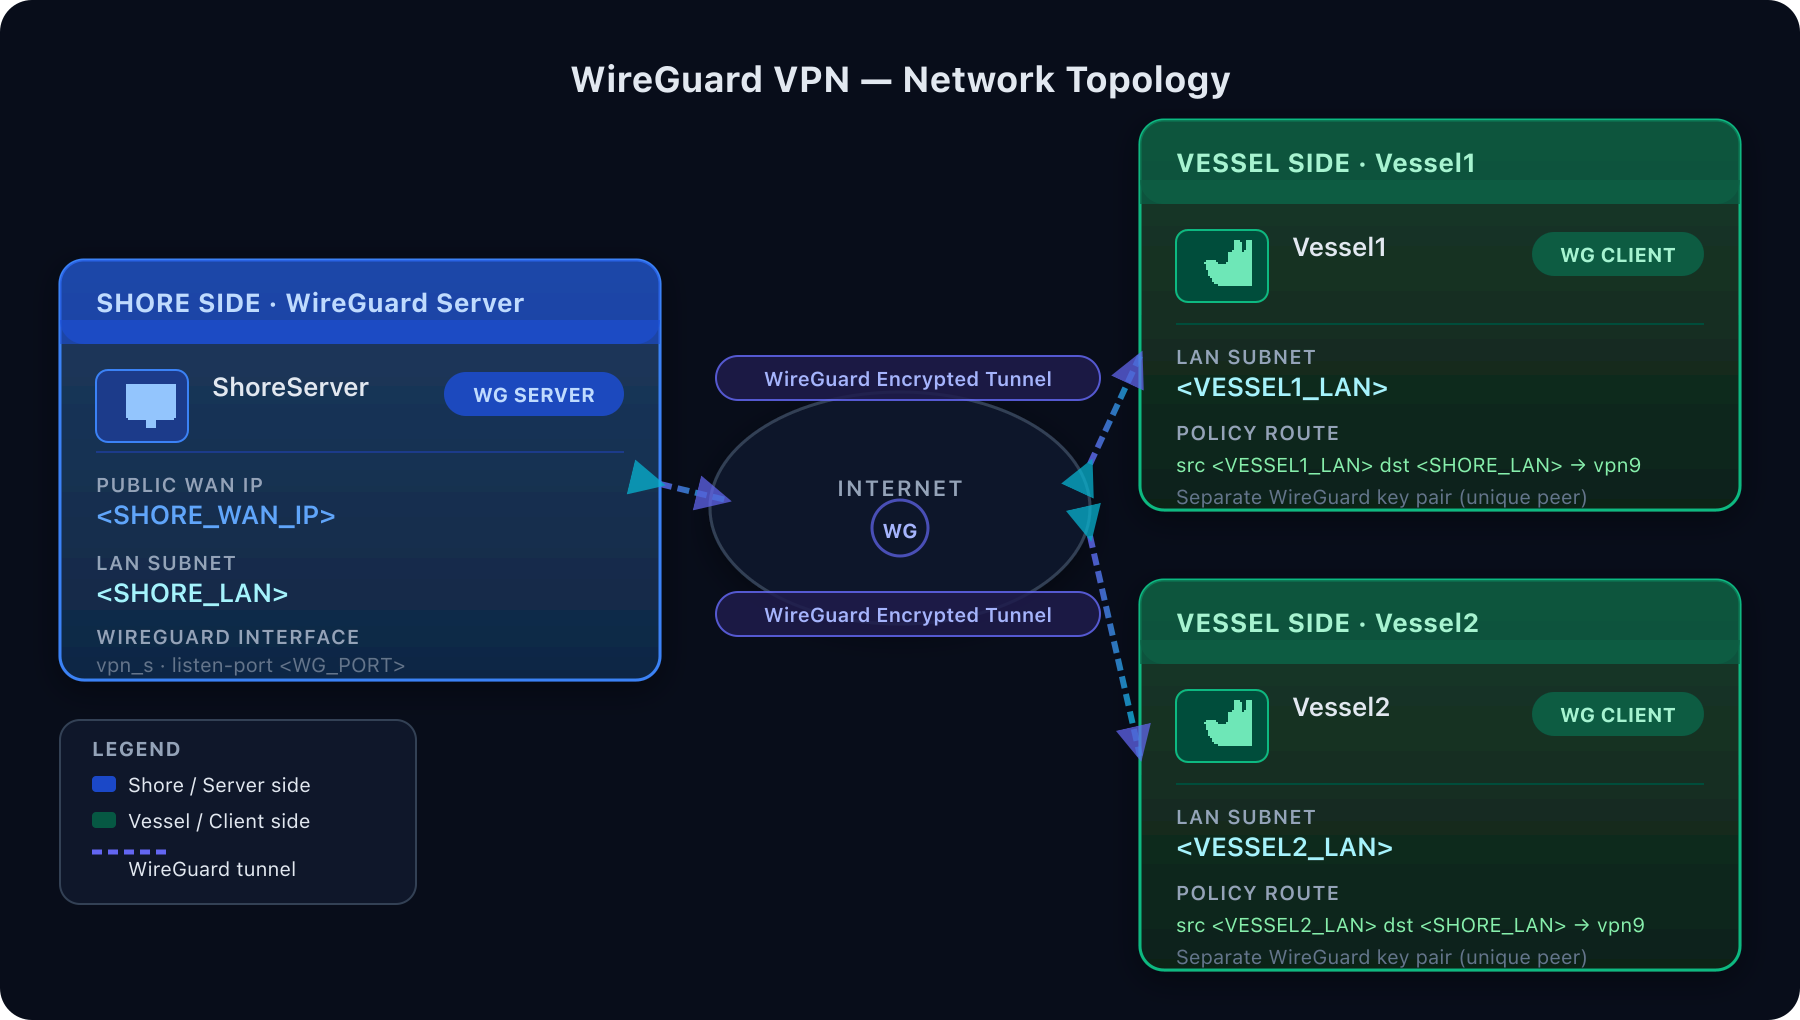
Walkthrough
-
On ShoreServer, follow Adding a new Wireguard VPN Client once for each vessel — Client Name “Vessel1” / “Vessel2”, Subnet(s) = <VESSEL1_LAN> / <VESSEL2_LAN>. Download each client's connection file; you'll need it in step 3.
-
On ShoreServer, follow Configuring Static Routes for Peer Subnets for each vessel: Destination =
<VESSEL1_LAN> / <VESSEL2_LAN>, Gateway = <VESSEL1_GW> / <VESSEL2_GW>. -
On each vessel, follow Adding a new Wireguard VPN Connection: Server Alias Name = “ShoreServer”, then upload that vessel's connection file from step 1. Do not generate a new key pair — the uploaded file already contains the matching keys.
-
On each vessel, follow Configuring a Policy Route for VPN Traffic: Source Network(s) = that vessel's own LAN, Destination = <SHORE_LAN>, WAN Profile / VPN = the ShoreServer connection from step 3.