IPSec VPN
The IPSec VPN feature allows the creation of VPN tunnels between an KonnectOS System and an IPSec VPN server, with the KonnectOS System being the VPN client (remote site) and the other end being an IPSec VPN server (operations center).
The following sections describe how to configure the KonnectOS System as an IPSec VPN client.
Configure IPSec VPN Client
An KonnectOS System can have multiple IPSec VPN client connections configured. For example, an KonnectOS System can have a unique IPSec VPN tunnel for each Access Network.
Each IPSec client connection must be configured with the details (or the configuration profile) provided by the IPSec VPN server.
To access the IPSec client configuration, perform the following steps.
-
Select VPN from the side menu bar and click the IPSec Client tab, see figure below.

The configured IPSec connections are listed in a table with the following columns:
|
Column |
Description |
|---|---|
|
Server Connection Name |
The name of the connection. |
|
Server IP Address |
The IP address of the IPSec server. |
|
Server Name |
The identifier of the server used for mutual authentication. |
|
Client Name |
The identifier of this client used for mutual authentication. |
|
Local IP Address |
The local IP address used when NAT is enabled. |
|
NAT (Y/N) |
Whether NAT is enabled for the connection. |
|
WAN Profile |
The WAN Profile used by the connection. The ℹ tooltip reads: Selected WAN Profile should not have bonded links. |
|
Status |
The connection status. |
|
Actions |
Icons to edit or delete the connection. |
Note: An event is generated each time an IPSec VPN connection is established or disconnected. These events appear under Alerts and are pushed to Kloud for monitoring and alerting. For details, see KonnectOS Alerts.
Add an IPSec VPN Server Connection
To create a new IPSec VPN server connection, perform the following steps.
-
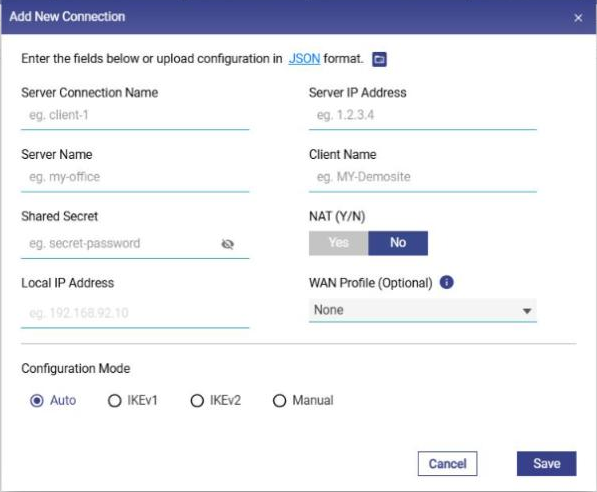
Click Add New Connection at the top right of the table. The Add New Connection pop-up appears, see figure below.
-
Enter the Server Connection Name (for example, client-1). It is used to refer to this connection in the rest of the user interface. It must be unique among all VPN connections configured in the system (IPSec and Wireguard).
-
Enter the Server IP Address (for example, 1.2.3.4) of the IPSec server that this connection connects to. Unlike Wireguard, there can be a maximum of one IPSec VPN connection to any given server IP.
-
Enter the Server Name (for example, my-office) and the Client Name (for example, MY-Demosite). These are the identifiers used by the server and this client to mutually authenticate each other.
-
Enter the Shared Secret, the password shared between the server and the client. Click the eye icon to show or hide it.
-
In NAT (Y/N), click Yes if the client will be assigned a single IP address, and enter that IP address in the Local IP Address field. Otherwise, keep No (default); the Local IP Address field is then disabled.
-
Optionally, select a WAN Profile for this connection (default None). The selected WAN Profile should not have bonded links.
-
Select the Configuration Mode (see below).
-
Click Save to create the VPN connection. To close the pop-up without saving, click Cancel or ×.
Uploading the connection in JSON format
Instead of entering the fields manually, the user can upload the connection details in JSON format. The top of the pop-up reads Enter the fields below or upload configuration in JSON format.
-
Click the JSON link to download the sample JSON file.
-
Enter the required details in the sample file and save it.
-
Click the Upload icon next to the JSON link and select the file. The fields of the pop-up are populated from the file.
-
Click Save.
Configuration Mode
The Configuration Mode controls the details of the IPSec configuration. The options are Auto, IKEv1, IKEv2 and Manual.
-
Auto (default) – the client tries auto-negotiation of security algorithms with the server. It uses IKE version 2 and proposes a reasonable subset of the algorithms it supports.
-
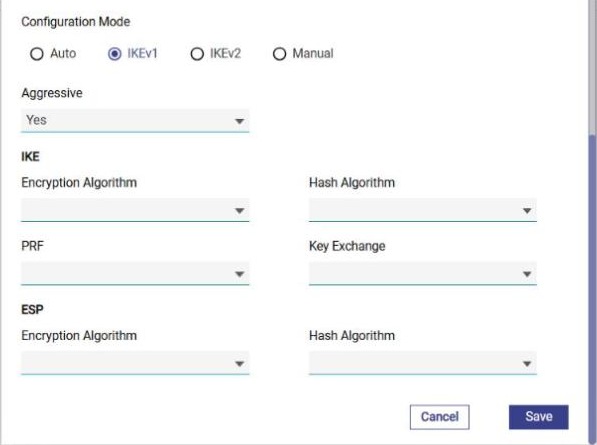
IKEv1 – use if the server requires IKE version 1. The following fields appear, see figure below:
-
Aggressive – select Yes (default) if the server uses Aggressive Mode, or No for Main Mode.
-
IKE (Phase 1) – Encryption Algorithm, Hash Algorithm, PRF (allows a None option) and Key Exchange.
-
ESP (Phase 2) – Encryption Algorithm and Hash Algorithm.
-
-
IKEv2 – use if the server requires IKE version 2. The fields are similar to IKEv1, except that there is no Aggressive/Main mode selection.
-
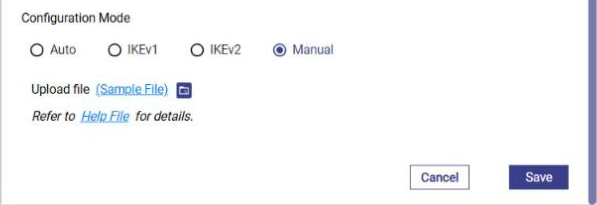
Manual – use if none of the above modes works. A configuration file snippet (consisting of '<whitespace> <name> = <value>' entries in the strongSwan 'ipsec.conf' configuration file format) is uploaded, see figure below.
-
Click (Sample File) next to Upload file to download the sample file.
-
Enter the required details in the sample file and save it.
-
Click the Upload icon and select the file.
-
For details of the supported entries, click the Help File link ("Refer to Help File for details").
-