
-
Click the Threat Kontrol tab. This screen enables the user to view and configure Threat Kontrol rules, monitor the threats received in the Sites & Devices and set threat actions to be performed according to the threat kontrol rules.
-20250716-063636.png?cb=a98c73260a9a49ba4696ff7ce31b7122)
Add Threat Kontrol Rule
-
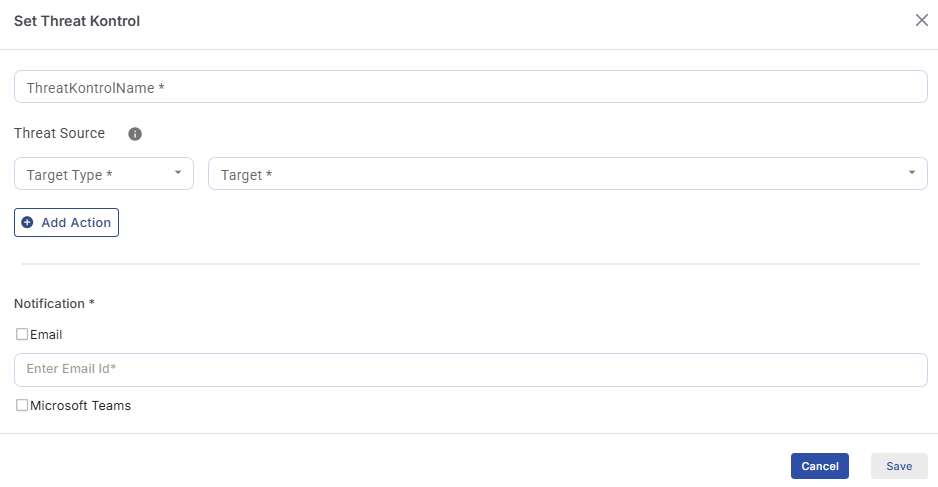
Click the Add Threat Kontrol button to create a new Threat Kontrol rule. The Set Threat Kontrol dialog box opens.
-
Enter a Threat Kontrol Name for the rule.
-
Select the Threat Sources in the Threat Source section.
-
Select the Target Type from the dropdown menu. The user has three options to select the target type - Device / Site / Managed Group
-
Device - Select the Device option from the dropdown menu in the Target Type field. Select the required devices from the dropdown menu in the Target field. Only the Threats received in the selected Target devices will be monitored under this Threat Kontrol Rule.
-
Site - Select the Site option from the dropdown menu in the Target Type field. Select the required sites from the dropdown menu in the Target field. Only the Threats received in the selected Target sites will be monitored under this Threat Kontrol Rule.
-
Managed Group - Select the Managed Group option from the dropdown menu in the Target Type field. Select the required groups from the dropdown menu in the Target field. These groups can be created in the Group Actions tab of the Inventory screen in Kognitive Cloud. Only the Threats received in the selected Target groups will be monitored under this Threat Kontrol Rule.
-
-
-
Click the + Add Action button to define the actions to be triggered when the number of received threats reaches the configured threshold.
-
Select the Severity from the options available in the dropdown menu.
-
Select the Class from the options available in the dropdown menu. The class options will be based on the Severity selected in the previous field. Multiple Classes can be selected in this field.
-
Select the Threat Name from the options available in the dropdown menu. The Threat name options will be based on the Class selected in the previous field. Multiple Threat Names can be selected in this field.
-
Select the Threat Action to be taken when the number of received threats reaches the configured threshold. The options available are Notification / Suppression.
-
Notification - When the user selects the Notification Threat Action, a notification will be sent to the selected communication channels stating details about the threats when the Threat Kontrol rule gets triggered.
-
Suppression - When the user selects the Suppression Threat Action, the threats marked as Suppressed will be hidden from all the data tables in the Overview, Top Threats, Endpoint, All Threats tabs. These threats are considered not critical. To view the data about these suppressed threats, select the Include Suppressed checkbox at the top of the inidvidual screens.
-
-
In the Measurement field, select the time period to be monitored for threat generation
-
In the Count field, select the number of threats received at which the threat action will be performed.
-
Click the + Add Action button to add multiple threat actions.
Notification
-
The Notifications to be sent to the user based on the Threat Kontrol rules configured can be sent to their Email addresses and Microsoft Team channel.
-
Under the Notification section, select the checkbox of medium to send the notification. The options available are Email and Microsoft Teams. The user can select both the checkboxes.
-
In the Enter Email ID field, select the Email address from the dropdown menu or enter a new email address.
-
Click the Save button to save the Threat Kontrol rule.
-
Now when the number of Threats received reaches the given percentage within the specific duration set in the Measurement field, a notification will be sent to the selected Email address and the Teams channel stating details about the threats.
Threat Kontrol Rule Table
-
The table shows the list of Threat Kontrol rules configured in the selected site of the user.
-
The table shows the below information:
-
Threat Kontrol Name - Name of the Threat Kontrol rule
-
Site – Name of the site
-
Device – Name of the device
-
Severity - Severity of the Threat configured in the rule
-
Classes - The threat classes configured in the rule
-
Threat Names - The threat names configured in the rule
-
Measurement Period - The time period to be assessed
-
Count - The number of threats received at which the threat action will be performed
-
Threat Action - The type of threat action to be taken (Notification/Suppression)
-
Operations:
-
Edit - Click the Pencil icon to edit the Threat Kontrol rule
-
Delete – Click the Delete icon to delete the Threat Kontrol rule
-
Enable/Disable – Click the Toggle button to enable or disable the Threat Kontrol rule. When a Threat Kontrol rule is disabled, all the threat actions that are configured to happen will not be executed. Only when the Threat Kontrol rule is enabled again, the actions will get executed.
-
-
-
The Search field can be used to search for the Threat Kontrol rule based on the Threat Kontrol Name/Site/Device/Classes/Threat Names.
-
Click Download to download the table data in CSV format.