
Orgs / Sites
Overview
The Orgs / Sites page provides a hierarchical view of all organizations, sub-organizations, and their associated sites within OrbitBills. This page acts as the foundation for managing customer accounts and service locations, allowing administrators to easily navigate between different organizational levels. From this page, users can quickly identify each entity’s structure, linked service lines, and relevant operational details. By maintaining an accurate Orgs / Sites hierarchy, OrbitBills ensures that billing, invoicing, and subscription management processes remain organized and efficient across the entire customer base.
The Orgs / Sites screen is further divided into two screens namely, Subscription Orders and Product Orders.
Subscription Orders
The Subscription Orders page has three tabs:
Org View
Service Line View
Sub Pool view
Subscription Orders
Org View
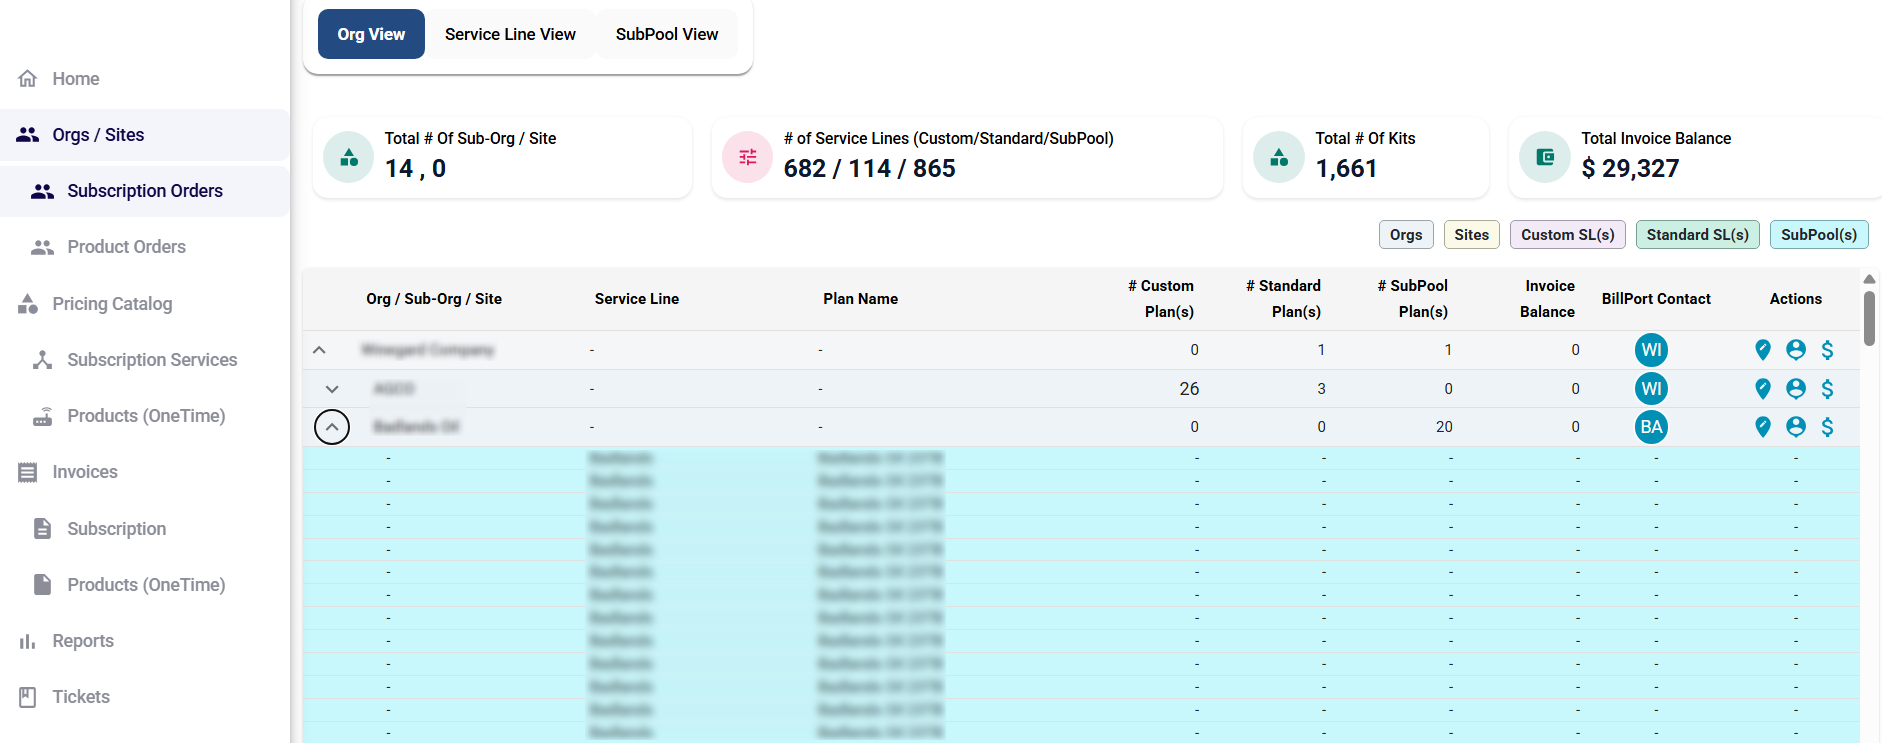
The Org View tab provides a structured view of all organizations, sub-organizations, and sites, along with their associated service lines, type of plans, and invoice details related to the subscription services. It serves as a central point to review and manage subscription-related data at different hierarchy levels.
Headers
The Headers show the following information:
Total # of Sub-Org / Site – Displays the total number of sub-organizations/sites.
# of Service Lines (Custom / Standard / Sub Pool) – Shows the total number of service lines under custom, standard and sub pool plans.
Total # of Kits – Indicates the total number of active starlink kits assigned to service lines.
Total Invoice Balance – Displays the sum of outstanding invoice balances for all listed entities under subscription services.
Subscription Orders Table
The table is organized into the following columns:
Org / Sub-Org / Site – Displays the hierarchical structure of organizations.
Clicking the arrow beside an organization expands its sub-organizations and sites.
Service Line – Shows the name of the service line under a site or sub-organization.
Plan Name – Displays the plan assigned to the service line. The legend given above the table is color-coded and shows the type of the plan:

Legend
# Custom Plan(s) – Indicates the number of service lines associated with custom plans.
# Standard Plan(s) – Indicates the number of service lines associated with Standard plans.
# Sub Pool(s) - Indicates the number of service lines associated with sub pools.
Invoice Balance – Shows the current outstanding balance for that entity under subscription services.
OrbitBills Contact – Displays the billing contact details for that organization.
Blue icon with initials – Active billing contact.
Yellow triangle icon – Missing or unassigned billing contact.
Actions - A set of quick-access icons for managing the subscription:
Click the
 Edit Address icon to edit the address of the organization. The Edit Address for Org dialog box opens.
Enter the address details.
Click the Save button to save the address.
Click the
 OrbitBills Invoicing Account icon to add the OrbitBills contact. The Edit Contact for Org dialog box opens.
The contact details pulled from IAM are displayed in the Contact(s) table.
Click the + Add Contact button to add a new contact.
Enter the Name & Email Address.
Under the Permissions column, use the checkbox to select the type of contact. The options available are OrbitBills, OrbitBills User, Finance, Shipping and Technical.
Select the OrbitBills checkbox to configure the contact as a OrbitBills contact. This contact will be used for all billing and invoicing process.
Click the
 View Invoice icon to view or manage invoice and payment details.
The table shows all the subscription invoices generated including details such as Invoice ID, Organization Name, Payable On Date, Charges, Invoice amount, Invoice Payment, Balance and Status.
For more information, please refer the Invoicespage.
-20250814-070135.png?inst-v=fc00cdc5-bdd5-43fe-995f-cbc9596ecc79)
Edit Address
-20250814-071633.png?inst-v=fc00cdc5-bdd5-43fe-995f-cbc9596ecc79)
Edit/Add Contact
-20250814-072019.png?inst-v=fc00cdc5-bdd5-43fe-995f-cbc9596ecc79)
Invoices
Service Line View
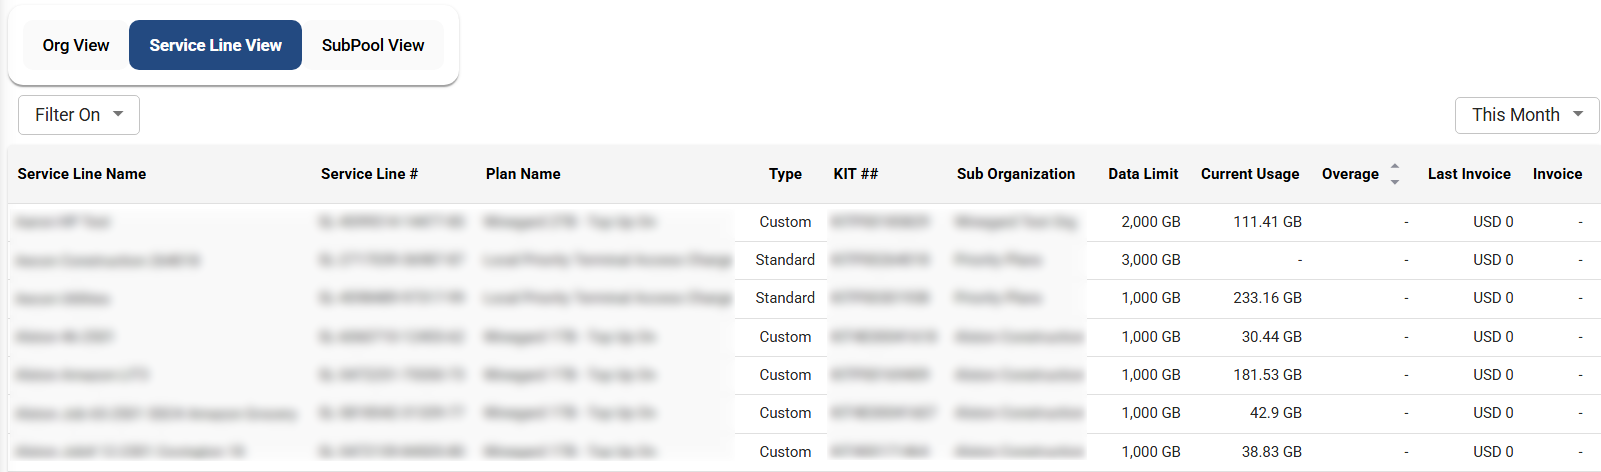
Click the Service Line View tab to view the usage details for each Service Line under the organization.
Service Line View
Click the Filter On button to filter the table based on the Service Line Name, Plan Name, Type, Sub Organization or Kit Number.
The table shows the following information:
Service Line Name - Name of the service line under a site or sub-organization.
Service Line # - Service Line Number
Plan Name - The plan assigned to the service line
Type - Type of the plan assigned to the service line (Standard / Custom / Sub Pool)
Kit # - The kit number of the service line
Sub Organization - The Sub Organization name
Data Limit - Data limit of the plan
Current Usage - The amount of data consumed by the service line under the current plan till date
Current Invoice - The current invoice amount
Overage - The amount of data consumed above the data limit
Invoice(s) - Invoice balance
Sub Pool View
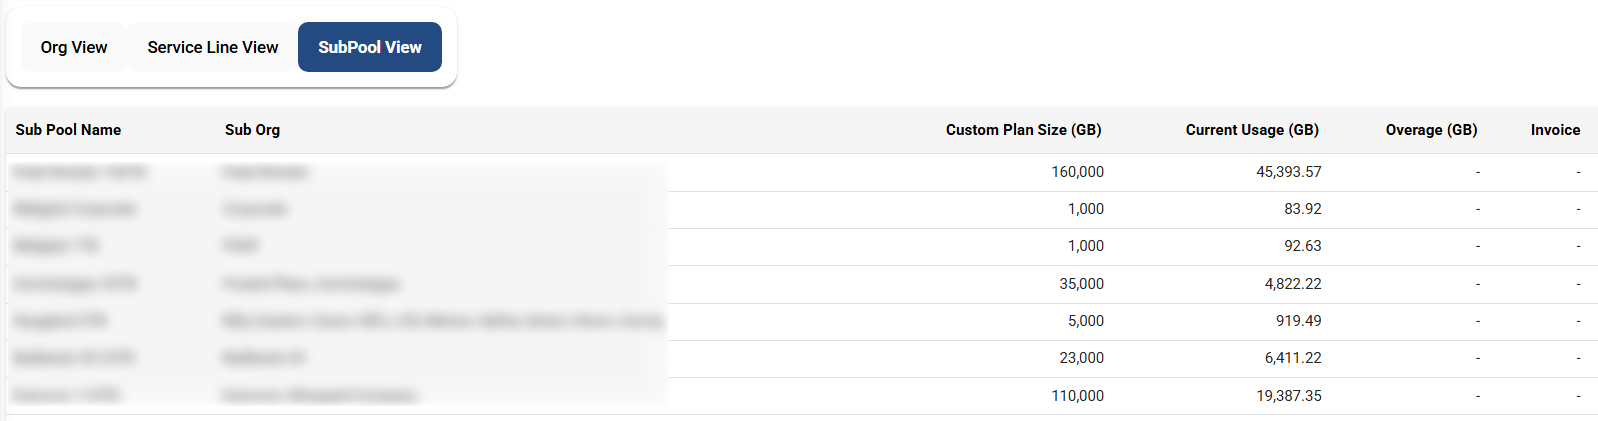
Click the Sub Pool View tab to view the usage details for each Sub Pool under the organization.
Sub Pool View
The table shows the following information:
Sub Pool Name - Name of the Sub Pool
Sub Org - Name of the Sub Organization
Custom Plan Size (GB) - Data limit of the Sub Pool
Current Usage (GB) - The amount of data consumed under the sub pool till date
Overage (GB) - The amount of data consumed above the data limit
Invoice - Invoice balance
Note: When a sub-pool is associated with an organization or sub-organization, the invoice is generated based solely on the price of the sub-pool. Any service lines under that sub-pool will have their usage details displayed in OrbitBills, primarily to help the end user monitor how much of the sub-pool’s total data has been consumed.
Users can view data usage for each individual service line associated with the sub-pool; however, billing for sub-pool plans is not performed at the individual service-line level. The service-line usage information is provided for monitoring purposes only.
Product Orders
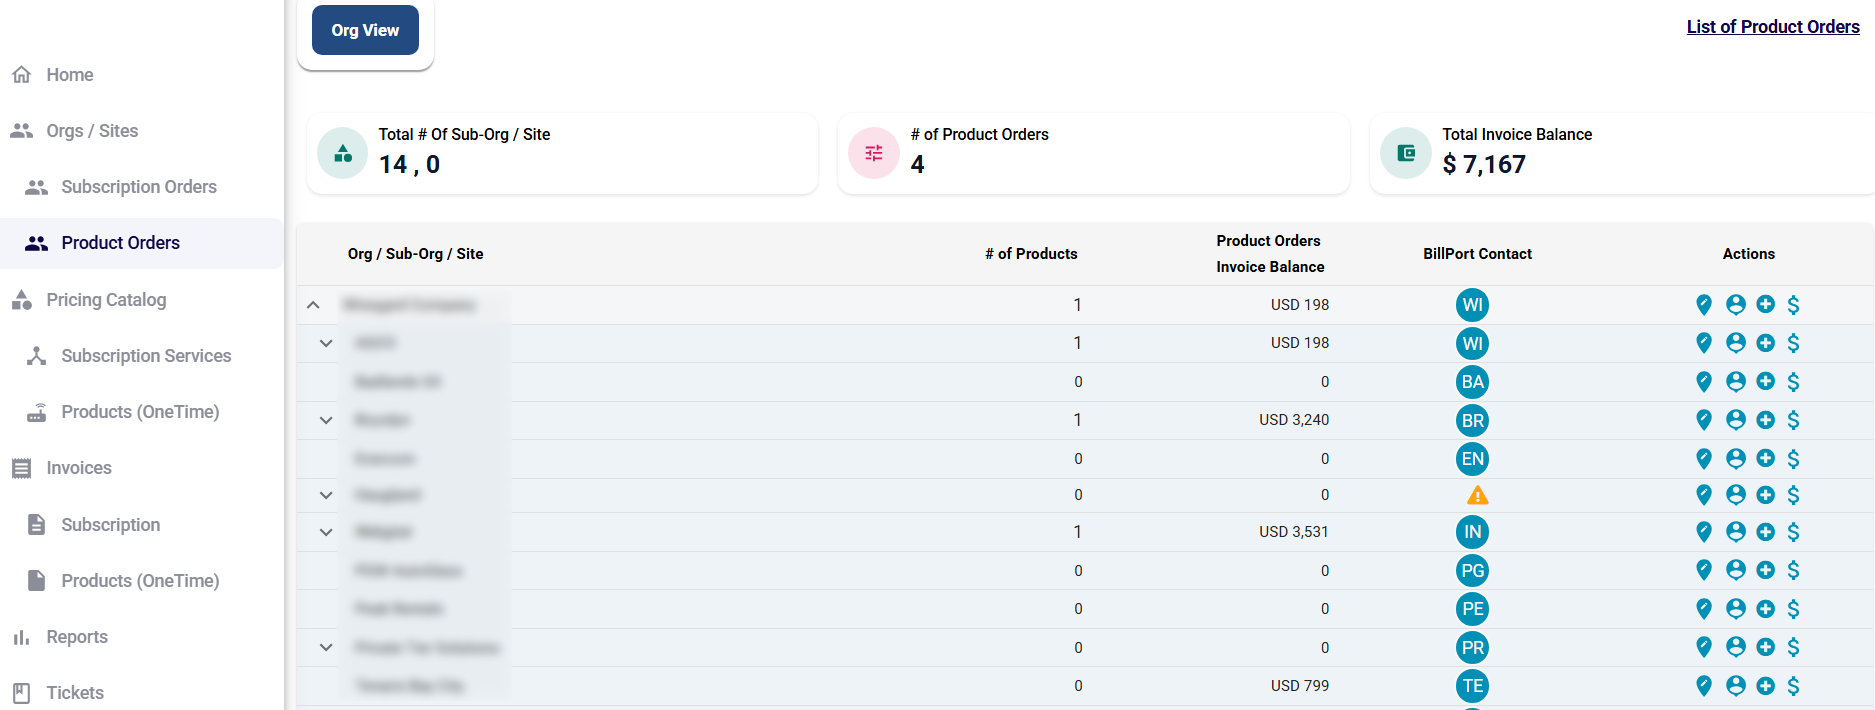
The Product Orders page provides a structured view of all organizations, sub-organizations, and sites, along with their associated service lines, plans, and invoice details related to the Products. It serves as a central point to review and manage product-related data at different hierarchy levels.
Product Orders
Headers
The Headers show the following information:
Total # of Org / Sub-Org / Site – Displays the total number of organizations and sub-organizations/sites.
# of Product Orders – Shows the total number of product orders under the selected organization.
Total Invoice Balance – Displays the sum of outstanding invoice balances for all listed entities under product services.
Product Orders Table
The table is organized into the following columns:
Org / Sub-Org / Site – Displays the hierarchical structure of organizations.
Clicking the arrow beside an organization expands its sub-organizations and sites.
# of Products – Shows the total number of products under the site or sub-organization.
Product Orders Invoice Balance – Shows the current outstanding balance for that entity under product services.
OrbitBills Contact – Displays the billing contact details for that organization.
Blue icon with initials – Active billing contact.
Yellow triangle icon – Missing or unassigned billing contact.
Actions - A set of quick-access icons for managing the subscription:
Click the
Edit Address icon to edit the address of the organization. The Edit Address for Org dialog box opens.Enter the address details.
Click the Save button to save the address.
Click the
OrbitBills Invoicing Account icon to add the OrbitBills contact. The Edit Contact for Org dialog box opens.The contact details pulled from IAM are displayed in the Contact(s) table.
Click the + Add Contact button to add a new contact.
Enter the Name & Email Address.
Under the Permissions column, use the checkbox to select the type of contact. The options available are OrbitBills, OrbitBills User, Finance, Shipping and Technical.
Select the OrbitBills checkbox to configure as a OrbitBills contact. This contact will be used for all billing and invoicing process.
Click the
 Create Product Order icon to create a product order. The Product Order Details screen opens.
Click the + icon at the top right corner of the screen to create a product order.
Select the Category from the dropdown menu. The options available are Hardware / Tech Service.
Select Hardware to order a product.
Select Tech Service add a service.
In the Product Field, select the type of product from the dropdown menu.
Enter any Remarks.
The Base price gets populated automatically according to the product or service.
Enter the Quantity.
Enter the actual Price.
Click the Taxable checkbox to make the entry taxable.
Click the
 icon to add the entry. The order gets added to the cart.
Click the
 Cart icon at the to right corner for checkout.
Verify the details in the Product Orders screen.
Click Proceed button to move to the Shipping/Billing Details screen.
The system auto populates the shipping and billing details based on the configuration of the organization or site.
The user can edit the shipping and billing details as needed.
Select the Product order.
Under the Shipping Details section, enter the Ship To (Name).
Enter the Custom Ship To name.
Enter the Title.
Select the Type. The options available are Individual / Company.
Enter the Additional Email.
Under the Billing Details section, click the Same as Shipping Details checkbox to copy the information in the shipping details section into the Billing Details section.
Under the Shipping Address section, enter the shipping address.
Under the Billing Address section, click the Same as Shipping Address checkbox to copy the information in the shipping address section into the billing address section.
Click Proceed button to move to the Finish screen.
Verify the order details in the Finish screen.
Click the Upload PO button to upload a product order document.
Click Checkout button to confirm the order.
Click the
View Invoice icon to view or manage invoice and payment details.The table shows all the invoices generated including details such as Invoice ID, Organization Name, Payable On Date, Charges, Invoice amount, Payment, and Balance.
For more information, please refer the Invoices page.
-20250814-081723.png?inst-v=fc00cdc5-bdd5-43fe-995f-cbc9596ecc79)
Create Product Order
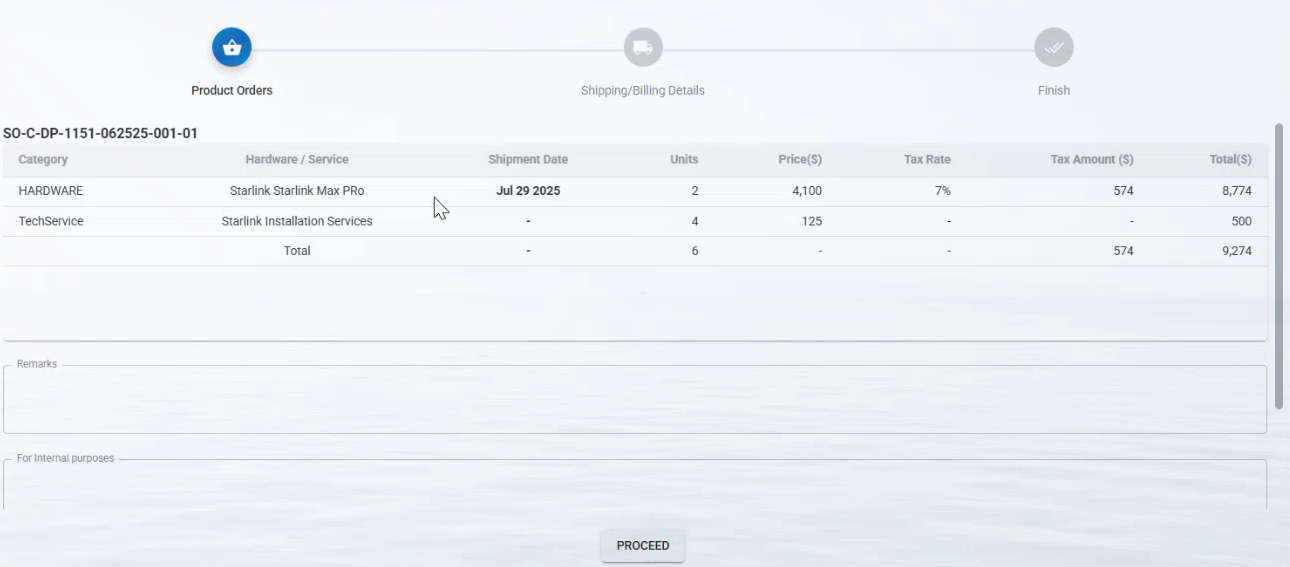
Checkout
-20250814-083004.png?inst-v=fc00cdc5-bdd5-43fe-995f-cbc9596ecc79)
Shipping/Billing Details
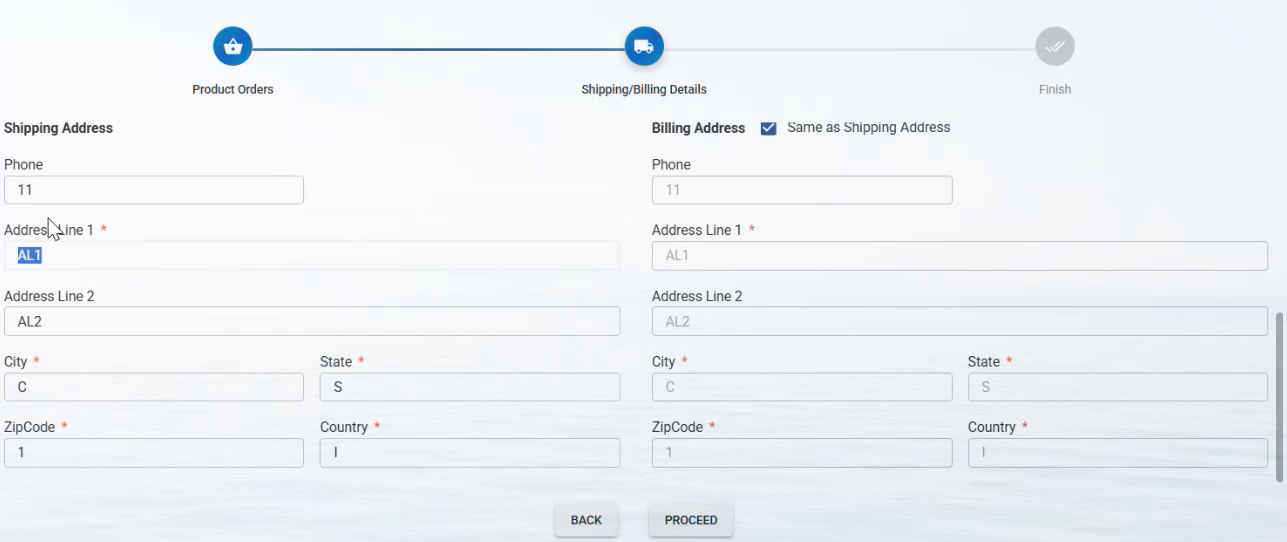
Shipping/Billing Address
-20250814-091354.png?inst-v=fc00cdc5-bdd5-43fe-995f-cbc9596ecc79)
Finish
Click the List of Product Orders button at the top right corner to view all the Product orders created in the system for the selected organization.
-20250814-091808.png?inst-v=fc00cdc5-bdd5-43fe-995f-cbc9596ecc79)
List of Product Orders
The table shows the following information:
Date - Date of product order
Organization / Site - Name of the Organization / Site
Product Order - Product Order Number
PO # - Click to view the Product Order
Invoice ID - Identification number of the Invoice
Invoice Amount - The invoice amount
State - Status of the Invoice
GENERATED – Initial state of the Invoice
SENT_FOR_PAYMENT – Once the invoice is APPROVED and sent to the customer
PARTIAL_PAID – Some partial payment has been received on the Invoice
PAYMENT_DONE – Full Payment has been received on the Invoice
Click the Organization field to change the organization.
Click the Filter On button to filter the table based on Product order number / Invoice number.