
VPN
VPN allows the EdgeOS System to route VPN access networks to a VPN Server; this is most utilized between EdgeOS Systems. The configuration involves the following steps.
· Creation of the VPN Client profile. The user needs to provide an Alias name for the Client and Access Network/subnet which is allowed from the client. Once the New client is created the Client configuration can be downloaded.
· Downloading of the client configuration from the server and applying the configuration by clicking the “New Connection” on the VPN Client end point.
· Configuring VPN on an Access Network, for details see section Figure Configuring VPN.
Note: The above steps just create the VPN tunnel between the end points. To route the Access Network traffic through the VPN, edit the Access Network configuration to pick the configured VPN end point to route. See Table Connected Network Information.
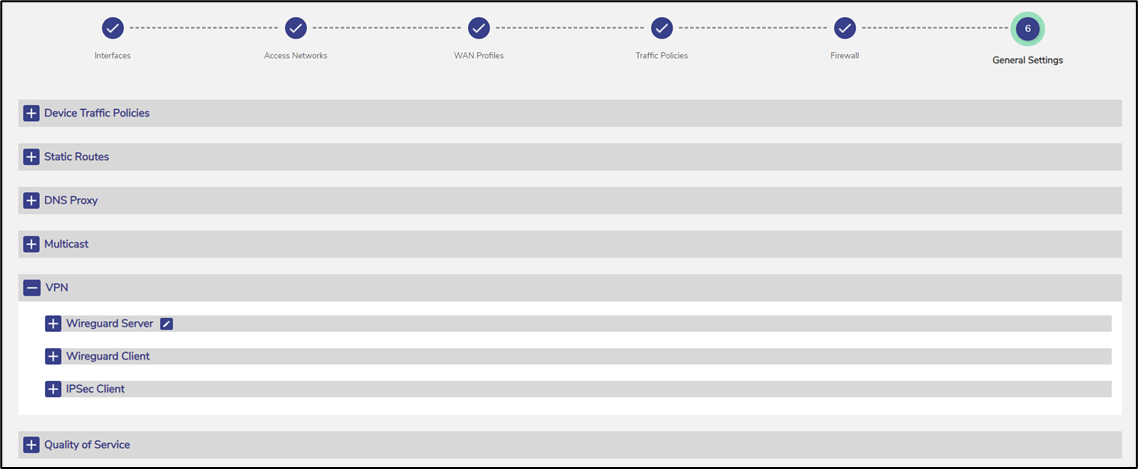
To access the VPN section, perform the following steps.
Steps
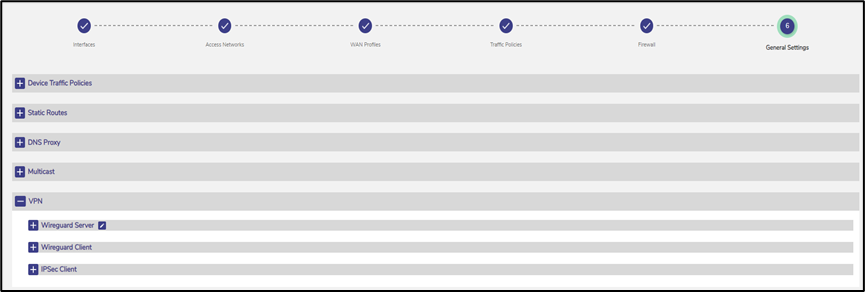
· Click Next on the Firewall page or click General Settings. The General Settings page appears.
· Click + VPN. The VPN section becomes available, see Figure VPN Settings.
· This section has three sub sections – Wireguard Server, Wireguard Client and IPSec Client.
VPN Settings
VPN server needs the Public IP Address and the Listening Port to be configured. The Public IP Address must be fetched from the Internet gateway where the EdgeOS System is connected, and the port forwarding must be enabled on the gateway as well.
Wireguard VPN Server Settings
To do Wireguard VPN Server settings, perform the following steps.
Steps
· Click Pencil icon next to Wireguard Server. Pop-up as seen Figure Wireguard VPN Server Settings in appears.
· Enter the Public IP Address or the Hostname of the Server.
· Enter the Port for the VPN server.
· Click Save.
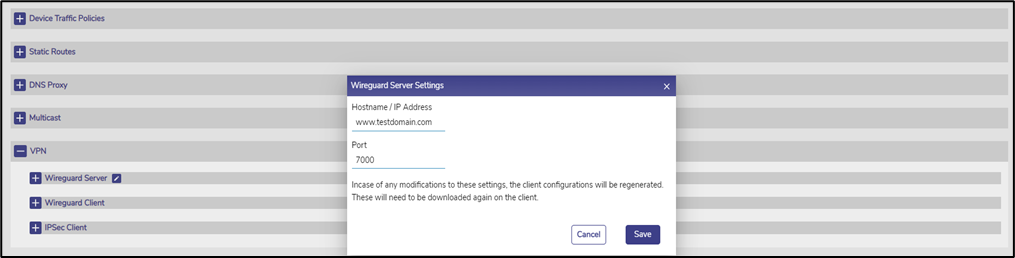
Wireguard VPN Server Settings
Adding a new Wireguard VPN Client
To add a new Wireguard VPN client, perform the following steps.
Steps
· Click the + Wireguard Server section.
· If a Client Configuration were built, the user will see a list of Wireguard VPN client profiles as shown in the below figure:

Wireguard VPN Server
· Click + New Client button on the top right, see Figure Wireguard VPN Server. Add New Client Pop-up appears, see Figure Add New Client Pop-up.
· Enter Client Alias Name, i.e., a name for the new client.
· Enter the Subnet(s) for the new client. The user can enter one or more subnets, which are comma separated but without spaces. Onboard networks should be used for this purpose.
· Click Save.
· The client details appear in the table listing the currently configured clients, see Figure Wireguard VPN Server with each row having details of the Client Name, Creation Timestamp, Subnet(s), and Status.
· The user can click on Download icon to download the Connection File of each client.
· The user can click on to Delete icon delete client.
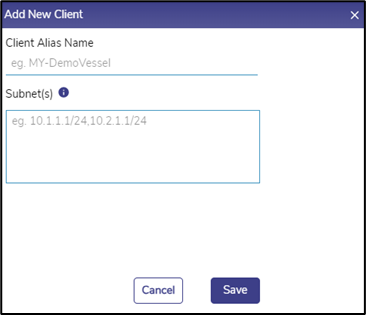
Add New Client Pop-up
Adding a new Wireguard VPN Connection
To add New Connection, perform the following steps.
Steps
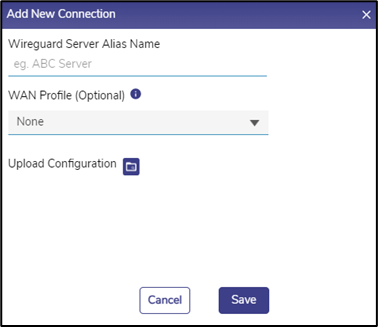
· Click the + Wireguard Client section.
· Click + New Connection button on the top right, see Figure Wireguard VPN Client Section.
· The Add New Connection Pop-up appears. see Figure Add New Connection.
· Enter the Wireguard Server Alias Name, i.e., a client connection name.
· Select a WAN Profile to apply this connection to. Note that the selected WAN profile should not have any bonded set.
· Click the Upload Configuration folder icon to upload the Connection File obtained
from the server.
· Click Save.
· The configured client connection details appear in the table listing the currently configured client connection table, see Wireguard Client Section with each row having details of the Server Connection Name, Creation Timestamp, Subnet(s), Hostname/IP Address, Port, Server Public Key, WAN Profile and Status.
· The user can click on Pencil icon to edit the client connection. Only Connection Name and WAN Profile are editable, see Figure Edit Client Connection. Click on Green tick icon to save the changes or X icon to discard them.
· The user can click on Delete icon to delete client connection.
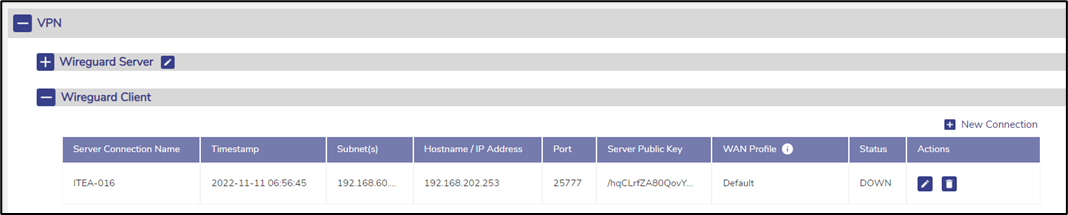
Wireguard VPN Client Section
Add New Connection

Edit Client Connection
IPSec VPN
The IPSec VPN feature allows the creation of VPN tunnels between an EdgeServer and an IPSec VPN server – with the EdgeServer being a VPN Client (Remote Site) and another being an IPsec VPN Server (Operations Center).
The following section will define the primary sequential steps to configure the EdgeServer device as an IPSec VPN Client.
Configure IPSec VPN Client
An EdgeServer IPSec VPN Client service can have multiple VPN Clients configured. Thus, for example, an EdgeServer can have a unique IPSec VPN tunnel for each Access network on the EdgeServer.
In any case, each EdgeServer IPSec Client must be configured using the IPSec VPN client profile downloaded from an IPSec VPN Server.
To access the configuration of the EdgeServer as a IPSec VPN Client, follow the below steps:
· Login to the Remote (IPSec VPN Client) EdgeServer.
· Click Menu -> Configuration Wizard.
· Select General Settings.
General Settings
· Click on the + VPN section.
· Expand + IPSec Client.
· The client configuration opens with the following screen.
If a IPSec VPN Server was configured, they will be listed here.
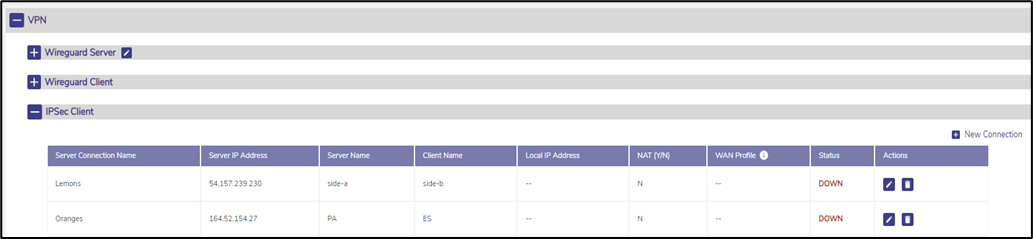
IPSec VPN Client
Add IPSec VPN Server Configuration to Remote EdgeServer
To create a new IPSec VPN server connection,
· Click + New Connection in the upper right of this section.
· The following dialog box opens.
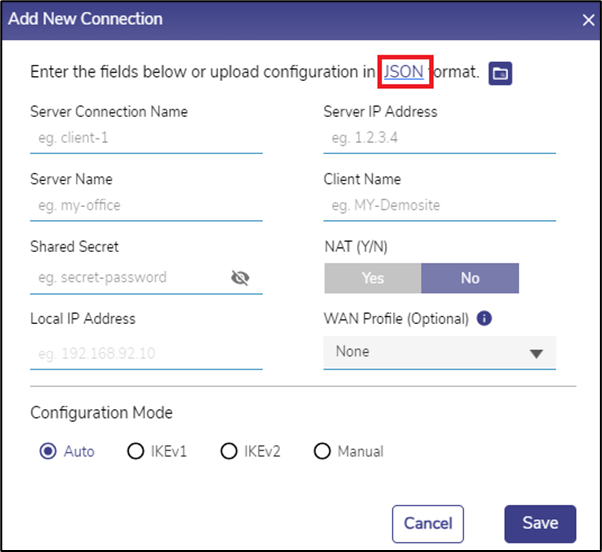
Add New Connection
· Enter the Server Connection Name. It will be used to refer to this connection in the rest of the user interface. It must be unique among all VPN connections configured in the system (IPSEC & Wireguard).
· Enter the Server IP Address. It is the IP address of the IPSec Server that this connection will connect to. Do note that unlike a Wireguard VPN, there can only be a maximum of one IPSec VPN Connection to any given Server IP.
· Enter the Server Name & Client Name. These are the identifiers to be used by the Server and this client to mutually authenticate each other.
· Enter the Shared Secret. It is a password shared between the server & client.
· If the client will be assigned a single IP address, then select Yes for NAT, and enter that IP address in the Local IP Address field – If not, select No for NAT.
· If the NAT field is selected as No, the Local IP Address field will be disabled.
· Select a WAN Profile from the dropdown menu for this connection. This field is optional.
· The user can also create a new connection by entering the required details in a Sample JSON file and uploading it.
· Click the JSON button to download the Sample JSON file.

Sample JSON File
· Enter the required details in the sample file and save it.
· Click the Upload Configuration Folder icon to select and upload the sample file with the required details. All the required fields will be taken from the sample file and auto populated in the dialog box.
· The Configuration Mode controls the details of the IPsec configuration. By default, Auto is chosen, which causes the client to try auto-negotiation of security algorithms with the server – it will set itself to use IKE version 2 and propose a reasonable subset of algorithms that it supports.
· If that does not work, a more advanced configuration is required. The actual protocol and algorithms must then be known by the user. If the user knows that the server requires IKE version 1, then choose IKEv1. The following options then appear.
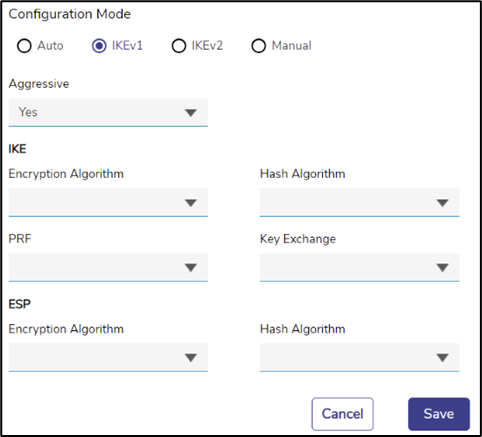
IKEv1 Mode
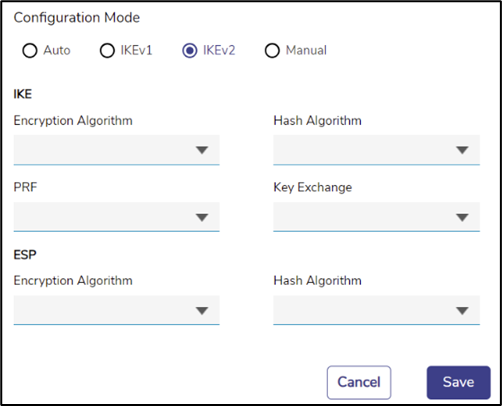
IKEv2 Mode
· For IKEv1, the user must specify if the server requires the Aggressive Mode, or will it use the Main Mode. Specify it by selecting Yes/No in the Aggressive dropdown.
· The user must then enter the details of the algorithms to be used for the IKE Phase (also called ‘Phase 1’) and ESP (also called ‘Phase 2’). Select the correct algorithms from the drop downs. Note that the PRF drop down allows a None option.
· If the server requires IKE version 2, select IKEv2. The configuration workflow for that is similar to that of IKEv1, except that there is no Aggressive/Main mode distinction.
· If none of the above Configuration Mode works, there is an option for a Manual mode of configuration, wherein a configuration file snippet (consisting of ‘<whitespace> <name> ‘=’ <value> entries in the StrongSWAN ‘ipsec.conf’ configuration file format) may be specified. Choose Manual mode to do it.
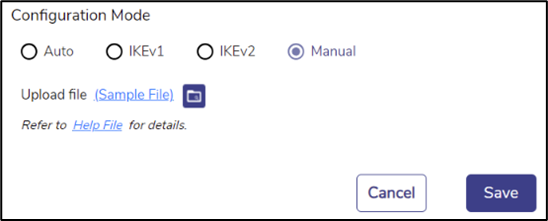
Manual Mode
· Click Sample File to download the sample file.
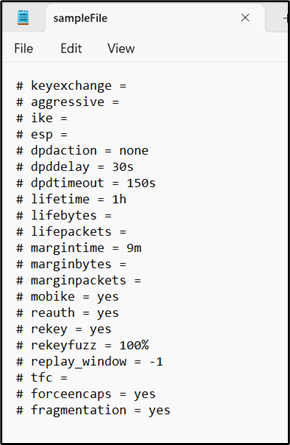
Sample File
· Enter the required details in the sample file and save it.
· Click the Upload Configuration Folder icon to select and upload the sample file with the required details.
· Click Save to create the VPN connection.