
1 VX100 - EdgeServer Virtual/Extendable
In network management, a Carrier Hub typically refers to a central component involved in the Policy Administration and Control (PAC) system. This term is often associated with frameworks or architectures where policies are used to manage and enforce network behaviors, security, and operations. It offers all the SD-WAN and security services of the EdgeServer, operating in a virtual environment. The product comes with a QCOW2 image for QEMU-based hosts and a VM XML definition file for setup. It supports multiple WAN and LAN interfaces and is managed via the Kognitive Cloud. VX100 is tailored for flexible and scalable network management, adapting to different virtual environments, and is designed to be used in high demand locations that require additional processing power and capacity.
2 Pre-requisites
2.1 Customer Deliverables
The following deliverables are given to the customer prior to installation:
QCOW2 image - This is a clean, unregistered VM disk image for QEMU-based hosts, such as KVM.
VM XML definition file - This is a reference definition and must be reviewed for use on a given VM host, especially for the interface mappings and the disk image name. Please refer to the attached VM XML definition file.
vx-blank-reference-definition.xml
2.2 System Requirements
The VX Virtual Edge is designed to run in the QEMU virtual environment, with KVM and libvirt. It is tested and validated using Ubuntu 22.04 LTS (either server or desktop versions) on Intel gen 6 CPUs or later.
Equivalent AMD CPUs should also work - the QEMU virtualization layer supports both.
2.3 Virtualization Basics
Users should be familiar with the general usage of KVM and virsh (libvirt command line). The following links are excellent resources on installing and using KVM/virsh.
Ubuntu documentation on libvirt and virsh
Tutorial for installing KVM/QEMU/libvirt on Ubuntu 22.04
The installation tutorial is highly recommended for setting up a new Ubuntu 22.04 server install with all the tools necessary to run VX virtual machines.
If the server version of Ubuntu is used, no GUI will be available. The GUI is not required for the VX product to work, all management and VM operations can be done via shell commands. The only real benefit of the virt-manager GUI is the ability to see the VM in a live state.
QEMU and virt-manager support remote connections. It is possible to use a single desktop system to manage multiple KVM host systems.
2.4 Recommended VM Configuration
|
Parameter |
Minimum Value |
Recommended Value |
|---|---|---|
|
CPU Cores |
2 |
4 |
|
RAM |
8GB |
16GB |
|
Storage |
120GB (max size) |
120GB (max size) |
|
Network |
1 WAN, 1 LAN, 1 Management |
2 WAN, 1 LAN, 1 Management |
-
The QCOW2 image file is a sparsely-filled compressed disk image. It will expand to a maximum of 120GB over time. No other additional storage devices or volumes are required.
-
Additional WAN and LAN interfaces may be configured.
-
For WAN interfaces, the macvtap interface/driver works as intended, and a specific physical interface may be shared across multiple VM instances.
-
For LAN interfaces, these should be bridge interfaces attached to unique network bridges on the host, as the LAN services of the VM will respond to DHCP DISCOVER requests. The macvtap driver does not work reliably in this case.
3 How to Buy VX100 (Virtual Machine)
-
The user submits the Purchase Order for the required number of VX100 virtual machines.
-
Kognitive Networks evaluates the PO and fulfills it by allocating the machine to the user from a pool of pre-generated DIDs.
-
The list of VX100 virtual machines sold to the user will be available in their Kognitive Cloud application. The user can access them from their Inventory screen.
4 How to Register the VX100 to Kognitive Cloud
-
Login to Kognitive Cloud using a web browser at https://cloud.kognitive.net
-
Select Inventory from the left menu bar.
-
Click on the Warehouse tab to see a list of devices available for registration.
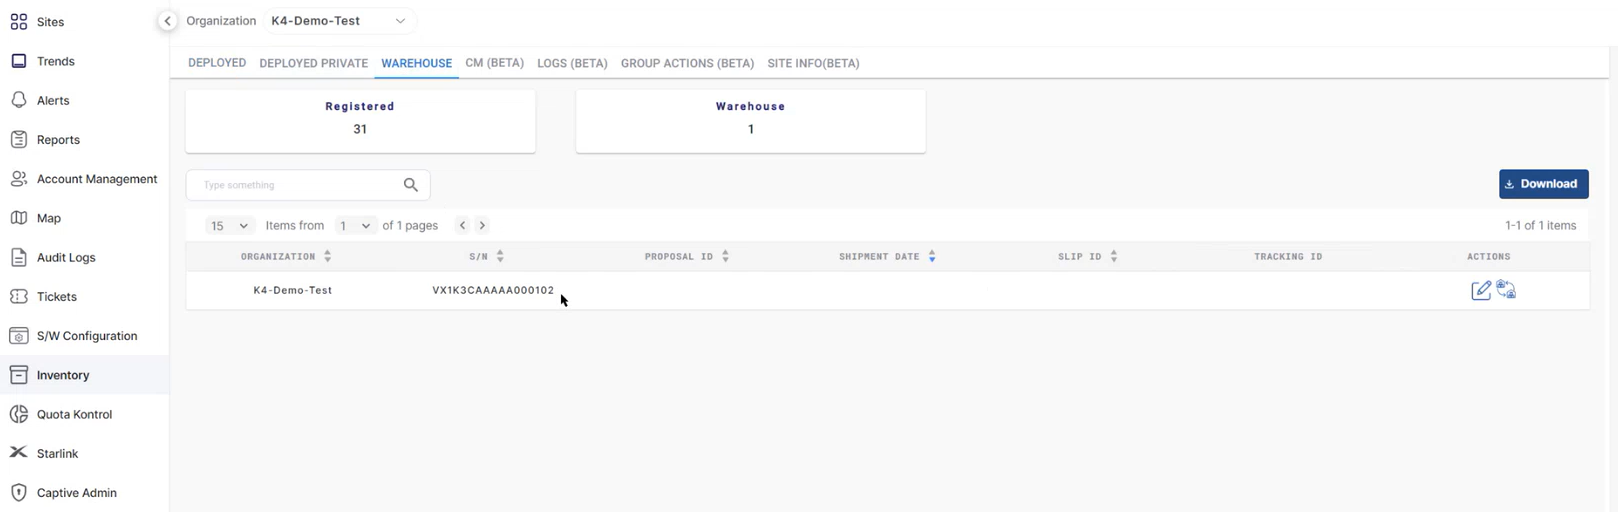
-
Search for the Serial number of the device to be registered and select Register button.
-
The Register Inventory dialog box opens.
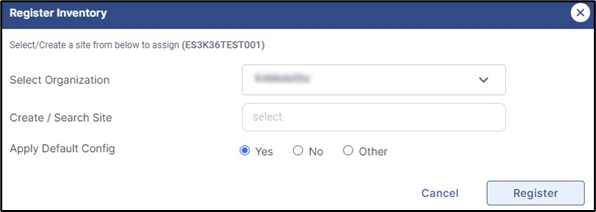
-
Select the Organization and Site Name.
-
To add a new site, enter the site name and select Add “New site name”.
-
-
Select the Yes radio button to apply the Golden Configuration.
-
Click Register button to assign the device to the site.
-
Once Assigned, the device will be moved from the Warehouse to the Deployed Tab.
-
After the registration is complete, the table in the Deployed Tab displays the Site Name, Device Type, Serial Number, Registration Date, Organization, etc.
5 Install VX100
-
Once the VX product is purchased, a unique Device ID is assigned and the same should show up in the customer inventory (in Kognitive Cloud).
-
Before bring up of the VM, please make sure the VX Device ID is associated to a site - Refer section 3 How to Register the VX100 to Kognitive Cloud or “How To: Register a Device” from the How To/ Guides section.
-
Download the QCOW2 image from the Kognitive Cloud / Sharepoint.
-
Create a copy of the QCOW2 image on the host, this will become the storage for the new VM - it is recommended to name the copy with the Device ID so that it can be identified easily.
-
Copy and edit the XML definition file to use the new image - again the Device ID is a good way to uniquely identify this XML definition. The XML must be edited with the VM name and path, as well as the logical names of the physical network interfaces. Each section that must be edited is marked with a comment and instructions after the text: ‘CHANGE’.
-
Use the XML to define a new VM in the host with
virsh define {xml file} -
A list of all defined VMs on the host, as well as their current state, can be obtained with
virsh list --all -
Start the VM with
virsh start {vm name}(to stop a VM the command isvirsh shutdown {vm name}) -
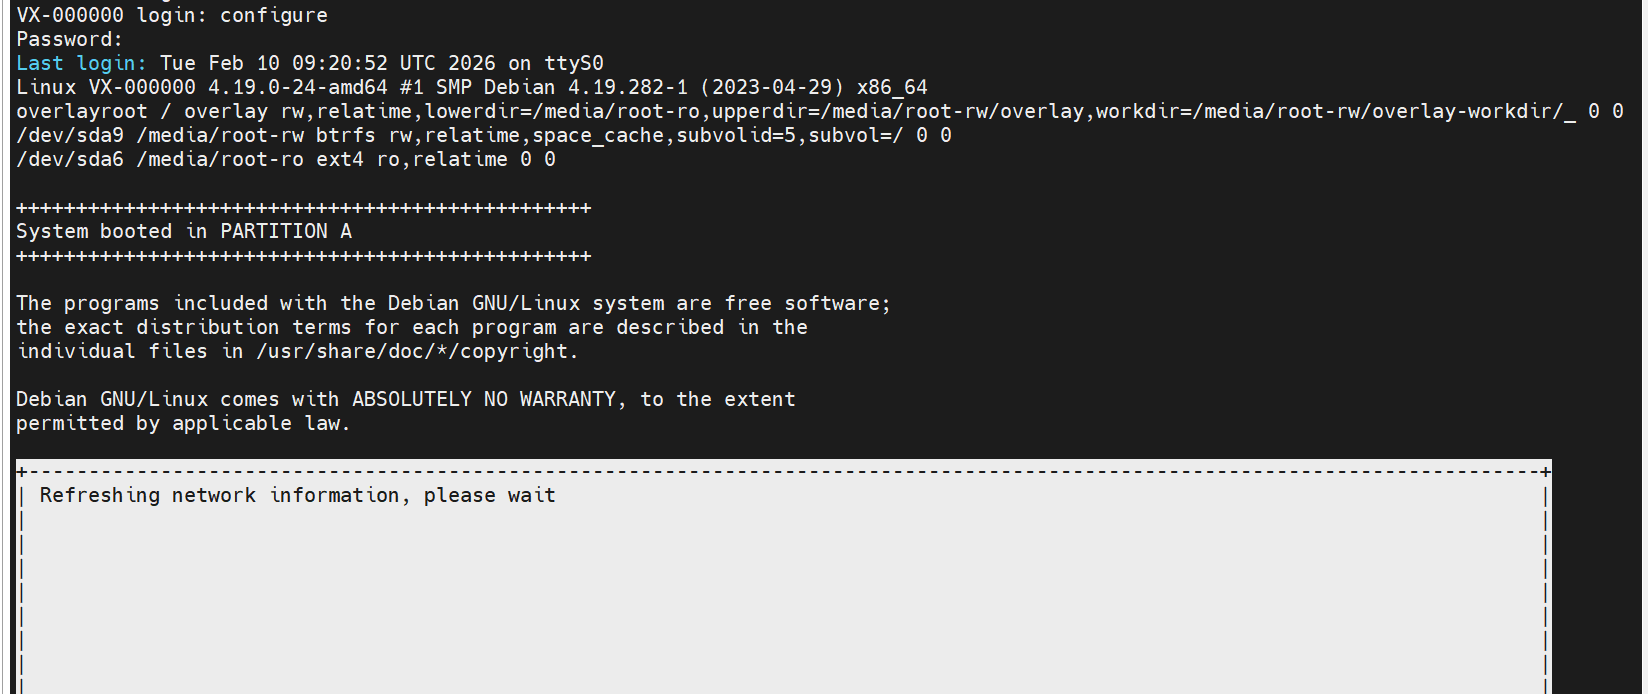
Once the VM is started, the VM needs to be personalized to bring it online and functional. This may be done using the virt-manager UI and opening the graphical console, or by opening a serial console on the VM (using
virsh console {vm name}) It may take 30-60 seconds for the VM to fully boot to where the serial console will respond. -
To disconnect the console, use ^] - control key and ]. It is good practice to log out from the VM first, since disconnecting does not automatically do so.
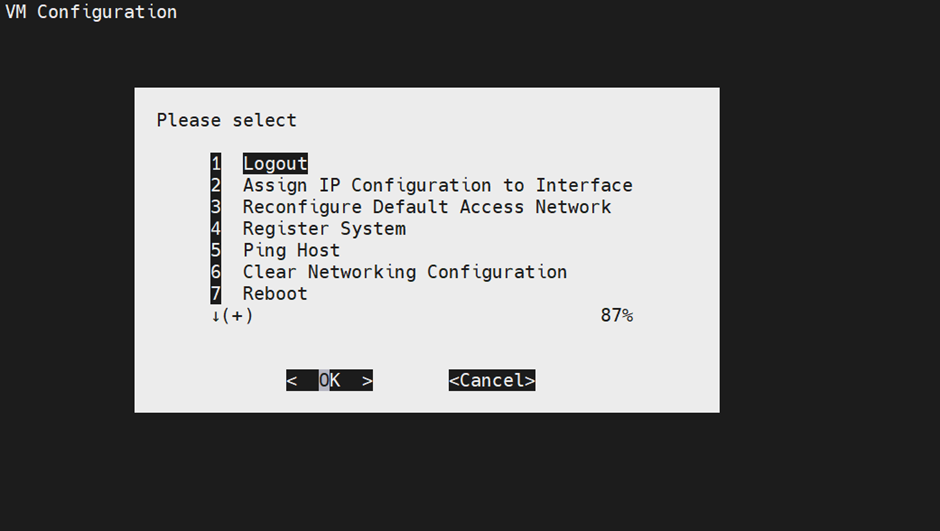
5.1 VM Personalization
All these steps must be done from the VM console.
-
The credentials are configure/configure.
Note:
-
The registration/personalization steps require internet access, hence make sure after the network IP configuration the internet is reachable. There is a ping command in the console for testing purposes.
-
After each of these above steps, the system may automatically reboot.
-
Below screen will slightly change depending if the network interfaces are assigned.
-
Interfaces can’t be changed once the VM has been provisioned. Any interface configuration change requires a reset of the complete network configuration and going thru the personalization step again.
-
Instances are unique and cannot be cloned. A new copy of the downloaded QCOW2 should be made for each instance, and the definition/provisioning/registration process used. Cloning a VM that is already provisioned will result in both instances being disabled.
-
After login, the user will be presented with the following screens.
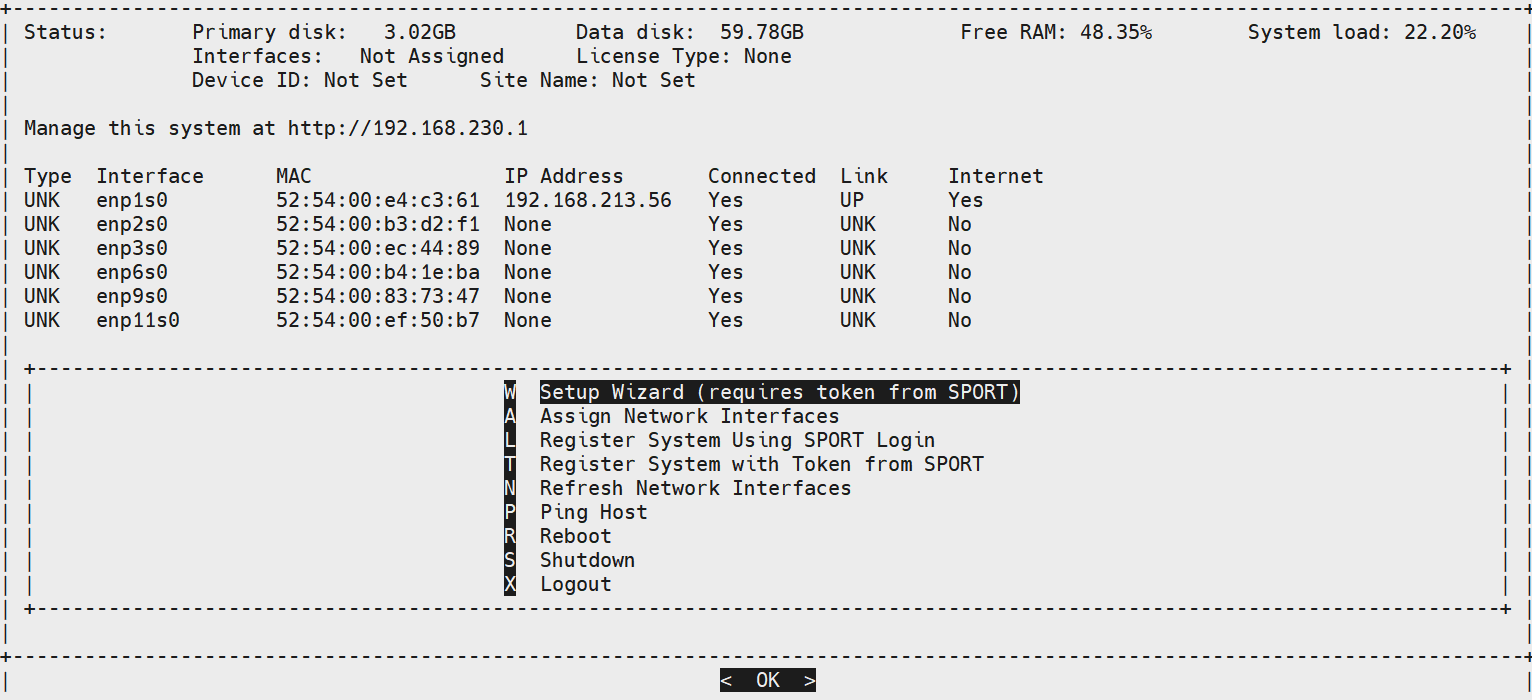
VM Personalization can be done in two ways:
-
Through Setup Wizard (or)
-
Manually Assign Network Interfaces and Register the system
5.1.1 Method 1 - Using Setup Wizard
-
Click the Setup Wizard option.
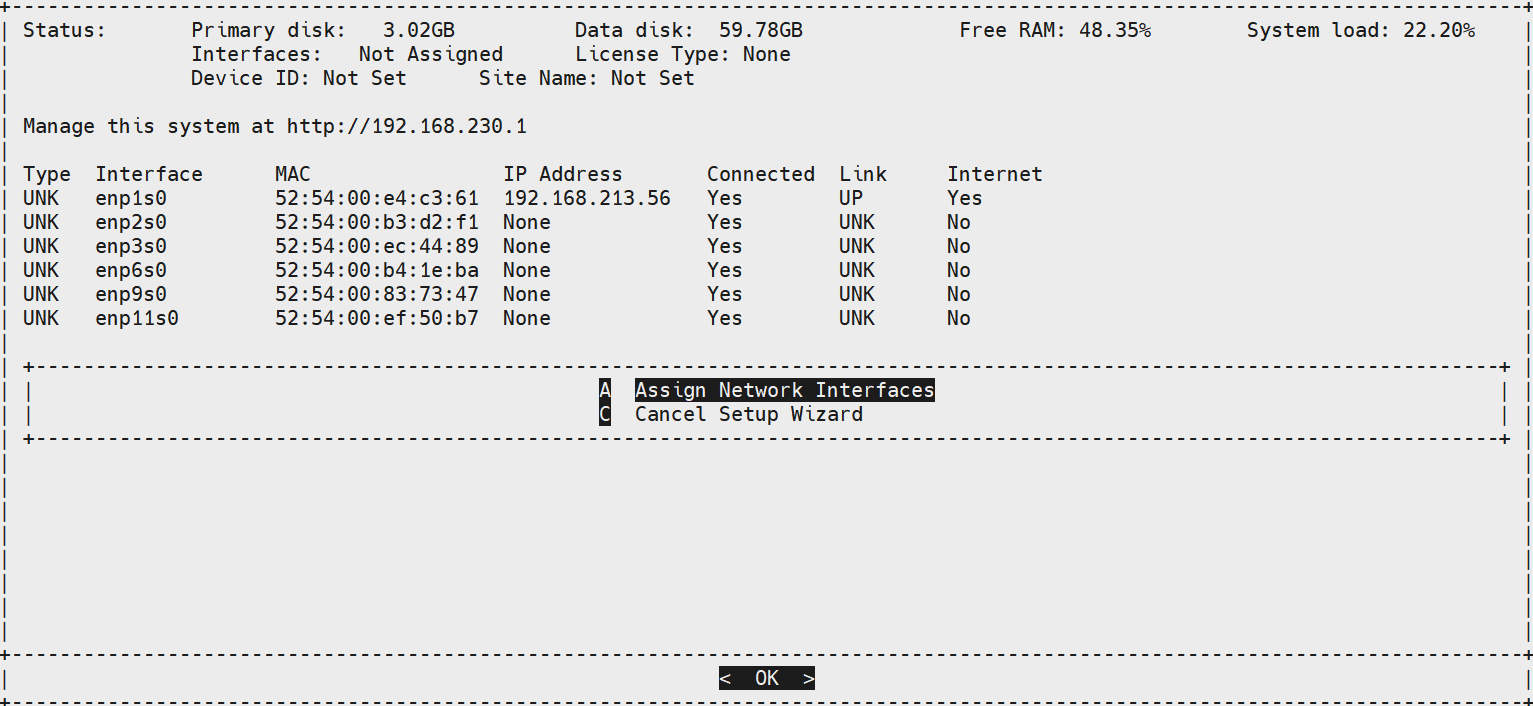
-
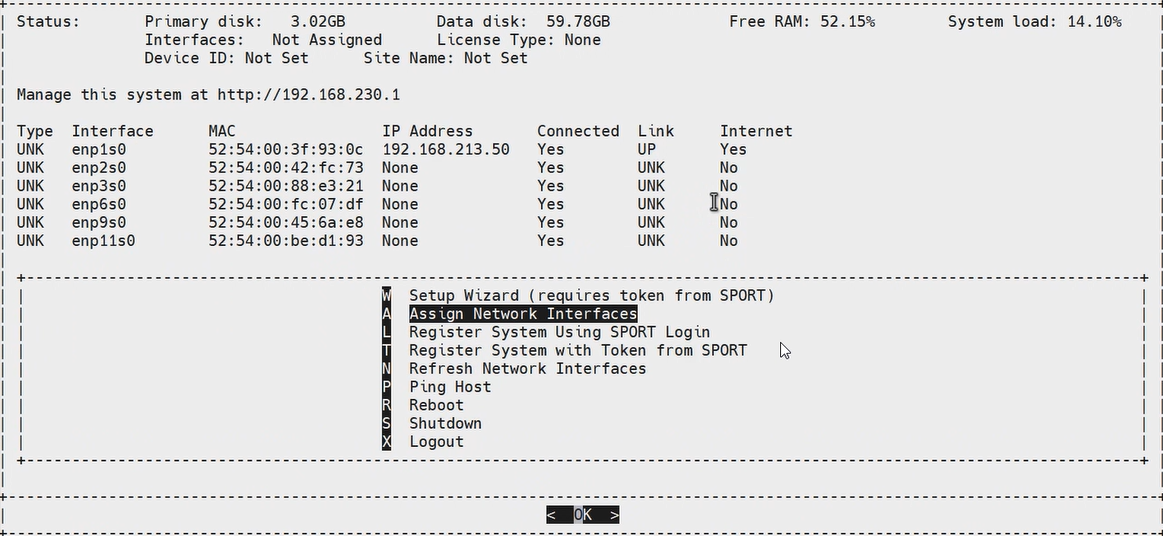
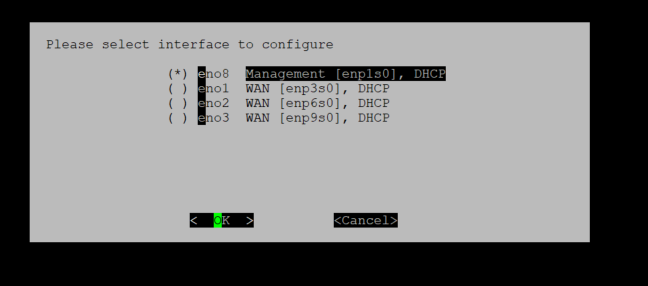
Select the Assign Network Interfaces option.
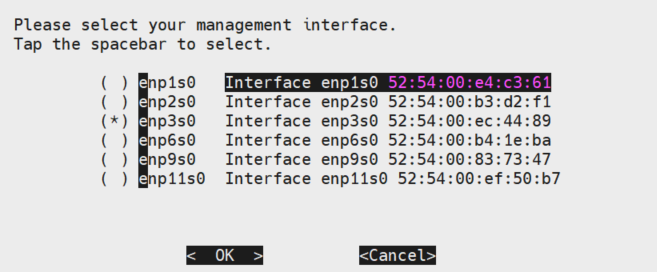
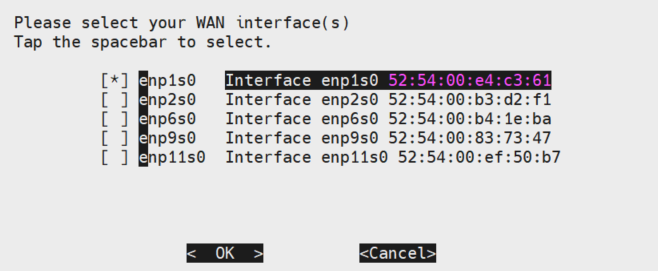
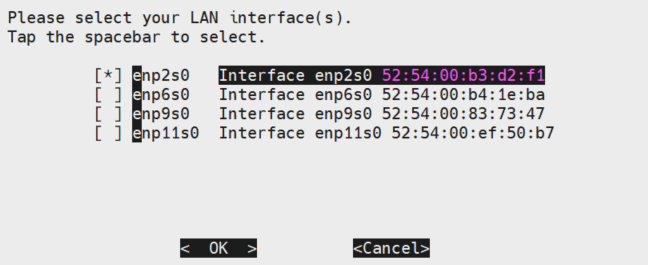
-
Select the Management Interface, WAN Interfaces and LAN Interfaces in successive screens.
-
There can be only one management interface selected. Multiple WAN and LAN interfaces may be configured.
-
After selecting the WAN, LAN Interfaces, the user can edit the Interface labels in the following screen.
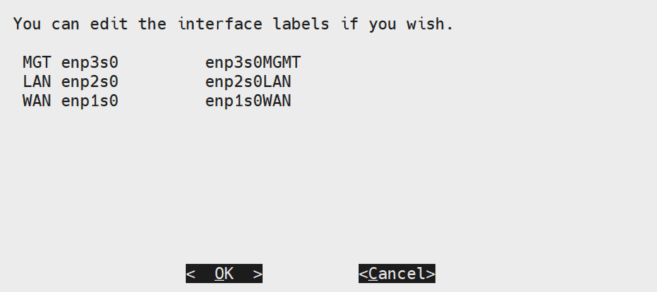
-
The exceptions for editing the Interface labels are shown below.
-
There should not be any duplicate labels.
-
No whitespace in the label.
-
Only alphanumeric characters can be used.
-

-
Update the Interface labels if needed and select OK to save the changes.
-
After updating, the labels will be listed.
-
The next step in the Setup Wizard is to complete the registration. In the next screen, select Token Validation.
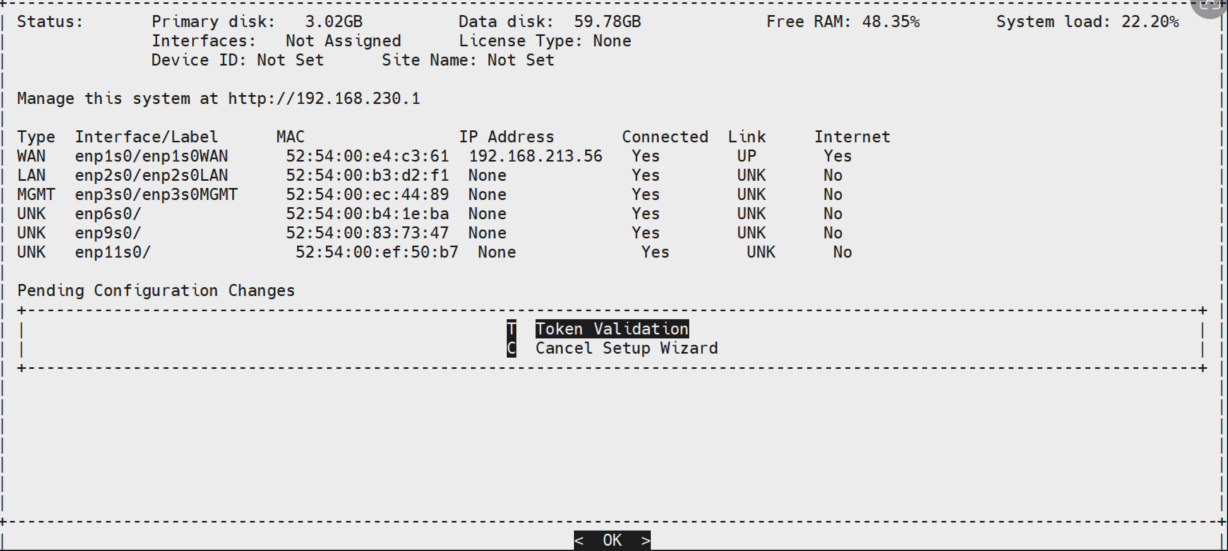
5.1.1.1 Token Validation
-
The Registration Token should be taken from Kognitive Cloud.
-
Login to Kognitive Cloud with valid credentials.
-
Select the required site from the Sites screen that houses the VX device.
-
The VX device will be listed under the Device Details section.
-
Select the

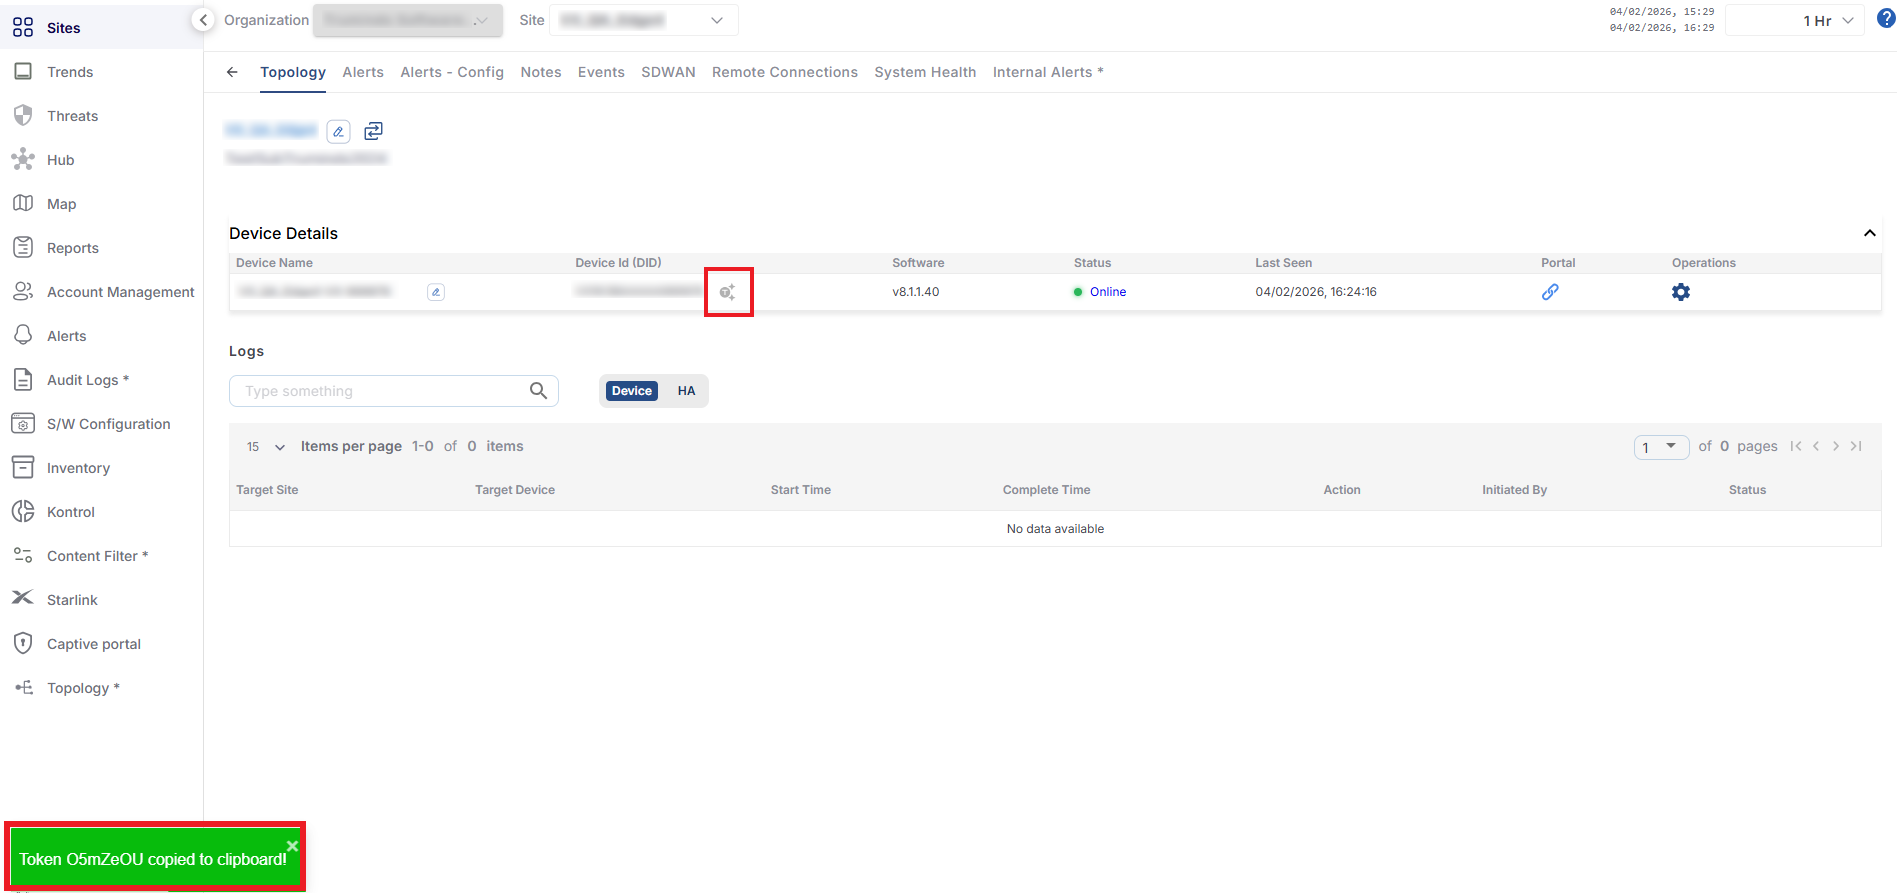
-
The Token will be generated and shown at the bottom left corner of the screen. It will also be copied to the clipboard.
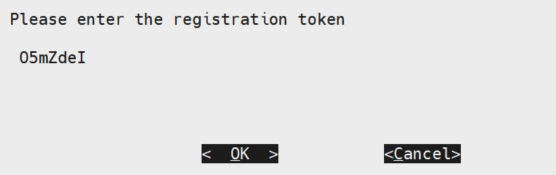
-
Move to the Setup Wizard and enter the Registration Token generated from Kognitive Cloud.
-
Click OK.
-
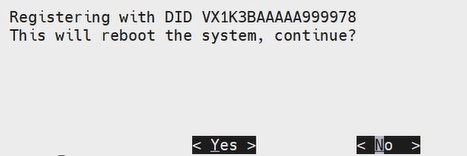
The DID of the corresponding device will be shown to the user. Click OK.
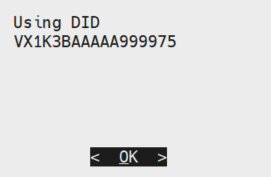
-
Click Yes to confirm.
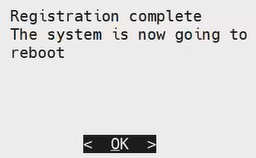
-
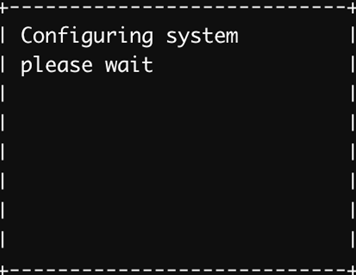
The following message is shown to the user after completing the registration - “System will be available in Konnect in approximately 10-15 minutes”. This indicates that the system is in the process of initializing.

-
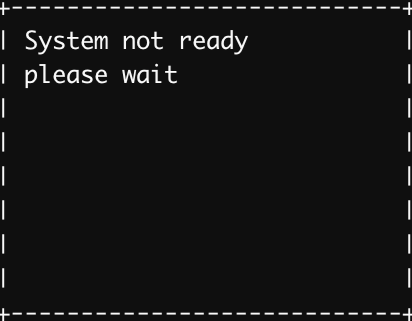
During this initialization period, the console may prompt the user to log in multiple times. Enter the login credentials to login to the system. The user may see the following screens in this time as the system is still initializing. This behavior is expected and does not indicate an error.
-
The system will become fully accessible once initialization is complete.
5.1.2 Method 2 - Manually Assign Network Interfaces
-
Instead of using the Setup Wizard, the user can choose to manually assign the network interfaces and do the registration.
-
Select the Assign Network Interfaces option after login.
-
There can be only one management interface selected. Multiple WAN and LAN interfaces may be configured.
-
Select the Management Interface, WAN Interfaces and LAN Interfaces in successive screens.
-
Selection of the WAN interface(s) is critical to provide internet access for the subsequent personalization/registration step.
-
After this configuration is complete, there will be confirmation needed to reboot the system to make this configuration. Wait for few minutes for the VM to reboot and connect to console again to proceed further.
-
After selecting the WAN, LAN Interfaces, the user can edit the Interface labels in the following screen.
-
The exceptions for editing the Interface labels are shown below.
-
There should not be any duplicate labels.
-
No whitespace in the label.
-
Only alphanumeric characters can be used.
-
-
Update the Interface labels if needed and select OK to save the changes.
-
After updating, the labels will be listed.
-
Click Yes to confirm rebooting the system and apply the changes done.

5.1.2.1 Register the System
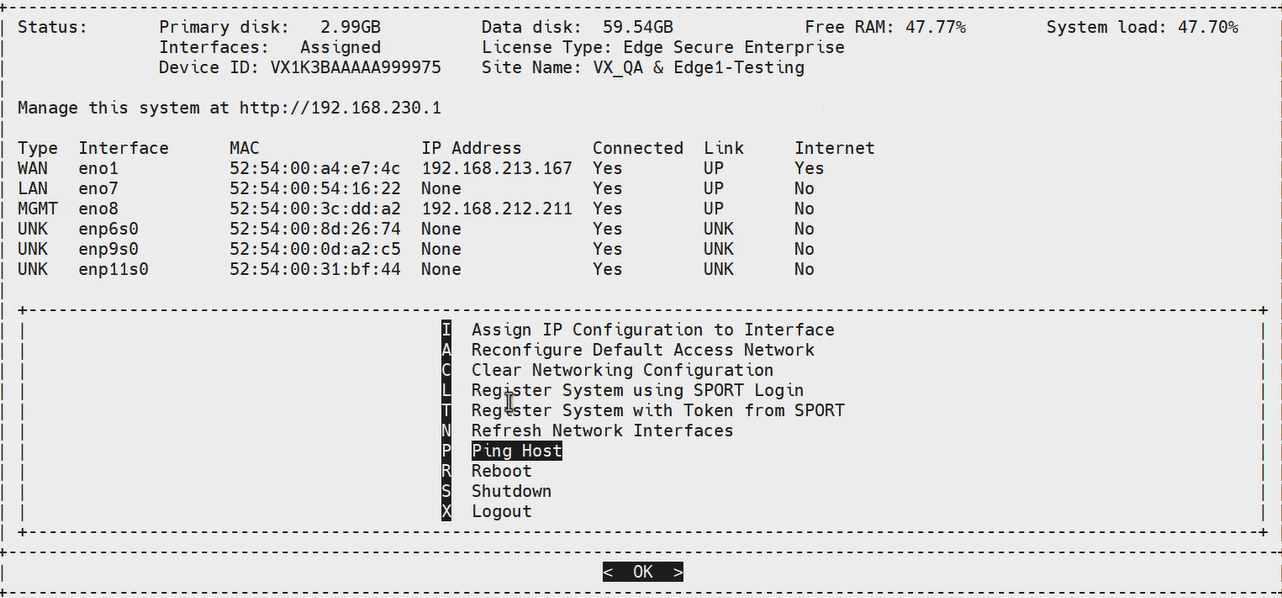
After assigning the Interfaces, the system will be rebooted. Before proceeding to register the system, it is suggested to do a ping test and proceed with registration when the ping is successful.
-
Select the Ping Host option.
-
Enter the Target as 8.8.8.8
-20260225-140447.png?cb=41027ea157e54c37b2030ea6ff480d5f)
-
If the Ping is successful, the below ping results will be shown to the user.
-20260225-140551.png?cb=4842458eb086aafea071da5db157eb00)
-
Proceed with registering the system if the ping is successful.
-
If the ping is not successful, the user might have to look at the interface assignment and make sure the WAN interface is configured correctly.
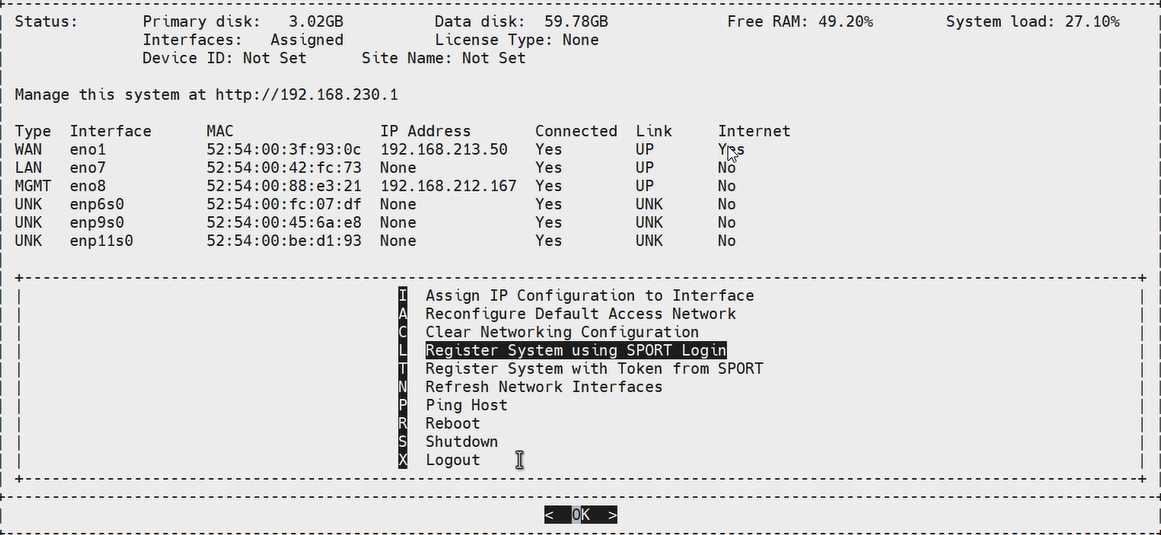
Next step in the process is registering the system. The registration of the system can be done in two methods:
-
Using SPORT Login
-
With Token from SPORT
Register System Using SPORT Login - Association of DID/License to VX100
-
During this step, user must provide login details for the (Kognitive Cloud Login). Based on the provided login, the console will list all the VM devices registered and the user must choose a specific Site/DeviceName/DeviceID which is then assigned/allocated for this specific VM instance.
-
Click the Register System using SPORT Login option.
-
Make sure the system has internet by running ping before proceeding with this option.
-
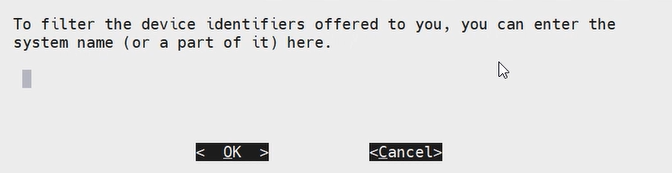
For the registering / personalizing the system, enter the Kognitive Cloud login/password details.
-
Once the login is successful/validated, the user can see the list of Sites/Devices registered.
-
User can pick the Site name / device name which can be assigned to this VM.
-
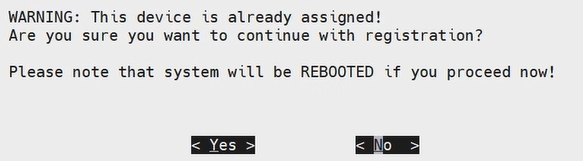
If the site/device name is already allocated to a VM, there will be a warning given to the user to accept. This is to prevent assigning multiple VMs to the same instance of Site/Device, as doing so will result in all affected VMs being locked.


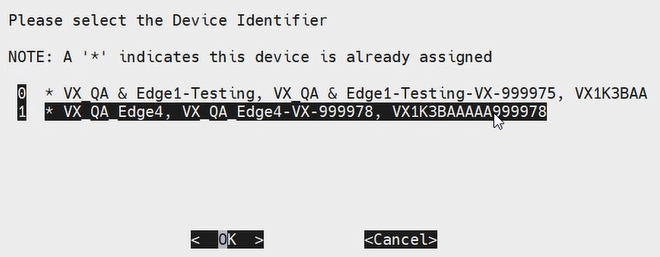
-
Select the Device ID. Note that a '*' indicates that this DID is already assigned.
-
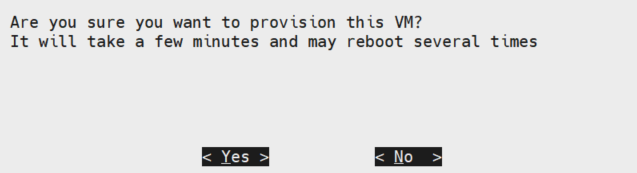
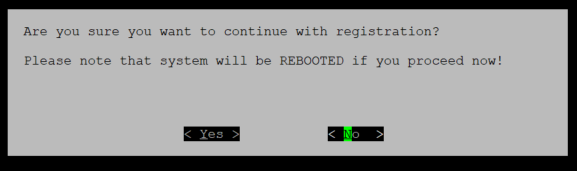
Click Yes to proceed with the registration and confirm rebooting the system.
-
As part of this registration step, the VM will go for reboot few times to bring in all the configurations and to fully become operational. Once the system is online, it can be accessible on Kognitive Cloud as any other Edge product.
-
The following message is shown to the user after completing the registration - “System will be available in Konnect in approximately 10-15 minutes”. This indicates that the system is in the process of initializing.
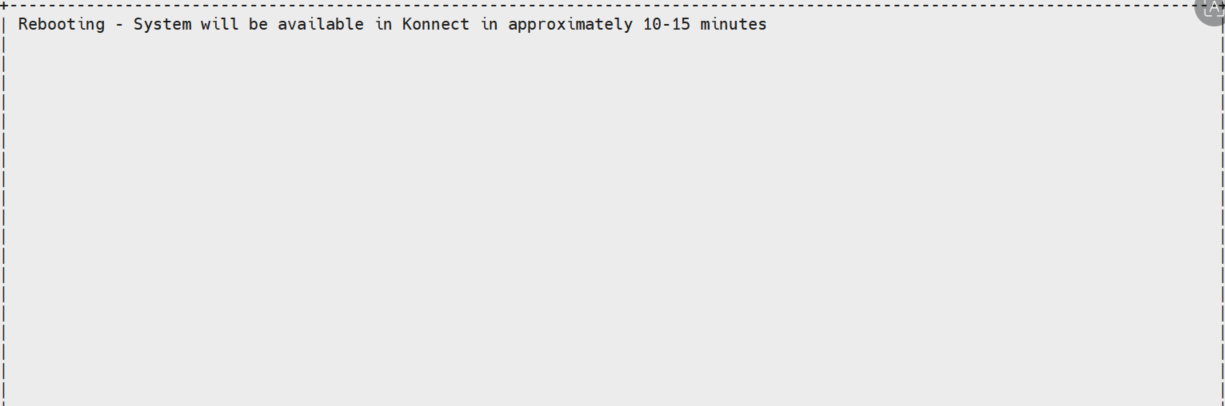
-
During this initialization period, the console may prompt the user to log in multiple times. Enter the login credentials to login to the system. The user may see the following screens in this time as the system is still initializing. This behavior is expected and does not indicate an error.
-
The system will become fully accessible once initialization is complete.
Register System with Token from SPORT
-
Click the Register System with token from SPORT option.
-
Enter the Registration Token generated from Kognitive Cloud. Click OK.
-
The DID of the corresponding device will be shown to the user. Click Yes.
-
Click Yes to confirm.
-
The following message is shown to the user after completing the registration - “System will be available in Konnect in approximately 10-15 minutes”. This indicates that the system is in the process of initializing.
-
During this initialization period, the console may prompt the user to log in multiple times. Enter the login credentials to login to the system. The user may see the following screens in this time as the system is still initializing. This behavior is expected and does not indicate an error.
-
The system will become fully accessible once initialization is complete.
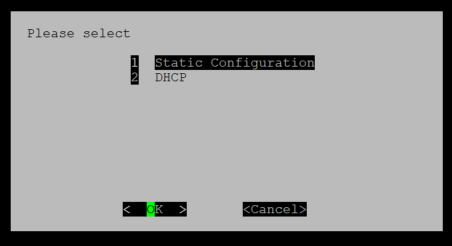
5.2 Assign Network / IP Configuration (Optional)
Network IP configuration for Management / WAN interfaces - By default they are configured as DHCP clients, this step is used to configure static IP's for these if necessary.
-
Once the network interfaces are assigned as Management, WAN, and LAN, both Management and WAN are configured as DHCP client.
-
If any of these must be configured as static IP addresses it should be done at this point.
Note: WAN interface can configured as either static/DHCP once the system is fully up using Edge portal, but the Management interface can only be configured during this step.
-
On selecting the option of “Reconfigure Default Access Network” the following screen/workflow will be executed.
-
Enter the IP Address for the Default Access Network.
-
Select OK.
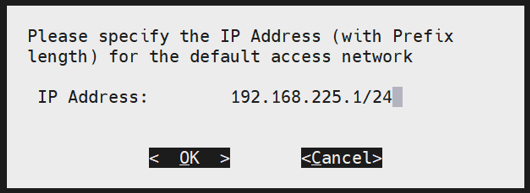
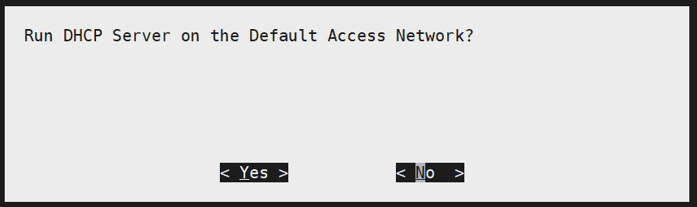
Please refer the Edge 7.1.4 Release Notes for more information about this feature.
5.3 Post Registration / Personalization
By default all the WAN interfaces are configured as Ethernet. This can be changed by logging to the Edge Portal. WAN or LAN interface type can be changed from the Edge portal as well.
-20240202-123836.png?cb=234b0deda53017683ef9fd1b38c055b3)
-20240202-123750.png?cb=d396b21926beffcd3736eee2326ecb5f)