
Service Line
Click Service Line tab from the Starlink screen to open the Service Line screen.
Once the service account is linked, all the Service Lines that are part of the Service Account are displayed under the Service Lines table in the Service Line tab.
-20251120-131210.png?inst-v=a5983b02-f917-4c6e-8a36-5bfb5e625083)
Service Line Tab
Service Line Tab Buttons
The functions of the buttons available above the Service Lines table are explained below:

Buttons and their Functions
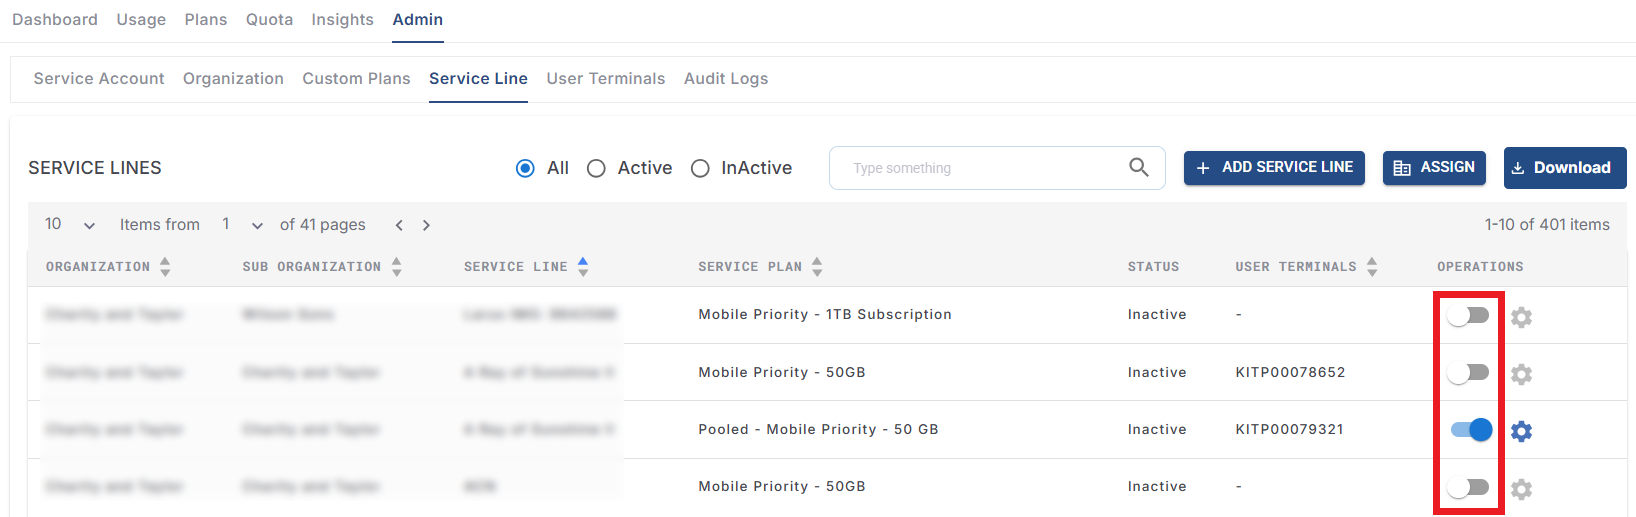
The user can filter the entries in the Service Lines table based on three categories:
Select the All radio button to view all the Service Lines in the system.
Select the Active radio button to view only the Service Lines that have an active Starlink Service Plan.
Select the InActive radio button to view only the Service Lines that have an inactive Starlink Service Plan.
The Search field can be used to search for the Service Lines based on the Organization/Sub Organization/Service Line/Service Plan/User Terminals.
Select the Assign button to assign any Service Line to a Sub-Organization.
Select the Sub-Organization from the dropdown menu.
If the user wants to create a new Sub-Organization, select + New Sub-Organization button.
Select the Parent Organization from the dropdown menu.
Enter the new Sub-Organization name.
Click Create button. The new Sub-Organization will be created.
In the Sub-Organization field, select the new Sub-Organization.
Select the Service Line from the dropdown menu.
Click Save to assign the Service Line to the Sub-Organization.

Assign
Click Download button to download the Service Lines details in CSV format.
Add Service Line
Select the Add Service Line button to add a new service line.
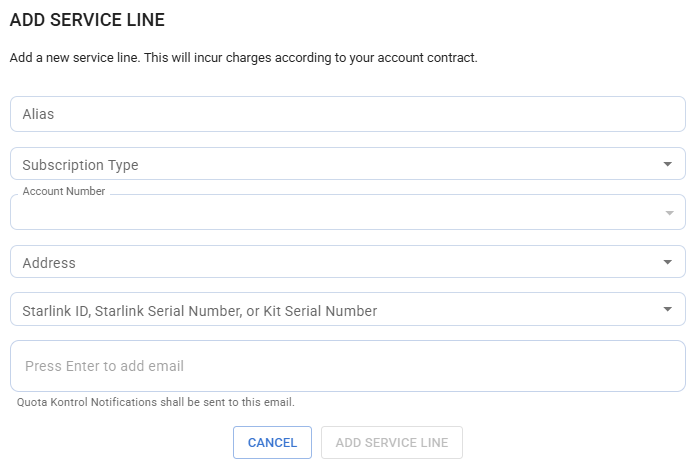
Add Service Line
Enter a Alias for the Service Line.
In the Subscription Type field, select the service plan to link with the Service Line. The dropdown menu contains both the Standard Plans created by Starlink and the Custom Plans created by the Admin.
The Account number field gets auto populated based on the Subscription Type selected.
In the Address field, select an address from the dropdown menu or select Add new address option to add a new address.
Select the Starlink ID/Starlink Serial Number/Kit Serial Number from the dropdown menu to associate them with the service line.
Enter new Starlink Ids/Starlink Serial Numbers/Kit Serial Numbers to create new Starlink User Terminals and associate them with the service line.
In the Email field, enter the email addresses to which the Quota Kontrol notifications should be sent.
Select the Add Service Line button to create the service line.
Service Lines Table
The Service Lines table lists all the service lines associated with the selected main organization. It shows the following information:
Organization – Name of the Organization
Sub Organization – Name of the Sub Organization
Service Line – Name of the Service Line
Service Plan – Name of the Service Plan linked with the Service Line
Status - Status of the Starlink Service Plan (Active / Inactive)
User Terminals – ID number of the User Terminals
Operations
The Service Lines table provides the user with four icons under the Operations column. These options are explained below:
Operations
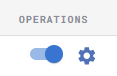
Starlink Subscription
Click the
 toggle button to enable Starlink Subscription on the corresponding Service Line.
Starlink User Terminals that use an Edge device in tandem with their Starlink device can see data from their User Terminals in the Dashboard, Usage, Admin and Analytics screens automatically. They are not charged to view their data.
Starlink User Terminals that do not have an Edge device are visible in the Terminal / Service Line accounts section of the client portal but display no data. These users will have to subscribe to the Starlink Subscription model to view data from their User Terminals.
Users have the option to selectively add a few terminals or choose to add all terminals for ease of inclusion. The users can remove/add terminals monthly. Once the terminal is added / subscribed, they will be charged for that month whether they unsubscribe later.
There are two ways in which the user can subscribe to Starlink Subscription . They are explained below:
Method 1: Add Service Lines individually
The user can click the Subscription toggle button in the Service Lines table to add the corresponding Service Line to the Starlink Subscription. The user can use this method to add the Service Lines individually.
Starlink Subscription
Method 2: Add all the Service Lines of a Service Account
Select the Admin tab from the Starlink page.
Select the Service Account tab.
Click Edit icon under the Actions column of the Service Accounts table.
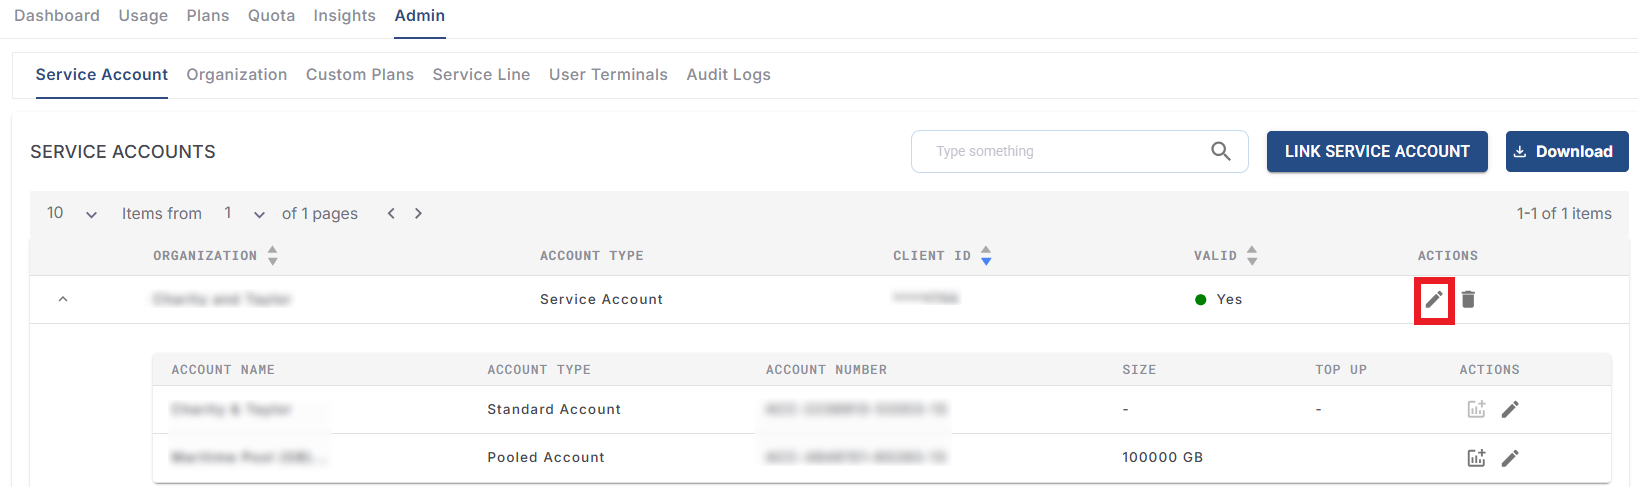
Edit Service Account
Click the Subscribe All Service Lines toggle button to add all the Service Lines associated with the Service Account to the Starlink Subscription.
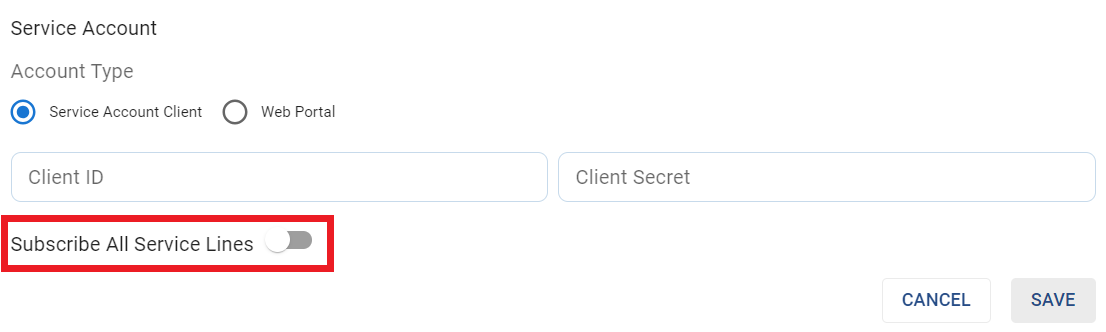
Subscribe All Service Lines
Action
Select the Actions
 icon to perform the following Service Line actions. The Operations pop up box opens.
%20(1)-20250210-143222.png?inst-v=a5983b02-f917-4c6e-8a36-5bfb5e625083)
Operations
Service Line Details
The Service Line Details option is selected by default in the side menu bar.
The right panel shows the Account Number of the selected service line, Service Line Number, Service Line Name, Home Address and Kit Serial Number.
Select the Site from the dropdown menu to assign the service line to it.
Select the Device.
Enter the Email Ids.
Change Sub Organization
Select the Change Sub Organization option from the side menu bar to change the sub organization of the Service Line.
-20250210-144132.png?inst-v=a5983b02-f917-4c6e-8a36-5bfb5e625083)
Change Sub Organization
The Current Organization of the service line is shown.
Select the New Sub-Organization from the dropdown menu.
If the user wants to create a new Sub-Organization, select the Create Sub-Organization button.
Select the Parent Organization from the dropdown menu.
Enter the new Sub-Organization name.
Click Create button. The new Sub-Organization will be created.
In the Sub-Organization field, select the required Sub-Organization.
Click Save to change the Sub-Organization.
Adding a Starlink User
After creating a new Sub-Organization, the user might want to add user accounts to that Sub-Organization. To add a new Starlink user account, follow the below steps:
Select Account Management option from the left menu bar.
The Account Management screen opens as shown in the below figure.
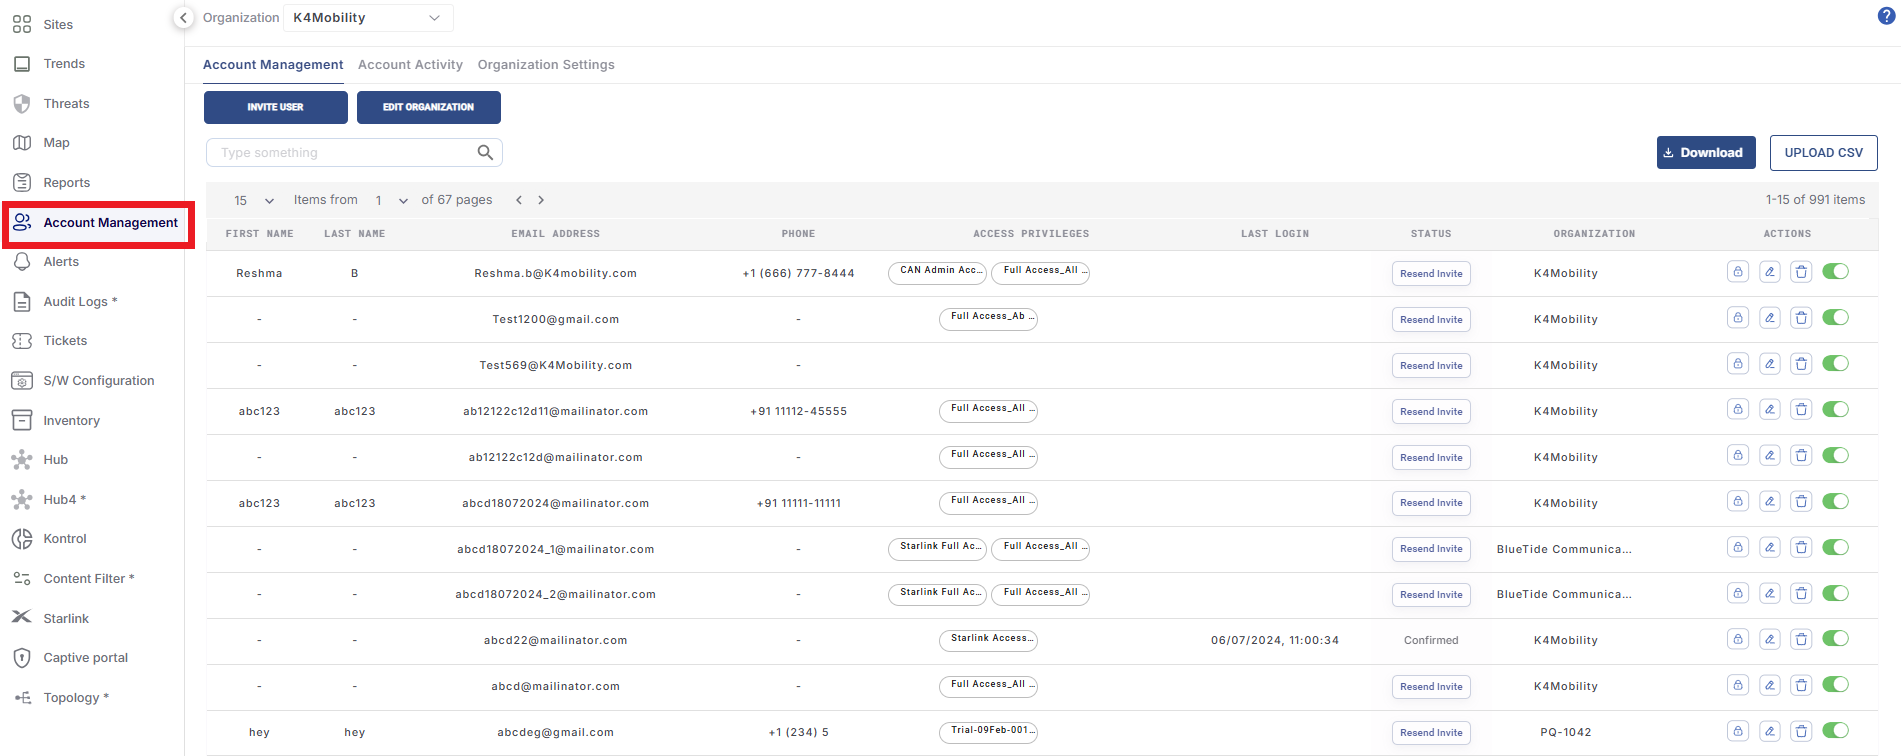
Account Management
Click Invite User button to create a new user account and invite them.
The Invite User dialog box opens.
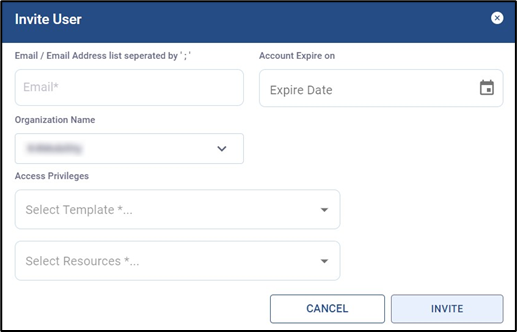
Invite User
Enter the Email Address. The admin can enter up to 30 Email IDs and create multiple accounts at once. The Email IDs should be separated by “;”.
Select the Expire date from the date picker. This is an optional field.
In the Organization Name field, select the required organization from the dropdown menu. If the Email ID of the user belongs to a new account, the selected organization becomes their Primary organization.
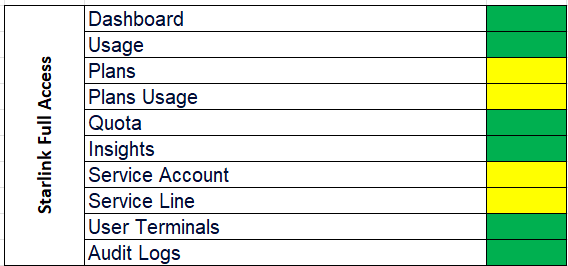
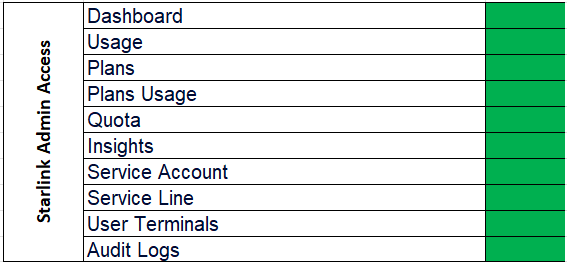
In the Select Template field, select the type of privilege that the user requires. The types of Access Privilege that can be selected for Starlink users are Starlink Access, Starlink Full Access and Starlink Admin Access.
If the Admin selects Starlink Access, the user will be able to access only the Dashboard, Usage and Insights tabs of the Starlink screen. They will not have access to the Plan creation, Plan usage, Quota and Admin operations.
If the Admin selects Starlink Full Access, the user will be able to access the Dashboard, Usage, Quota, Insights, User Terminals and Audit Logs tabs. The user will also have Read Only access to Plans, Plans Usage, Service Account and Service Line tabs.
If the Admin selects Starlink Admin Access, the user can access all the tabs of the Starlink screen. They can perform the Starlink Admin operations also.
These details can be viewed pictorially in the below figures. All the tabs available for the user in Starlink Access Privilege types are highlighted in Green, Read-Only tabs are highlighted in Yellow and the ones not available are highlighted in Red.
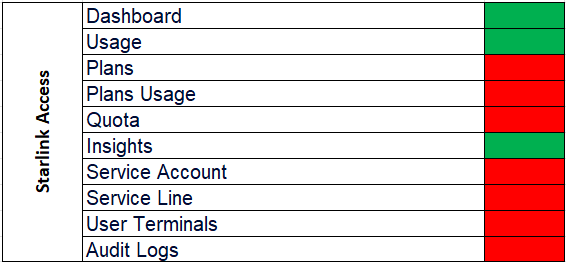
Starlink Access
Starlink Full Access
Starlink Admin Access
Note: The users with only Starlink Access, Starlink Full Access or Starlink Admin Access can access only the Starlink screen in Kognitive Cloud. They cannot access the other screens available in Kognitive Cloud such as Sites, Trends, Threats, Map, Reports, Account Management, Alerts, Audit Logs, Tickets, Software Configuration, Inventory, Hub, Kontrol, Content Filter, Captive Portal and Topology. These are stand-alone IAM policies. But these access privileges can be used as “Add On” policies for Full Access Clients.
In the Select Resources field, select the sites that the user needs access to from the drop down menu. Select All Sites to give the user access to all the sites under the selected organization.
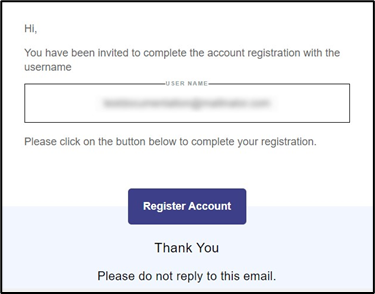
Click Invite button to send the account registration invite to the user.
The user will receive the following registration invite email from Accounts.
Register Account Email
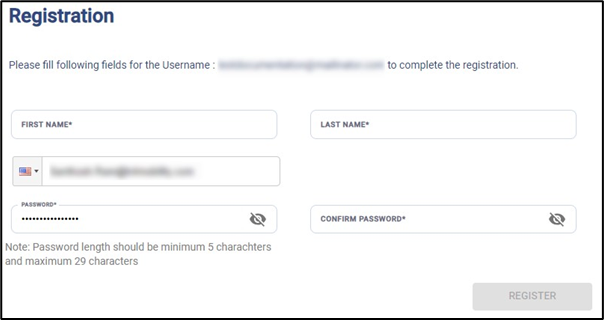
Click on Register Account button at the bottom of the email body. The user is directed to the Account Registration Page.
Enter the required details in the form.
Registration Page
Click Register button.
The account will be activated successfully. The user can now access the Starlink screen in the Kognitive Cloud.
Mobile Priority
The user can activate Mobile Priority feature on the Starlink Service Plan of their User terminals by using the Mobile Priority option in the side menu bar.
The Mobile Priority feature enables the user to experience high speed internet even when their sites are mobile or in transit.
To activate Mobile Priority, the Service Line must be subscribed to Starlink Subscription and it should have an active Starlink Service Plan.
Click the
 toggle button to activate Mobile Priority feature for the corresponding service line.
After the user clicks the Enabled toggle button, the below dialog box will be displayed and Mobile Priority will begin within 15 minutes.

The user can Opt-out of the Mobile Priority feature by clicking the Disabling the toggle button.
Resume Service Line
The user can Pause/Resume their Starlink Service Plan on their User terminals by using the Pause/Resume Service Line option in the side menu bar.
Click the Pause Service Line option.
After clicking the Pause Service Line option, the user has to choose when to end the Service Plan. They can choose to end it immediately or on the Billing Date. Choose the required option from the dropdown menu.
-20240509-115216.png?inst-v=a5983b02-f917-4c6e-8a36-5bfb5e625083)
Pause Service Line
Similarly, the user can also Resume their Starlink Service Plan on their User terminals that were paused previously.
Click the Resume Service Line option in the side menu bar.
After clicking the Resume Service Line option icon, the user has to select the required Service Plan from the dropdown menu in the Select Products field.
-20240509-122722.png?inst-v=a5983b02-f917-4c6e-8a36-5bfb5e625083)
Resume Service Line
Click Resume to resume the Starlink Service Plan on their User terminal.
Service Plan
Select the Service Plan option from the side menu bar to view or change the service plan linked with the service line.
-20250210-152046.png?inst-v=a5983b02-f917-4c6e-8a36-5bfb5e625083)
Service Plan
The current service plan linked with the service line is shown in the Plan field.
To change the service plan, select the required plan in the Plan field. The dropdown menu shows all the custom plans created by the user and also the standard plans provided by Starlink.
Select the Assign button to save the changes.
Please note that when a service plan is changed to one with a higher Plan Size, the change is reflected in the system immediately. But, when a service plan is changed to one with a lesser Plan Size, the change is reflected in the system only at the start of the next billing cycle.
The Account Number and Terminal Number of the service line is also shown.
The table shows the following information:
Plan Size - Data quota of the current service plan.
Plan Start - Start date of the current plan
Plan Duration - Duration of the current plan
Plan Description - The description of the current plan
Top Up
Select the Top Up option from the side menu bar to add top up date to the plan of the service line.
-20250210-152249.png?inst-v=a5983b02-f917-4c6e-8a36-5bfb5e625083)
Top Up
Enter the required top up data in the Top Up field.
Select the Unit.
Select the Save button to save the changes.
Terminals
Select the Terminals option from the side menu bar to view the Associated Terminals and also add more terminals to the service line.
-20250210-152631.png?inst-v=a5983b02-f917-4c6e-8a36-5bfb5e625083)
Terminals
The Associated Terminals are shown in the right panel.
Click the Delete
 icon to delete the terminal.
Click the Reboot Terminal
 icon to reboot the terminal.
Under the Available Terminals field, select any terminal from the dropdown menu.
Select the Add Starlink button to add the terminals to the corresponding Service Line.
Public IP
Select the Public IP option from the side menu bar.
-20250904-144431.png?inst-v=a5983b02-f917-4c6e-8a36-5bfb5e625083)
Public IP
Use the
 Toggle button to change between using the Default IP or Public IP.
When selecting the Public IP, the Public IPv4, the Public IPv6 CPE and Public IPv6 UE will be shown to the user.
Routers
The Routers section allows you to view details about your router and dish, check Wi-Fi status, monitor uptime, and configure network settings such as SSIDs and passwords.
%20(1)-20251120-151505.png?inst-v=a5983b02-f917-4c6e-8a36-5bfb5e625083)
Routers
This section displays unique identifiers associated with the router and dish.
Router ID – A unique number assigned to the router hardware.
Dish ID – A unique number assigned to the Starlink dish.
The Wi‑Fi information section provides real‑time status about the router’s connectivity and firmware.
Uptime – Shows how long the router has been running since the last restart.
Repeater – Indicates whether a repeater is currently being used. (Yes/No)
Software Version – Displays the current firmware version installed on the router.
Hardware Version – Indicates the hardware revision of the router.
Bypass Mode – A toggle option that allows the router to operate in bypass or bridge mode.
When enabled, the built‑in router functions (such as Wi‑Fi) are disabled to allow use of an external router.
When disabled, the router operates normally with built‑in Wi‑Fi functionality.
The Network section allows you to manage Wi‑Fi network names (SSIDs) and passwords.
Split 2.4/5 GHz Bands Checkbox – When enabled, the router creates two separate networks - One for 2.4 GHz (longer range, slower speed), One for 5 GHz (shorter range, faster speed)
When disabled, both frequencies are combined under a single SSID.
The user can configure the Wi‑Fi network names and passwords for each frequency band.
RF_2GHz SSID – Name of the 2.4 GHz Wi‑Fi network.
Password – Password for the 2.4 GHz network.
RF_5GHz SSID – Name of the 5 GHz Wi‑Fi network.
Password – Password for the 5 GHz network.
Note: For security, choose strong passwords composed of letters, numbers, and symbols.
Click Save to apply all configuration changes.
Click Cancel to discard the changes.