
Quota
The Quota tab enables the user to set quotas for the Starlink Service Lines deployed in their sites. The users can also specify particular actions to be done when the data usage reached a specific amount. For example, users can set up email notifications when a specified amount of data is used, opt out of using Mobile Priority data, and pause internet connectivity for service lines once data usage crosses a defined limit.
Click Quota tab from the Starlink screen to open the Quota screen.
In the Organization field, select the Organization or sub-organization from the dropdown menu. The logged in admin Organization is populated by default here. This is the organization corresponding to the email ID used to login.
The dropdown list consists of all the sub-organizations under logged in admin organization.
In the Service Lines field, select the required services lines from the dropdown menu. The dropdown menu consists of all the service lines associated with the selected Organization and sub-organizations.
-20250423-060442.png?inst-v=cd2204a7-e381-44f1-b4d0-400520472550)
Quota
The table shows the list of Service lines and their data consumption.
It shows the below information:
Organization – Name of the organization.
Service line – Name of the service line.
KIT Number - ID number of the Starlink devices in the service line.
Quota Start – Start date and time of the quota.
Quota Period – Time period of the quota.
Usage – Breakdown of data usage. The color codes for different levels of data usage are explained below. Refer Figure Color Codes for Usage.
Remaining – The amount of data remaining in the quota.
Normal – The amount of data consumed by the user.
Over Quota Threshold – The amount of data consumed after reaching the threshold amount.
Over Max Quota - The amount of data consumed after reaching the maximum quota limit.
Hover the cursor on the progress bar to open the pop-up that shows additional information explained below. Refer Figure Usage Column Pop-up.
Usage – Amount of data consumed
Priority - Amount of Priority data consumed
Standard - Amount of Standard data consumed
Non Billable - Amount of Non Billable data consumed
Opt In Priority - Amount of Opt In Priority data consumed
Quota percentages – The different quota action limits set for the quota and their values in GB.
Max Quota – The maximum amount data allocated for the Quota.
Period – The number of days elapsed / Total number of days for the quota.
Est. Max Over Date – The estimated date by which the Quota data would get completely used up.
Status – Status of data usage in the quota.
Actions:
Edit - Click Pencil icon to edit the quota.
Delete – Click Delete icon to delete the quota.
The Search field can be used to search for the device based on the Organization Name/Service Line Name/KIT Number.

Color Codes for Usage

Usage Column Pop-up
Add Quota
Click Add Quota to create a new Quota. The Add Quota dialog box opens.
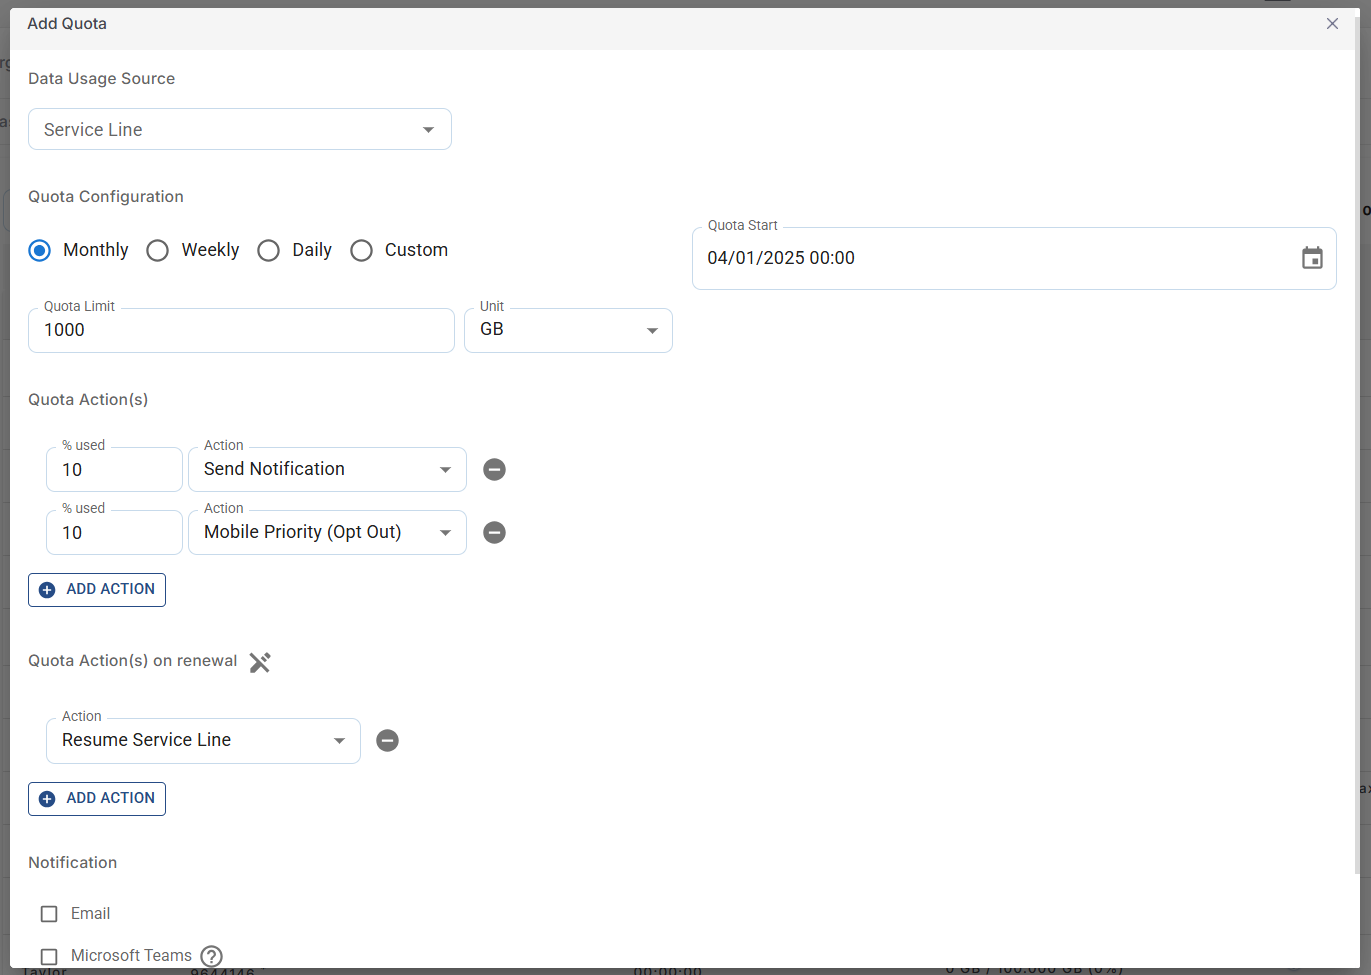
Add Quota
In the Data Usage Source field, select the required service line from the dropdown menu. The service line list in the dropdown will be shown according to the selected organization.
Select the Quota Configuration. The user can select any option between Monthly / Weekly / Daily / Custom.
If the user selects Custom, enter the Quota Period.
Select the Unit from the dropdown menu.
Enter the Quota Start date and time from the date picker and clock.
Enter the Quota Limit.
Select the Unit from the dropdown menu. The user can select any option between MB/GB/TB.
Quota Actions
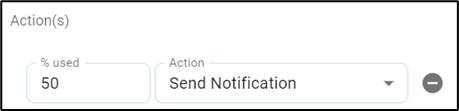
Click + Add Action button to configure the actions to be done when the data usage reaches a specific percentage of total quota.
In the % used field, enter the target percentage at which the action should be done.
There are three types of actions that the user can configure.
Send Notification
The first action type is Send Notification. Using this option, the user can configure to send a notification about the data usage when the data usage reaches a specific percentage of the total quota.
In the Action field, select Send Notification from the dropdown menu.
Send Notification
In the Notification section, select the checkbox of medium to send the notification. The options available are Email and Microsoft Teams.

Notification
In the Send To (Via Email) field, select the Email address from the dropdown menu or enter a new email address.
Click Save.
Now when the usage reaches the given percentage, a notification will be sent to the given Email address and the Teams channel stating details about the data consumption.
Select the
icon to add another action.
Mobile Priority (Opt Out)
The second action type is Mobile Priority (Opt Out) - Using this option, the user can configure all the service lines to opt out from using the priority data. When the site is located closer to the shore within a preset distance, the site uses standard data to access internet. When the site crosses this fixed distance and travels into the deep sea, it can access internet only using the Priority data. Using the Opt out all service lines action type, the user can configure to stop using the priority data for internet connectivity.

Mobile Priority (Opt Out)
In the % used field, enter the target percentage at which the service should opt out from using priority data.
Select Mobile Priority (Opt Out) in the next field from the dropdown menu.
Now when the usage reaches the given percentage, the service will stop using the priority data for internet connectivity.
Select the
Pause Service Line
The third action type is Pause Service Line - Using this option, the user can configure all the service lines to pause internet connectivity.
In the % used field, enter the target percentage at which the service should pause all service lines.
Select Pause All Service Lines in the next field from the dropdown menu.
Now when the usage reaches the given percentage, the service will stop providing internet access.
Quota Actions on Renewal
The Quota Actions is used to apply different configurations to the quota when the user reaches different percentages of data usage. When the quota refreshes, the user might want to restore the initial configurations and start as new. The Quota Actions on renewal option can be used for that purpose.

Quota Actions on renewal
Click the Pencil icon to enable editing.
Select the Action from the dropdown menu. There are three types of actions that the user can configure.
Resume Service Line
The user can configure to Resume Service Lines when the quota resumes.
In the Action field, select Resume Service Line from the dropdown menu.
Now when the quota refreshes, the internet connectivity will be restored to the service lines.
Send Notification
The user can configure to Send Notification when the quota resumes.
In the Action field, select Send Notification from the dropdown menu.
Now when quota refreshes, notification will be sent to the user.
Mobile Priority (Opt In)
The user can configure to Opt in Mobile Priority when the quota resumes.
In the Action field, select Mobile Priority (Opt In) from the dropdown menu.
Now when quota refreshes, the service lines will be opted in for Mobile Priority.