
Plans
Click Plans tab from the Captive Access Network Homepage to open the Plans section.
The Plans section displays detailed information of all the plans created for the selected organization.
-20250319-140819.png?inst-v=e0cf5ebf-01b8-481c-aa14-2a58f83bb340)
Plans Tab
It displays the below information:
Plan Name – Name of the plan.
Organization – Name of the organization.
Quota – Amount of data allocated for the plan.
WAN Type - The WAN Types selected for the plan during plan creation. Hover on the entry in the table to view all the WAN types selected. Only the data consumed by these WAN types will be accounted under the total quota.
Duration - Duration of the plan.
Price - Price of the plan.
Start Date - Start Date of the plan.
End Date - End Date of the plan.
Auto Renewal – Status of Auto Renewal of the plan (Enabled/Disabled).
Traffic Policy – EdgeOS device policy assigned to plan.
Maximum Device Allowed – Number of maximum devices allowed to connect.
Inactivity Timer – Duration of Inactivity Timer for the plan.
Duration Limit - The type of Quota limit set for the plan (Daily/Weekly)
Usage Limit – Amount of data limit.
Time Limit – Time limit per day.
Action:
Pencil – Click Pencil icon to edit the plan details.
Delete – Click Delete icon to delete the plan. A plan can only be deleted if it is not assigned to any user as current plan.
The Search field can be used to search for the Plan based on the Plan Name/Quota/Validity/Policy.
Add New Plan
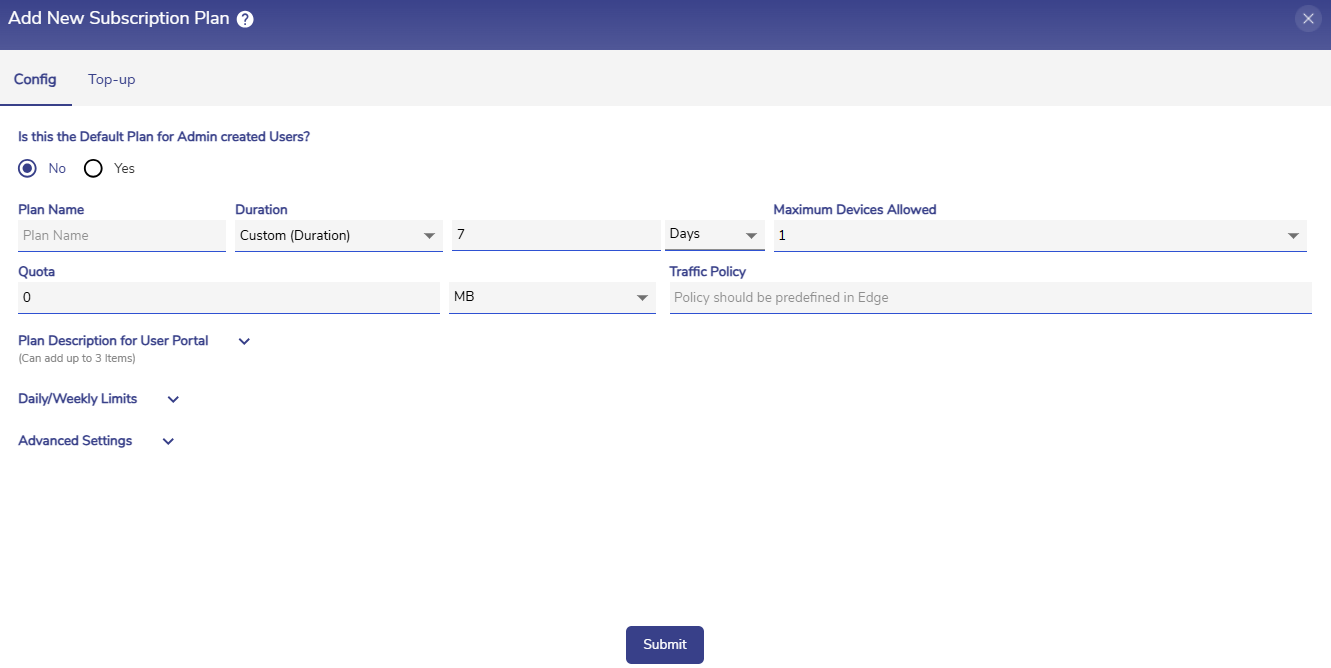
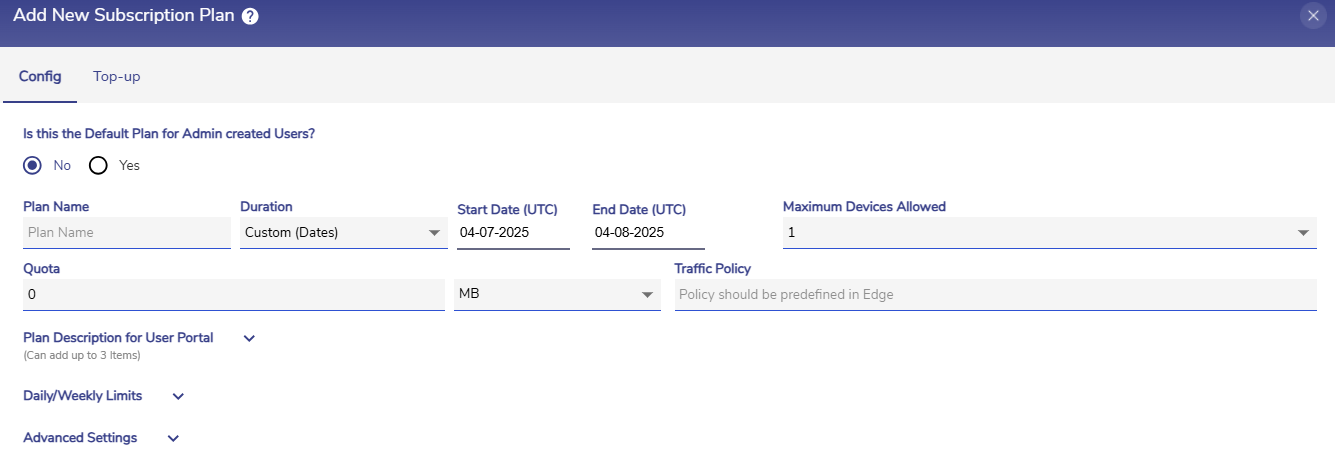
Click Add New Plan button to add a new plan. The Add New Subscription Plan dialog box opens.
Add New Plan
In the Is this the Default Plan for Admin created Users? field, select the Yes radio button to save the current plan as default plan for all Admin created users.
Enter a name for the plan in the Plan Name field.
Enter the Duration. Admin can choose the following four options from the dropdown menu.
No End Date - The plan will not have an end date
Custom (Duration) - Enter any number of days/hours. The plan will be active only for the specified duration from start of service.
Monthly
Custom (Dates) - Select the Start Date and End Date for plan expiry.
The admin can create Monthly plans and Custom plans based on the Duration. Refer the Monthly plans and Custom plans (Dates) section for more information.
Select the number of Maximum Devices Allowed from the dropdown menu. The drop down consists of options from 1 to 5 and unlimited. Specify the maximum number of devices from which users can login at a time the with same credentials.
Enter the Quota. The quota should be entered in multiples of 100MB. Select the unit of data as either MB or GB using the dropdown menu. The value of quota cannot be less than 100MB.
Enter the Traffic Policy. Device policy should be predefined on EdgeOS Portal and must match the name exactly.
Plan Description for User Portal
Expand the Plan Description for User Portal section to enter the description of the plan. This description will be displayed to the users on their User Portal.

Plan Description for User Portal
Daily/Weekly Limits
Expand the Daily/Weekly Limits section to set the Duration Limit, Usage Limit and Daily Time Limit. This is an optional feature.
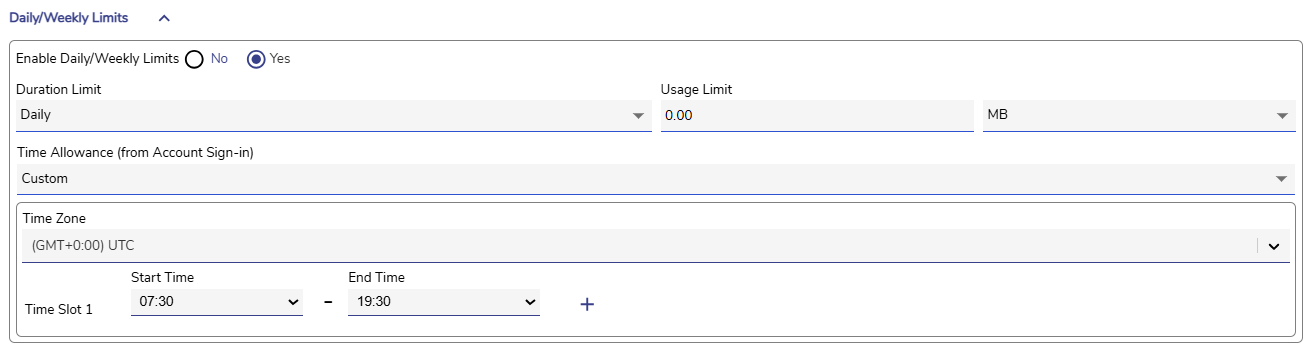
Daily/Weekly Limits
In the Enable Daily/Weekly Limits field, select the Yes radio button to enable Daily/Weekly limits checkbox to configure the Daily/Weekly limits. Select the No radio button to disable Daily/Weekly limits.
Duration Limit - The type of Quota limit set for the plan. The admin has 2 options namely Daily / Weekly.
Usage Limit – The maximum amount of data that can be used by the plan during the given Duration Limit. Amount of data entered by admin should be less than the given Quota of the plan. Select the Unit of the Usage Limit.
Time Allowance – By default, time allowance is set to NA which is 24 hrs. Admin can choose any option between 1 hour to 23 hours from the dropdown menu. The user will be allowed to access internet only for that time period per day.
The admin can also provide custom time intervals by selecting Custom option in the Time Allowance field. The Start Time and End Time fields become available. The user will be allowed to access internet only during those selected time intervals.
Select the Time Zone from the dropdown menu.
The admin can create a maximum of two time intervals.
Advanced Settings
Expand the Advanced Settings section.
Select the WAN Types to associate with the plan from the dropdown menu. Only the data consumed by the WAN types selected here will be accounted under the total Quota of the plan. The data consumed by the WAN types that are not selected here can be unlimited.
Select All to associate all the available WAN types with the plan. In this case, the data used by all WAN types will be accounted under the quota.
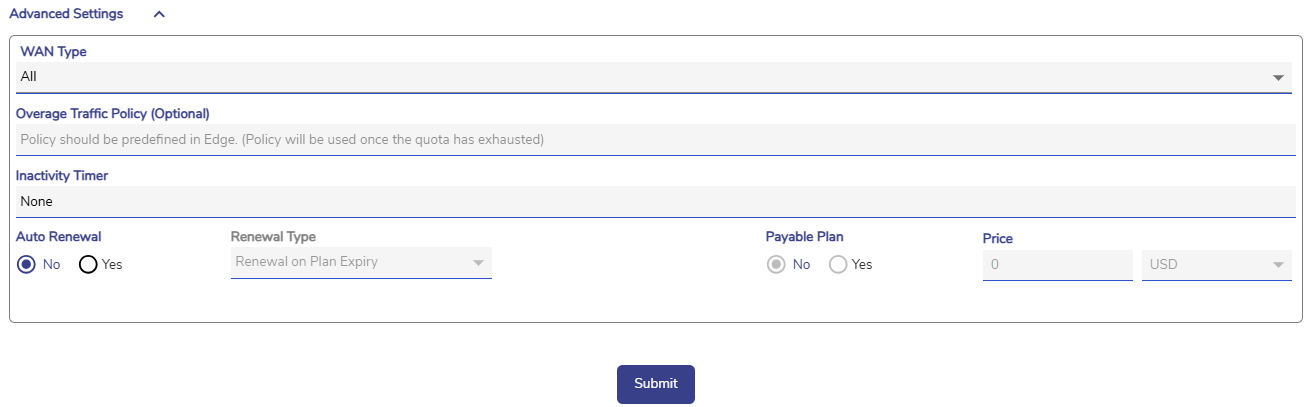
Advanced Settings
Enter the Overage Traffic Policy. This is an optional feature designed to provide continued internet connectivity even after the user's plan quota has been exhausted.
Typically, when a plan's quota is fully exhausted, the user loses internet access regardless of the WAN types selected in the WAN Type field. The Overage Traffic Policy field is used to counter this behavior and maintain connectivity.
When a user specifies the name of a traffic policy in the Overage Traffic Policy field, that policy is applied to all WAN types once the plan quota is fully exhausted. The policy must be predefined in the EdgeOS Portal, and the name must match exactly.
The Overage Traffic Policy allows users to maintain internet access even after their plan quota has been exhausted.
Select the duration of the Inactivity Timer from the dropdown menu. If the admin does not select any value in this field or selects None, the inactivity timer duration will be set as 1 hour by default.
In the Auto Renewal field, select the Yes radio button to enable auto renewal of the plan.
In the Renewal Type field, select Renewal on Plan Expiry to automatically renew the same plan once the current plan expires.
Select Renewal on Login to automatically renew the plan when the user logs in their account.
Select No to disable auto renewal.
In the Payable Plan field, select the Yes radio button to configure the plan as a paid plan. Only the plans configured as Payable plans can be used by the Paywall feature.
For Payable plans, the Auto Renewal and Renewal Type fields will be disabled.
Select the No radio button to configure the plan as a normal plan that is not needed in the Paywall feature.
Enter the Price. Select the type of currency.
The Payable Plan and Price fields are only available for the Organizations that have enabled the Paywall feature. To enable the Paywall feature, please contact your respective Account Manager.
Select Submit button to save the plan.
Monthly Plans
In the Duration field, select the Monthly option from the dropdown menu to create monthly plans.
When Monthly option is selected, a new Starts on day ____ of the month field becomes available. Enter the day of month on which the plan should start.
Enter the required details and click the Submit button to create the monthly plan.
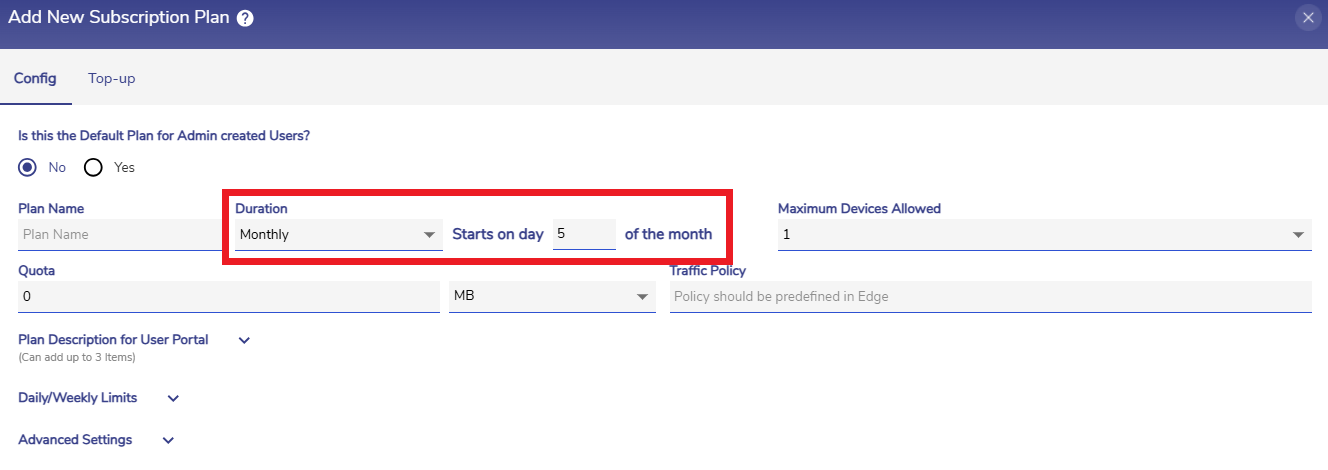
Create Monthly Plan
These plans can be associated with the users using the Users tab of the Admin Portal when creating or editing the user account.
-20250320-060151.png?inst-v=e0cf5ebf-01b8-481c-aa14-2a58f83bb340)
Users Tab
The main difference between monthly plans and normal plans is that, normal plans start their validity period when the user logs in to their account for the first time. But monthly plans start their validity period according to when the plan is associated with the user account.
If the monthly plan is added to an user account after the commencement of starting date, the plan will be active until the starting the date of the next month arrives. But, if the plan is added to the user account before the starting date commences, the plan will end immediately once the starting date arrives.
For example, let us consider a monthly plan that starts at the fifth day of the month. This plan will be created in advance by the admin.
If this plan is added to an user account on 5th January or any day after 5th January (Ex: 6th January, 7th January etc.) this plan will be active until 4 February. But if this plan is added to the user account on any day between 1st - 4th January, the plan will end on 4th January.
If the user buys the Monthly plan as payable plans by themselves in the user portal, they will be given full month validity irrespective of the start date and end date.
Custom Plans
In the Duration field, select the Custom (Dates) option from the dropdown menu to create custom plans.
When Custom (Dates) option is selected, a new Start Date and End Date field becomes available. Select the start date and end date.
Custom (Dates) Plan
These plans can be associated with the users using the Users tab of the Admin Portal when creating or editing the user account.
The validity of the custom plans do not vary according to when the plan is associated with the user account. The start date and end date remains the same as that entered by the user.
Please note that the Custom (Dates) plans get expired after their End Date. In other words, these plans get deleted from the plans list after the end date of the plan.