
High Availability Configuration
This user guide explains the steps required to set up and use the High Availability (HA) feature. The HA functionality is a fully cloud driven solution that enables the user to setup an alternate serving system that may be needed to serve data when the primary server faces any down time. The secondary server is configured and kept ready on standby mode to serve data when required. This feature helps the users to have continued internet access when the Primary server is down.
For the HA feature to work successfully, both Primary and Secondary servers have to be connected to the Internet. The configuration between the servers is periodically synced and LAN ports are active/enabled only on the Serving System. When the primary server/serving system fails, user can promote the secondary server to be the serving system by logging into Kognitive Cloud.
High Availability Setup
Below diagram provides the overview of the HA servers configuration and how the trigger happens.
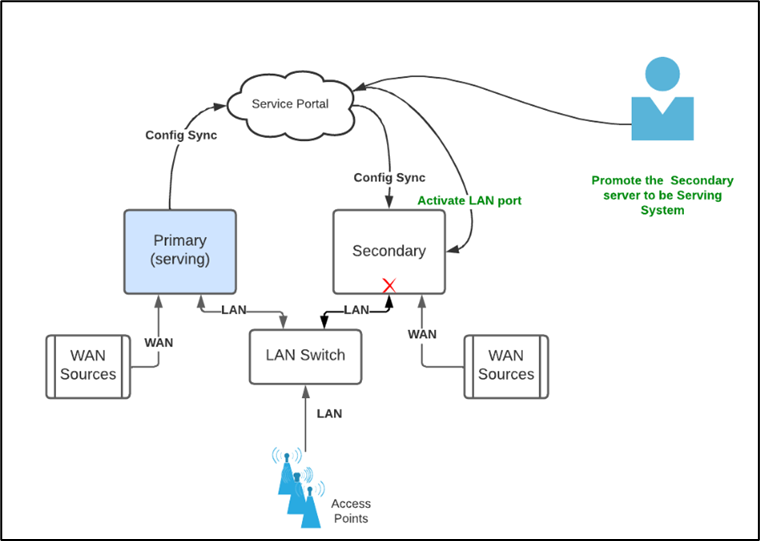
HA Configuration – Overview
Pre-requisites
HA is supported only on servers of the same type. In other words, both Primary and Secondary servers have to be of the same hardware type.
Both the servers must be connected to WAN sources and be online all the time. Note that the WAN configurations should be identical on both. If any of the WAN source is configured with static IP, then that configuration will be overridden from the Serving system configuration.
The site must have the wiring done for HA (with dual servers, with WAN sources connected to both the servers and the LAN interfaces connected to the LAN switch). Note that the HA Primary and Secondary servers are not inter-connected.
Installation Steps
Register both the primary and secondary server under the same Site/Location.
Power up both primary and the secondary server.
Connect the WAN sources to both the servers and make sure that both servers can access the internet. Both the servers must have the same WAN configuration - e.g., Starlink WAN2, Cellular WAN2, LAN port LAN1 etc.
Configure the primary server for all the Access network, WAN profiles, Traffic policies. The secondary server need not be configured at this time.
Login to Kognitive Cloud and select the Site from the Dashboard.
Click the HA tab.
The HA tab will be visible to the user only if the Site has more than one Server device of the same type registered.
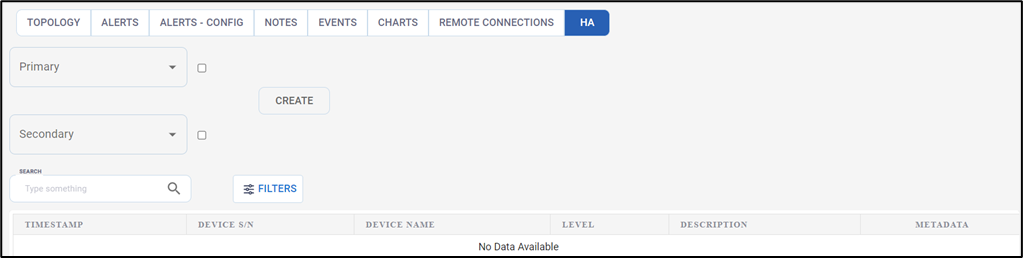
HA Tab
In the Primary field, select the Device name/Device ID from the dropdown menu that has to be configured as the primary server.
In the Secondary field, select the Device name/Device ID from the dropdown menu that has to be configured as the secondary server.
Select the checkbox next to the Primary or Secondary server to configure that as Serving system. The other server will be configured automatically as the Non Serving System.
Click CREATE button to save the configuration. This initiates the periodic configuration sync up between the servers.
Configuration from Serving System is copied and applied to the Non Serving System on daily basis. This is called the Sync process. After the configuration restoration, Non serving system goes for a reboot.
After successful configuration, three new buttons become available – UPDATE, DELETE and SYNC.
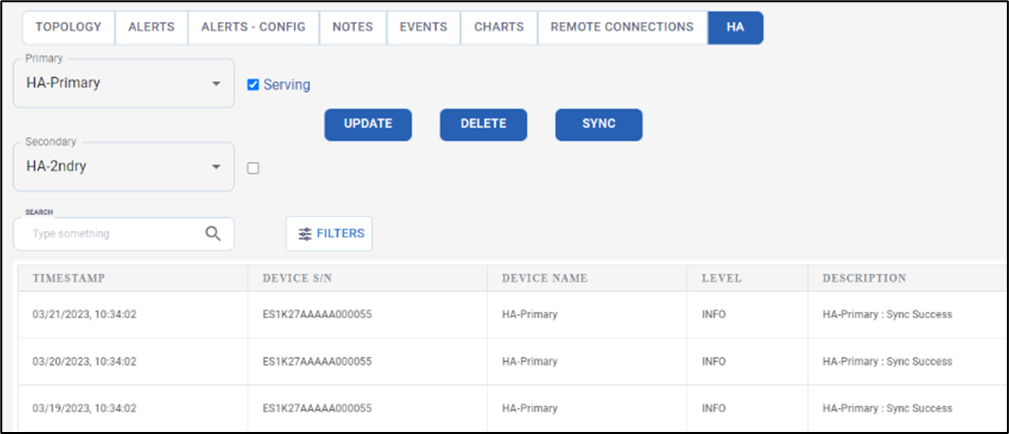
Sync Success
Click the SYNC button to do the instantaneous sync between the servers. This syncs the configuration from Serving system to the Non Serving System.
After the Configuration Sync, verify if both Serving and Non Serving Systems have the same configuration.
Connect the LAN interfaces of both the servers to the LAN switch and verify if the Access network has the connectivity to the internet thru the Primary/Serving System. This can be verified by looking at the Usage Status on the Primary Server.
If the Serving System goes offline, promote the secondary server to be the Serving System.
To promote the Secondary Server as a Serving System login to Kognitive Cloud and open the HA screen for that Site.
Select the checkbox next to the Secondary server to make that as Serving system and click on the UPDATE button for the configuration to take effect.
Click DELETE button to delete the configuration.
The HA Log table shows the event history of all the actions and configurations done in the HA screen. It shows the Timestamp, Device Serial Number, Device Name, Description and Metadata.
Click the FILTERS button to open the HA Log Filters.
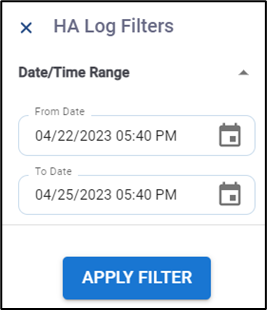
HA Log Filters
HA Log filters can be used to filter and view the HA Log history between a specific time duration.
Select the From Date from the date picker and select the time.
Select the To Date from the date picker and select the time.
Click APPLY FILTER button to view the HA Log history between the selected time interval.