Alerts - Config (Site level configuration)
The Alerts - Config tab in the Sites screen shows the configuration of all the Alerts set in the system and also allows the user to change the configuration of the Alerts for the selected site. The organization and site will be shown according to the site selected by the user in the Sites screen.
-20250318-073158.png?inst-v=cd2204a7-e381-44f1-b4d0-400520472550)
Alerts Config
When a site has set customized alert configurations, the alerts will be raised according to only those site specific configurations. The alert configurations set on the organization level will not be valid for the site anymore. The alert configurations set on the site level will overwrite the organization level alert configurations.
Expand the Alerts Config section to configure the three primary alerts for the site. These alerts are:
Link Availability
Internet Status
System Events
Let us look at these alert configurations in detail:
Link Availability
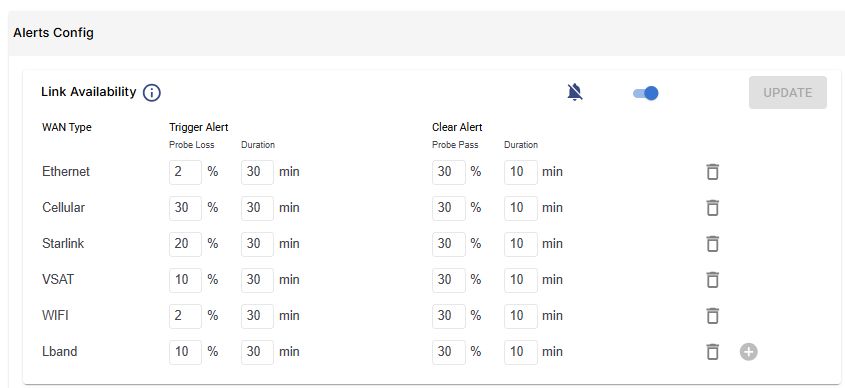
The Link Availability section is used to configure the Link Availability alert. This alert notifies the user if the WAN Interfaces are not active i.e. if the availability percentage goes below a predefined threshold value.

Link Availability
All the WAN types available are listed on the left.
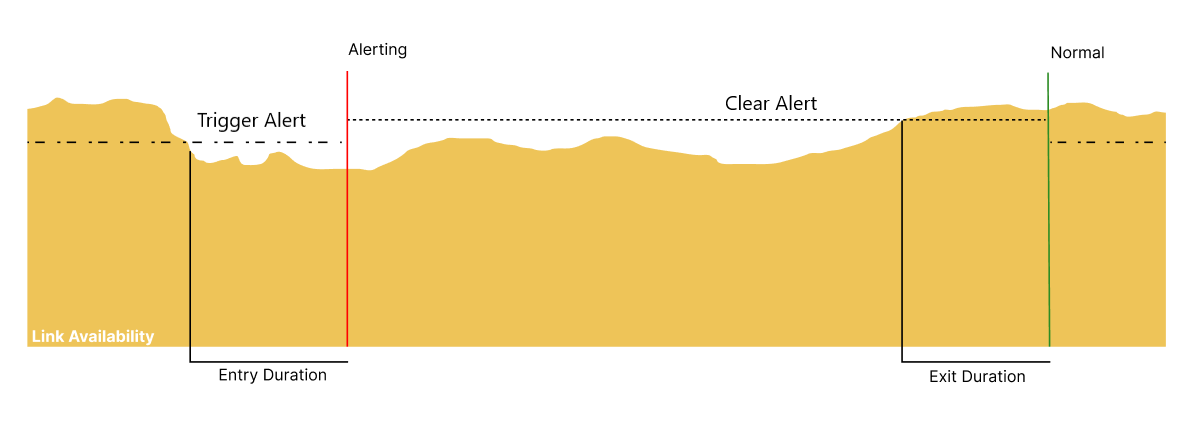
The alert is raised and closed depending upon the Trigger alert and Clear alert rules configured.
The alert moves to Alerting status when the Trigger Alert rule is satisfied and the alert changes to Normal status when the Clear Alert rule is satisfied. This holds true for all types of alerts.

Alert Timing Diagram
Enter the Trigger Alert Duration (in min) and the Probe Loss %.
Enter the Clear Alert Duration (in min) and the Probe Pass %.
Now the system will check the internet availability of the WAN interfaces periodically.
If the Link Availability of any of the interfaces drops below the given Probe Loss % and remains lesser than Probe Loss % for the amount of time specified in Trigger Alert Duration, the alert will be raised.
After the alert moves to Alerting status, the system starts checking for the exit conditions periodically. The notification about the alert will be sent to the preconfigured communication channels.
If the Link Availability goes above the given Probe Pass % and remains higher than Probe Pass % for the amount of time specified in Clear Alert Duration, the alert changes to Normal status.
Click the Delete
 icon to delete the alert configuration of the corresponding interface.
Click the Notification
 icon to mute the notifications sent to the communication channels but continue to track the alert.
Click the Toggle
 button to stop tracking the alert.
Click Add
 icon to add a new interface.
Click Update button to save the changes.
Internet Status
The Internet Status section is used to configure the Internet Status alert. This alert notifies the user if the internet access is not active in all the WAN interfaces.

Internet Status
The alert is raised and closed depending upon the Trigger Alert and Clear Alert rules configured.
The alert moves to Alerting status when the Trigger Alert rule is satisfied and the alert changes to Normal status when the Clear Alert rule is satisfied. This holds true for all types of alerts.
Enter the Trigger Alert Duration (in min).
Enter the Clear Alert Duration (in min).
Now the system will check the internet status of the WAN interfaces periodically.
If the internet status of all the interfaces goes down and remains down for the amount of time specified in Trigger Alert Duration, the alert will be raised.
After the alert moves to Alerting status, the system starts checking for the exit conditions periodically. The notification about the alert will be sent to the preconfigured communication channels.
If the internet status of any of the interfaces comes back online and remains online for the amount of time specified in Clear Alert Duration, the alert changes to Normal status.
Click the Notification
 icon to mute the notifications sent to the communication channels but continue to track the alert.
Click the Toggle
 button to stop tracking the alert.
Click Update button to save the changes.
System Events
The System Events section is used to configure the System Events alert. This alert notifies the user if there is a suspicious amount of failed login attempts within a set time period.

System Events
Enter the Login Failures count.
Enter the Duration (in min).
This alert moves to Alerting status when the user enters the wrong login credentials more times than the Login Failures count within the set Duration.
Click the Notification
 icon to mute the notifications sent to the communication channels but continue to track the alert.
Click the Toggle
 button to stop tracking the alert.
Click Update button to save the changes.
Alerts Config Change Log
The Alerts Config Change Log shows the list of all activities done by the admin in the alert configurations.
-20250318-080939.png?inst-v=cd2204a7-e381-44f1-b4d0-400520472550)
Logs
The table shows the following information:
Time Stamp - Date and time of the alert activity
User - Username of the user
Organization - Name of the organization
Description - A short description of the alert
Resource - States whether it was a organization level alert / Site level alert
Action - The type of action
IP Address - IP Address of the user
Click the Expand
 icon to view the Metadata, New Value and the Old Value.
Send Notification
The admin can configure to send notification about the Alerts raised in the system to selected users of the Organization. This configuration is done in the Organization Settings tab of the Account Management screen.
Login to the Kognitive Cloud using valid credentials.
Select Account Management option from the left menu bar.

Account Management
The Account Management screen opens as shown in the below figure.
-20240621-084854.png?inst-v=cd2204a7-e381-44f1-b4d0-400520472550)
Account Management Page
Click the Organization Settings tab. The user can configure settings for the selected organization using the different fields available under the Organization Settings tab.

Organization Settings Tab
Click the Edit button to edit the fields.
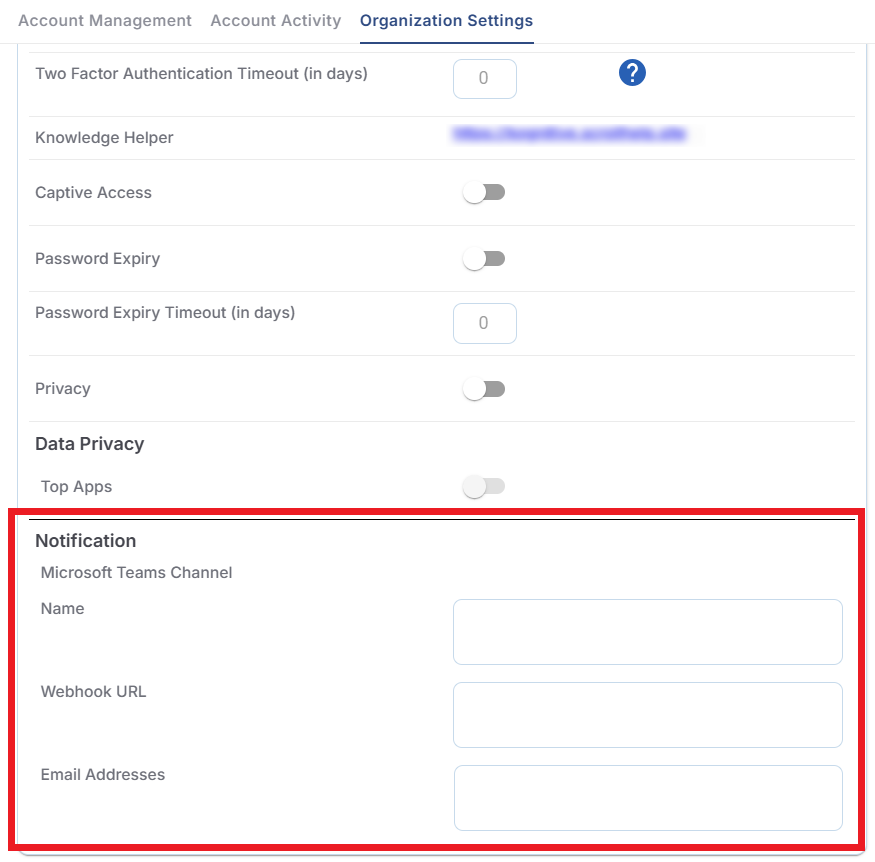
The Notification section provides the options to send notification about the Alerts raised in the system to selected users of the Organization.
The notification can be sent using two mediums. It can be sent to selected email addresses and to Microsoft Teams channel.
In the Name field under the Notification section, enter the name of the teams channel.
In the Webhook URL field, enter the Webhook URL of the required Microsoft Team channel.
In the Email Addresses field, enter the email addresses to which the notification about the alerts should be sent. The email addresses should be comma separated.
Click Update button to save the changes.
Now, every time an alert is raised in the system, the notification about the alert will sent to the provided Email addresses and Microsoft Teams communication channels.
