
Pricing Catalog
Overview
The Pricing Catalog page acts as the central repository for all subscription and product pricing within OrbitBills. It allows administrators to define, update, and maintain prices for both custom and standard plans, as well as one-time product offerings. By keeping the catalog up-to-date, organizations ensure that all invoices and reports reflect accurate costs. The catalog also supports adjustments to base charges, overage rates, and additional fees, making it a vital tool for financial transparency and efficient billing management.
The Pricing Catalog screen is further divided into two screens namely, Subscription Services and Products (OneTime).
Subscription Services
The Subscription Services page allows administrators to configure and manage the details of subscription plans offered to organizations. It provides options to create, edit, and monitor both Starlink Custom, Starlink Standard and Starlink Sub Pool plans, including associated charges and usage details.
Subscription Services
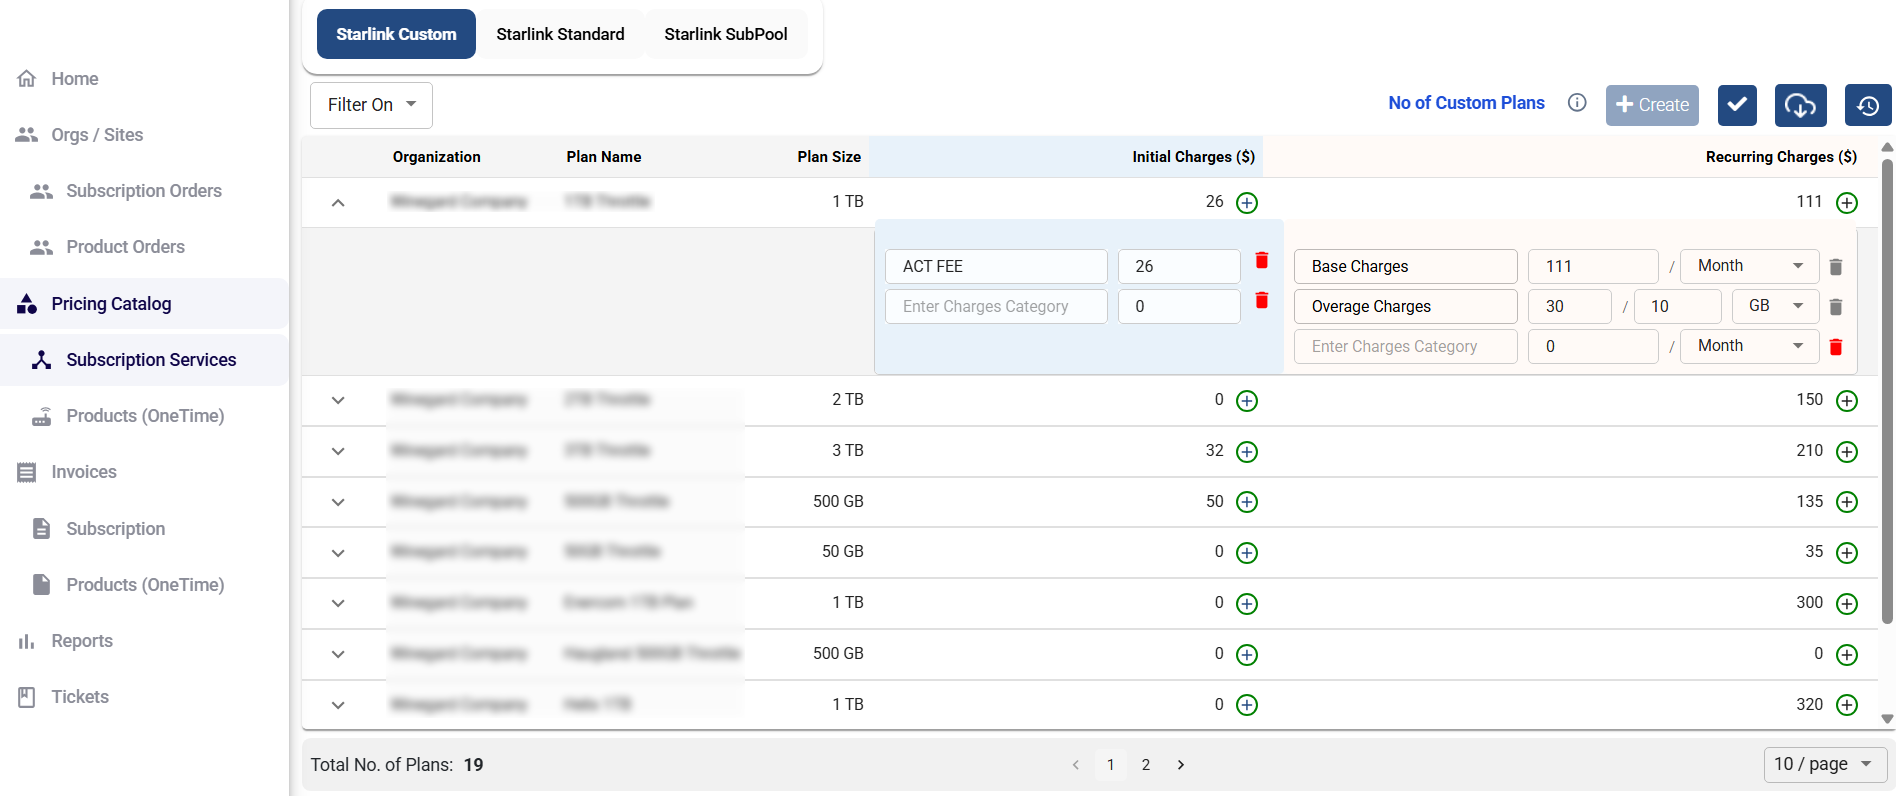
Starlink Custom
Click the Starlink Custom tab to view all the custom plans created for specific organizations.
Click the Filter On button to filter the table based on the Plan Name, Plan Size or Currency.
The table consists of the following fields:
Organization – Shows the organization associated with the plan.
Plan Name – Name of the subscription plan
Plan Size – The data size or bandwidth of the plan
Click the
 icon to view the charges configured in a plan.
 Initial Charges ($) – One-time charges linked with the plan such as setup or activation fees.
Enter the name of the fee and enter the fee amount.
Click the
 icon to add another entry.
Click the
 icon to delete an entry.
Recurring Charges ($) – Monthly or periodic charges for the plan.
Includes the Base Charges and Overage Charges.
Enter the Base Charge amount and select its frequency.
Enter the Overage Charge, set the data amount it applies to, and choose the unit (MB, GB, or TB).
Click the
icon to add another entry.Enter the name of the charge and enter the fee amount. Select its frequency.
Click the
icon to delete an entry.
Click the + Create button to add a new subscription plan.
Click the
 icon to save the pricing changes.
Click the
 icon to download the pricing details locally in CSV format.
Click the
 icon to view the history of all pricing changes.
-20250817-165321.png?inst-v=fc00cdc5-bdd5-43fe-995f-cbc9596ecc79)
Custom Plan Pricing History
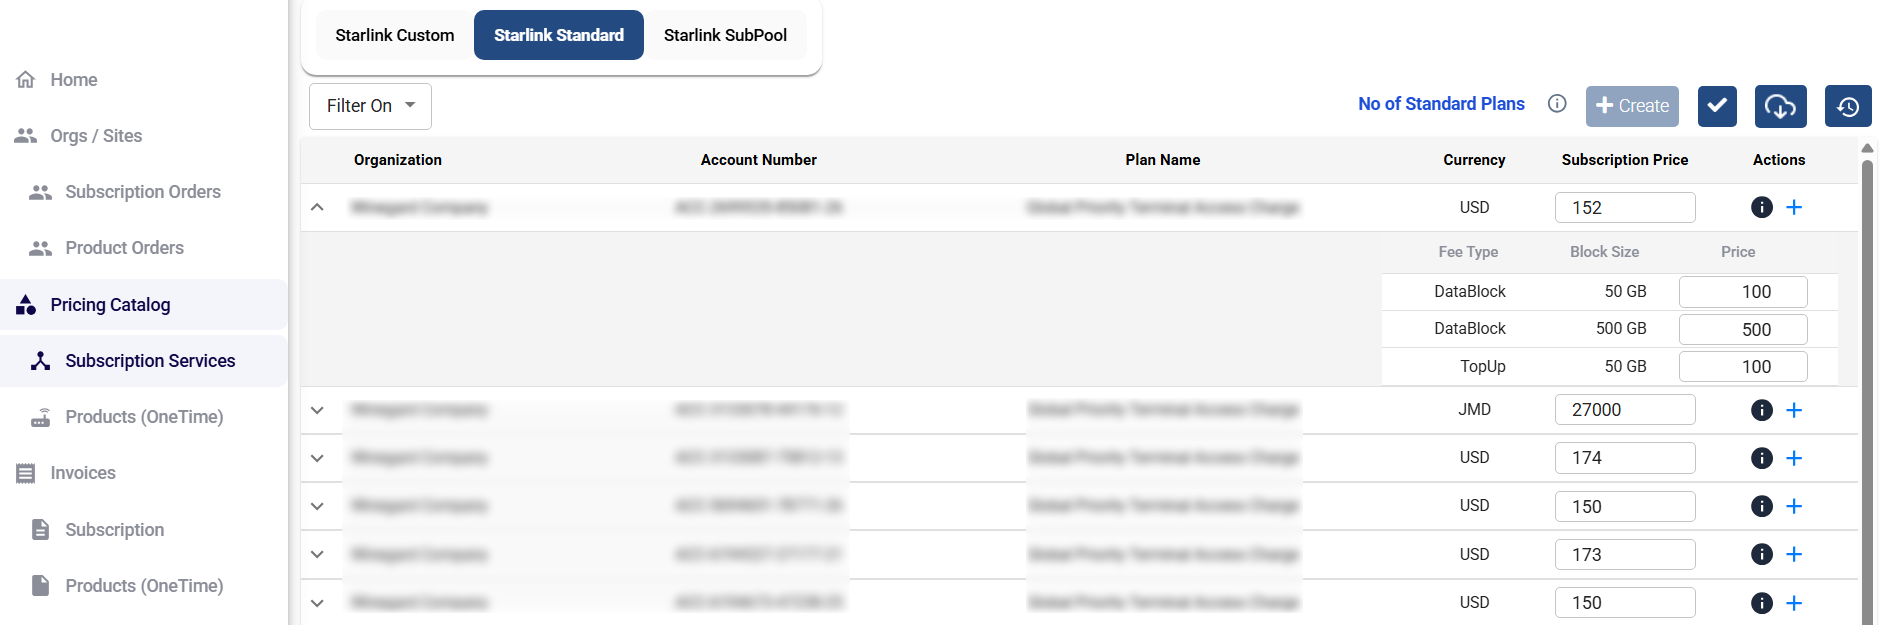
Starlink Standard
Click the Starlink Standard tab to view the standard Starlink subscription plans.
Click the Filter On button to filter the table based on the Plan Name, Account Number, Type (DataBlock / TopUp) and Currency.
The Starlink Standard tab displays all the standard Starlink plans linked to organizations. It allows administrators to view, configure, and manage subscription pricing, block sizes, and top-up charges for each plan.
Starlink Standard
The table consists of the following fields:
Organization Name – Name of the organization the plan belongs to.
Account Number – Unique Starlink account identifier
Plan Name – The name of the assigned plan
Currency – Currency in which the plan is billed
Click the
icon to view the fee-level details in a plan such as: Fee Type – The type of charge applied.
DataBlock – Usage-based block charges.
TopUp – Additional charges for extra usage.
Block Size – The data allowance linked to the fee (e.g., 50 GB, 500 GB).
Price – The amount charged for the block size or top-up.
Subscription Price – Enter the recurring monthly subscription charge.
Click the
 icon to view the history of all pricing changes for the plan.
-20250817-175808.png?inst-v=fc00cdc5-bdd5-43fe-995f-cbc9596ecc79)
View Pricing
Click the
 icon to add an additional cost.
Enter the Description. Select the frequency from the dropdown menu.
Enter the Amount.
Click the Create button to add the additional costs to the plan charges.
-20250817-180232.png?inst-v=fc00cdc5-bdd5-43fe-995f-cbc9596ecc79)
Additional Cost
Click the + Create button to add a new subscription plan.
Click the
icon to save the pricing changes.Click the
icon to download the pricing details locally in CSV format.Click the
icon to view the history of all pricing changes.
Starlink Sub Pool
Click the Starlink Sub Pool tab to view all the sub pool plans created for specific organizations.
Click the Filter On button to filter the table based on the Plan Name, Plan Size or Currency.
-20251007-153652.png?inst-v=fc00cdc5-bdd5-43fe-995f-cbc9596ecc79)
Starlink Sub Pool
The table consists of the following fields:
Organization – Shows the organization associated with the plan.
Plan Name – Name of the subscription plan
Plan Size – The data size or bandwidth of the plan
Click the
icon to view the charges configured in a plan. Initial Charges ($) – One-time charges linked with the plan such as setup or activation fees.
Enter the name of the fee and enter the fee amount.
Click the
icon to add another entry.Click the
icon to delete an entry.
Recurring Charges ($) – Monthly or periodic charges for the plan.
Includes the Base Charges and Overage Charges.
Enter the Base Charge amount and select its frequency.
Enter the Overage Charge, set the data amount it applies to, and choose the unit (MB, GB, or TB).
Click the
icon to add another entry.Enter the name of the charge and enter the fee amount. Select its frequency.
Click the
icon to delete an entry.
Note: When a sub-pool is associated with an organization or sub-organization, the invoice is generated based solely on the price of the sub-pool. Any service lines under that sub-pool will have their usage details displayed in OrbitBills, primarily to help the end user monitor how much of the sub-pool’s total data has been consumed.
Users can view data usage for each individual service line associated with the sub-pool; however, billing for sub-pool plans is not performed at the individual service-line level. The service-line usage information is provided for monitoring purposes only.
Click the + Create button to add a new subscription plan.
Click the
icon to save the pricing changes.Click the
icon to download the pricing details locally in CSV format.Click the
icon to view the history of all pricing changes.
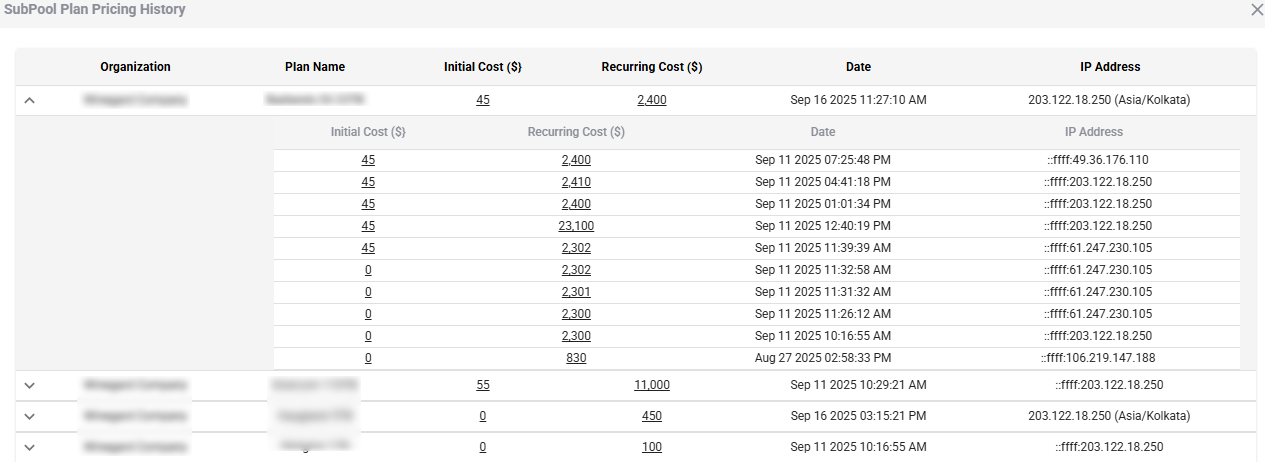
Sub Pool Plan Pricing History
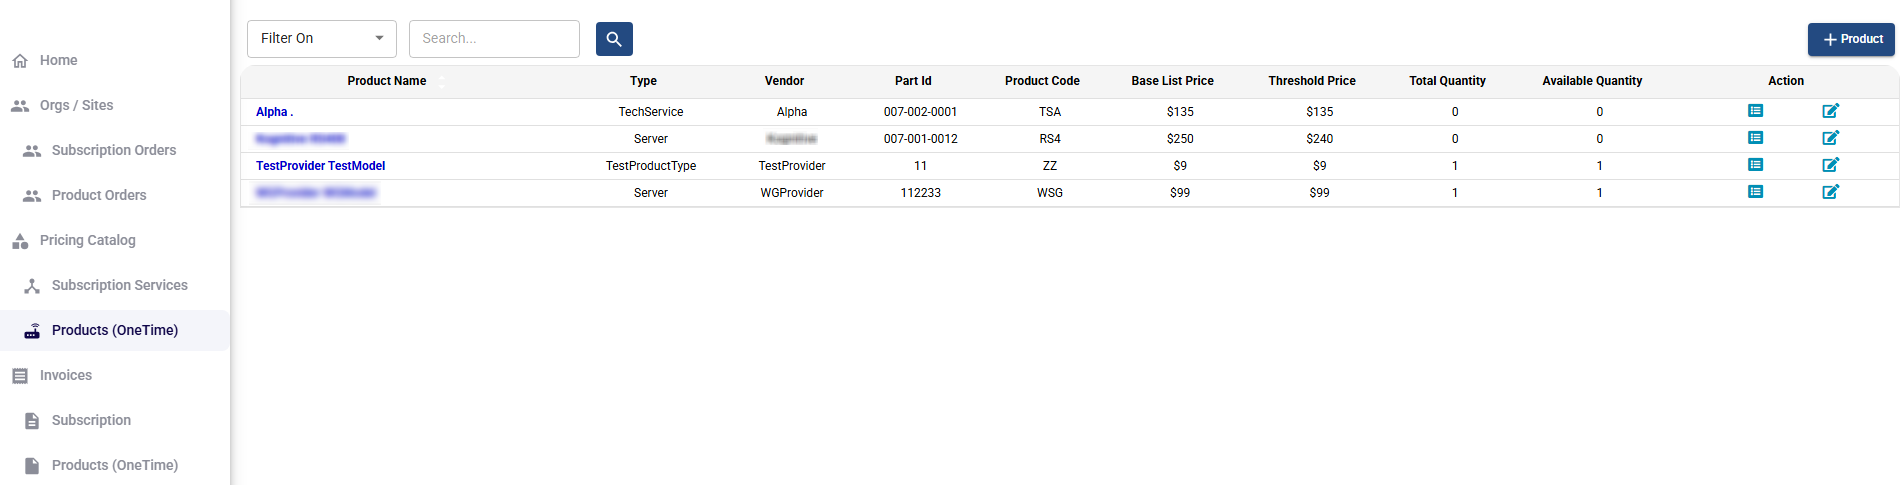
Products (OneTime)
The Products (OneTime) page in OrbitBills is designed to manage all one-time purchase items such as hardware, installation services, and related offerings. Administrators can view product details, track quantities, and update pricing information in one centralized place. This section ensures accurate billing, maintains inventory visibility, and provides quick access to product management actions.
Products (OneTime)
The Products (OneTime) page lists all available one-time products along with their key details, pricing, and inventory.
Click the Filter On button to filter the table based on the Device Identification Number (DID), Name, Type, Base List Price, Threshold Price.
Click the + Product button to create a new product.
Select the Product Type from the options in the dropdown menu. The options available are Server / Tech Service / Standard Shipping / Switch / Consumer Electronics / Starlink Kit.
Select the + Add Product Type option to add a new product type.
Enter the Name of the new product type.
Enter a Description.
Click the Save button to save the product type.
Enter the Supplier name.
Enter the Part ID.
Enter the Product Code.
Enter the Base List Price.
Enter the Threshold Price.
Cost Price.
Enter the Description.
Click the Save button to save the product.
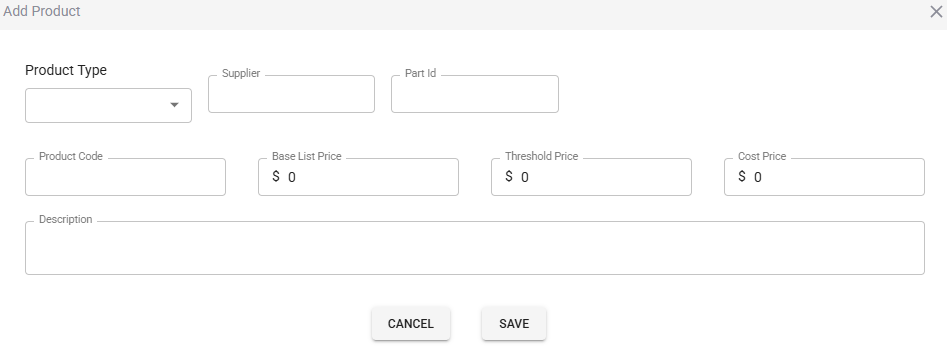
Add Product
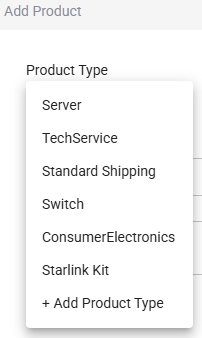
Add Product Type
The table consists of the following fields:
Product Name – The name of the product (e.g., Starlink Standard V4 Dish, Installation Services).
Type – Defines the category (e.g., Starlink Kit, TechService, Server).
Vendor – Name of the vendor supplying the product (e.g., Starlink, Installer).
Part ID – Unique part number for the product.
Product Code – Additional code identifier for the product (if available).
Base List Price – Standard listed price of the product.
Threshold Price – Minimum threshold price for the product (used for invoicing or discount checks).
Total Quantity – Total number of units available in the system.
Available Quantity – Remaining stock available for assignment.
Action -
Click the
 View / Add Product Item(s) icon to view the details of the product and add product items.
Click the
 Update Product icon to edit or update the product details.