Self Sign Up Users
Self Sign Up Users
The Users can sign up and create their accounts by themselves using the Self Sign Up function. Self Sign Up fields should be configured in the Admin Portal in order for the user to perform self sign up from the User Portal. Refer section Self Sign Up Configuration for information on configuring the Self Sign Up details in Admin Portal.
There are two ways in which Self sign up user can sign up and access the internet - With Admin Approval and Without Admin Approval. This workflow must be set by the Admin during the Self Sign Up setup in the Admin Portal.
Self Sign Up (Not Requiring Admin Approval)
Open the User Portal login page.
-20241119-103321-20241212-143239.png?inst-v=e5136ef4-a18d-4119-94aa-95bce19658fe)
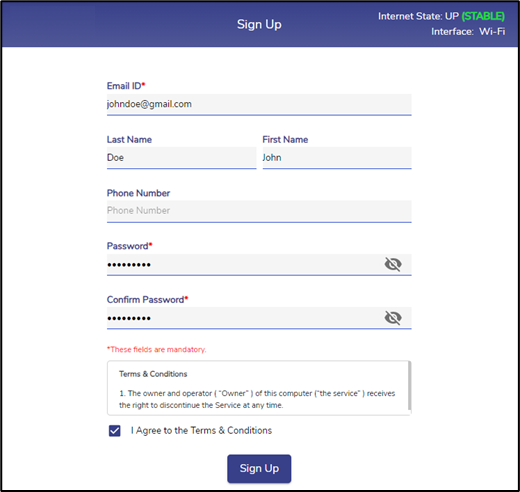
Click the Self Sign Up button in the User Authentication screen to start the Self Sign Up process. The Sign Up dialog box opens.

Sign Up
If Self Sign Up feature is disabled by the admin, the Self Sign Up Page will also be disabled.
The Sign up fields in the dialog box are populated based on the sign up configuration updated in the Admin Portal.
Enter the Email ID. If the entered Email ID is not in the correct format or if required domain is not included, the user is notified with the message “*Please enter valid Email ID”.
Enter the First Name & Last Name.
Enter the Password.
Re-enter the Password in the Confirm Password field.
Fill all the mandatory fields.
Click the I Agree to the terms & Conditions checkbox.
Click Sign Up button to proceed to the next step.
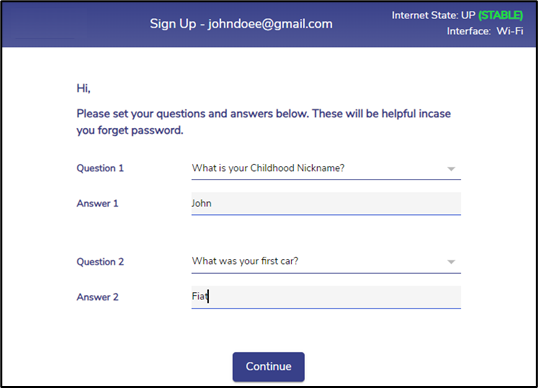
The Security questions dialog box opens.

Security Questions
Select any two questions from the dropdown menu.
Set the answers for the selected questions.
After setting the questions and answers, click Continue button to complete the self sign up.
The user is then directed to the User Portal homepage.

User Portal Homepage
The Homepage shows the name of the Active Plan of the user, Data Used and Remaining quota, Quota Limits, Time Allowance set for the plan, Time Zone, and the Plan End Date.
Click Usage Details button to open the Usage details section.

Usage Details
Click the
icon and select Log Out to stop accessing the internet and logout from the Portal.
Self Sign Up (Requiring Admin Approval)
Click the Self Sign Up button in the User Authentication screen to start the Self Sign Up process. The Sign Up dialog box opens.

Sign Up Dialog Box
The Sign up fields in the dialog box are populated based on the sign up configuration updated in the Admin Portal.
Enter the Email ID. If the entered Email ID is not in the correct format or if required domain is not included, the user is notified with the message “*Please enter valid Email ID”.
Enter the First Name & Last Name.
Enter the Password.
Re-enter the Password in the Confirm Password field.
Fill all the mandatory fields.
Click the I Agree to the terms & Conditions checkbox.
Click button to proceed to the next step.
The Security questions dialog box opens.

Security Questions
Select any two questions from the dropdown menu.
Set the answers for the selected questions.
After setting the questions and answers, click Continue button to complete the self-sign up.
The sign up success dialog box shows the shows the message “Your Account has been submitted for Administrator Approval. This may take sometime”.
In this method, users require approval from admin to activate their accounts. On successful sign up, admin will be notified for approval.
In the Administration Portal, admin will be alerted with blue background for the user that has successfully signed up and requires admin approval.

Admin Approval
After verification of user details, the admin can click Toggle button to enable the user account. The Enable User Account dialog box opens.

Enable User Account
Click Confirm button to give permission for the user to login and access the internet.
After giving the approval, the Admin informs the user that their sign up request is approved.
The user can then open the User Portal with the link http://10.0.254.1/go
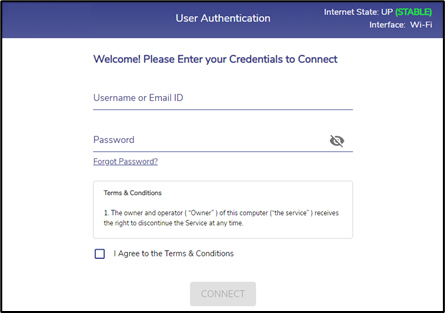
Enter the Username or Email ID and Password.

User Authentication
Click the I Agree to the terms & Conditions checkbox.
Click Connect button to login into the User Portal.
The user is then directed to the User Portal homepage.

User Portal Homepage
The Homepage shows the name of the Active Plan of the user, Data Used and Remaining quota, Quota Limits, Time Allowance set for the plan, Time Zone, and the Plan End Date.
Click Usage Details button to open the Usage details section.

Usage Details
Click the
icon and select Log Out to stop accessing the internet and logout from the Portal.
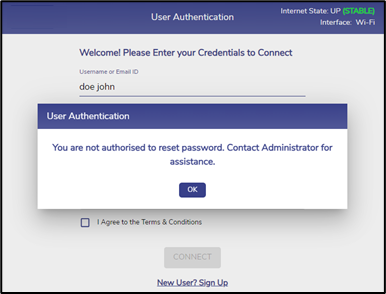
Until the admin approves, the user will not be able to login to access internet and will not have access to update or alter their password.
If the user whose admin approval is pending clicks Forgot Password?, the below pop-up is displayed.

Approval Pending
