
KonnectRM Application
The KonnectRM application is used to make the connections to the Kognitive server remotely. KonnectRM application enables the user to open connections to remote KonnectOS devices, and any devices connected to KonnectOS products. Using this application, the user can add a new device to the site, edit the existing the site and also start and stop the servers. This user guide explains the steps in setting up and using the KonnectRM Application. The other uses of this KonnectRM application are explained screen wise in the document.
Login page
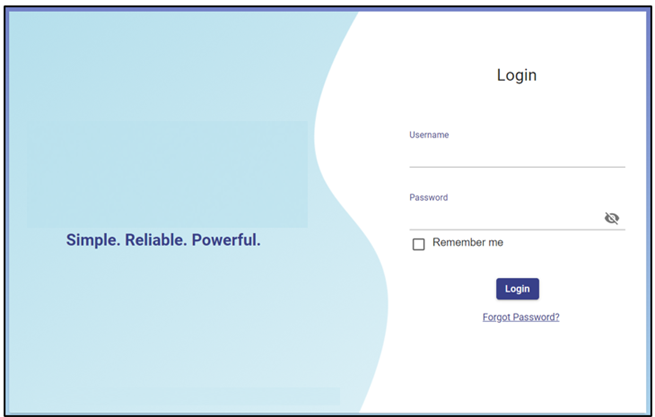
Login Page
Enter the valid Username, Password and click Login button to login to the application.
Click the Remember me checkbox to remember the username and password while logging in. The login details will be saved for the user for future logins.
In case the user forgets the Password, click on Forgot Password? to reset it. Enter the registered e-mail address and a link to reset the password will be sent to that email ID.
If Two Factor Authentication is enabled for the user, a security code would be sent to their registered Email Address.
Enter the Security Code and click Verify button to login to the application.

Two Factor Authentication
After successful validation, the user is directed to the User Dashboard.

User Dashboard
If the user is logging in for the first time, the application does auto configuration of adding all sites in the user profile based on the user polices.
If the user had already logged in previously, the Dashboard shows all the sites added by the user. The Dashboard will be empty only if the user has removed all the sites from their profile.
The adding of Sites and Connections in unique to the login account.
When a different account is logged in, the Sites corresponding to that account will be displayed in the Locations tab.
Also, when a new site is commissioned in the Organization, the user has to manually add that site to the Locations tab.
The Dashboard consists of the following tabs:
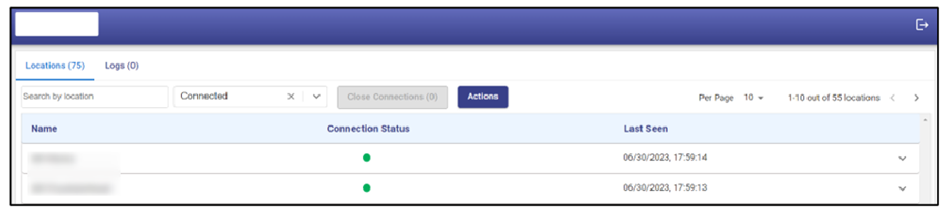
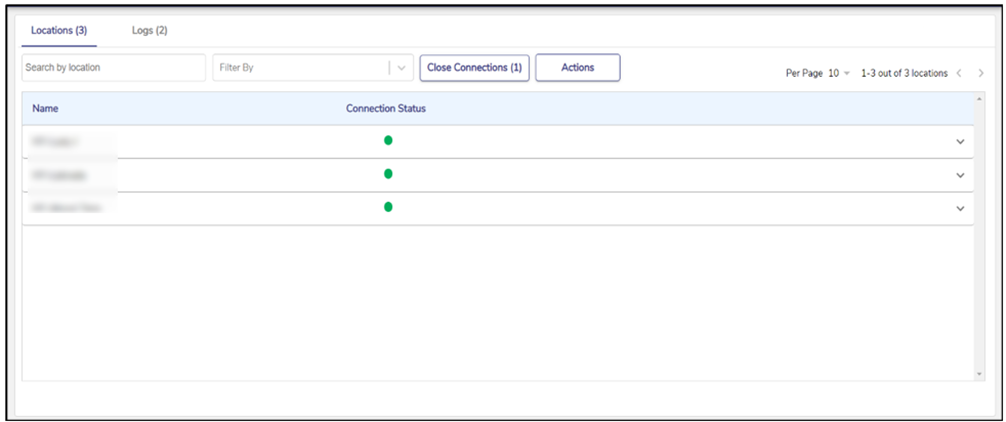
Locations tab
In the Locations tab, the user can see all the sites that are added by them. The number next to locations inside the brackets indicates the total count of the sites added by the user. The table shows the below information:
Name – Name of the site.
Connection Status - Connection Status of the Site.
Green circle indicates that the site is online.
Red circle indicates that the site is down.
Last Seen - Last Seen date and time of the server. It shows the last time when the server was up or down.
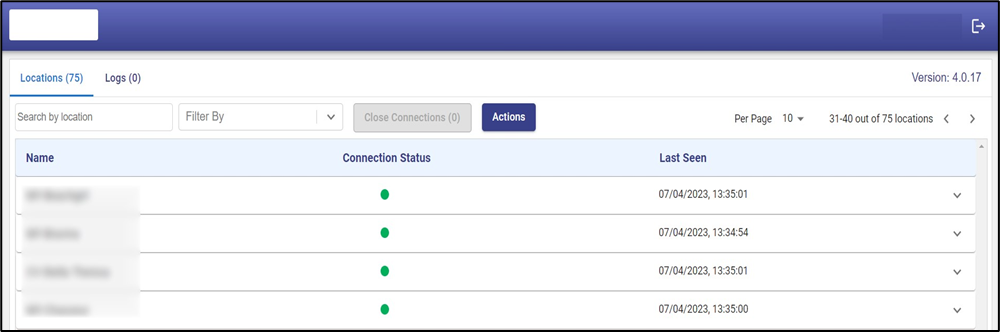
Locations Tab
Search by location
Search by location is an input field where the user can search the sites based on the Site name.
Type the Site name and all the assigned Sites which are accessible will be shown as search results. The Location Tab will also be filtered based on the user search in this field. The count beside the Location will also be updated based on the user input in this text-field. Sites that are already added will be checked with a tick.
Click on Add to add the site under the Location tab.
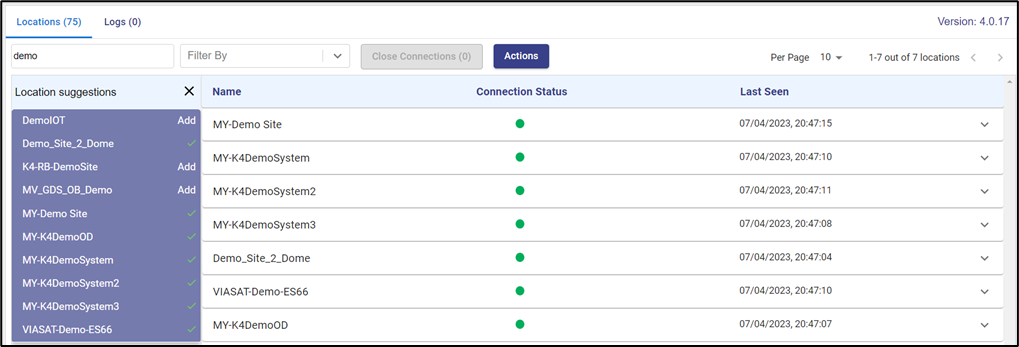
Search by location
By default, when a site is added, two connections are visible - Portal (GUI) and Shell which lands a Edge node.
Site Added
User can also delete the added location.
Click the close button (X) to close the dropdown. User has to manually delete the text from the search field to remove the screen filter based on the search.
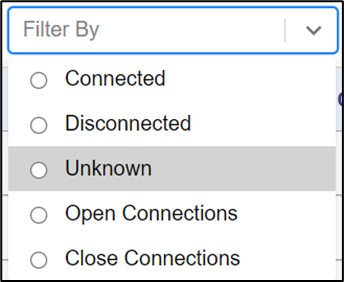
Filter By
Filter by field is used to filter the sites under the Location tab based on their Connection Status. The options available are:
Connected
Disconnected
Unknown
Open Connections
Close Connections
Filter By input field – dropdown
Select the required type and the Sites will be filtered based on the selection.
Filter By input field – dropdown with value selected
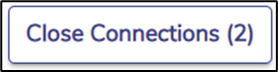
Close Connections
The Close Connections button is used to close all the open connections instantly. If the user wishes to close all the opened connections, they can do it with a single click through this button instead of closing all the connections individually.
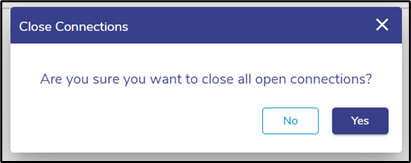
Click Close Connections.
Click Yes in the pop-up asking confirmation to close all the open connections.
All the active connections will be stopped or closed.
Close Connections button
Close all open Connections pop-up
Actions
Actions button allows the user to perform 3 operations:
Delete selected devices
Delete all locations
Refresh connection status
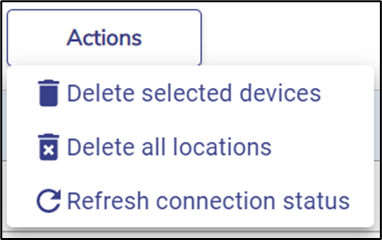
Options available under Actions
Delete selected devices
Delete selected devices button provides the user with the option to select specific devices from a site and delete them.
User needs to select the checkboxes of the devices which they intend to delete and click on Actions > Delete selected devices.
Click Yes on the pop-up to confirm deleting all the selected devices.
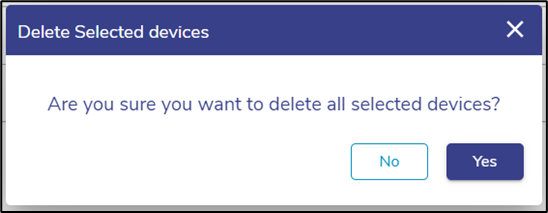
Delete all selected devices confirmation pop-up
To delete an entire site, select the checkbox placed to the left of Name column. All the devices under the site will get selected.
Click on Actions > Delete selected devices.
Click Yes on the pop-up to confirm deleting the entire site.
Delete Entire Site
Delete all locations
Click Delete all locations option to delete all the sites which were added by the user.
Click Yes in the pop-up to confirm deleting all the added sites.

Delete all location data confirmation pop-up
Refresh connection status
Click Refresh connection status option to refresh the page or connection before the auto refresh.
If there is any change in the connection status, user will be able to see it after clicking this button.
Logs tab
The Logs tab displays the list of actions performed by the user after they log in such as starting a connection, closing a connection or if the user encounters any error related to starting or stopping the servers. By default, the logs are enabled, but the user can opt to disable the logs as well. The logs shown here are only of that session and once the session expires the logs are erased. When the user logins again, the logs will be generated freshly for that session.
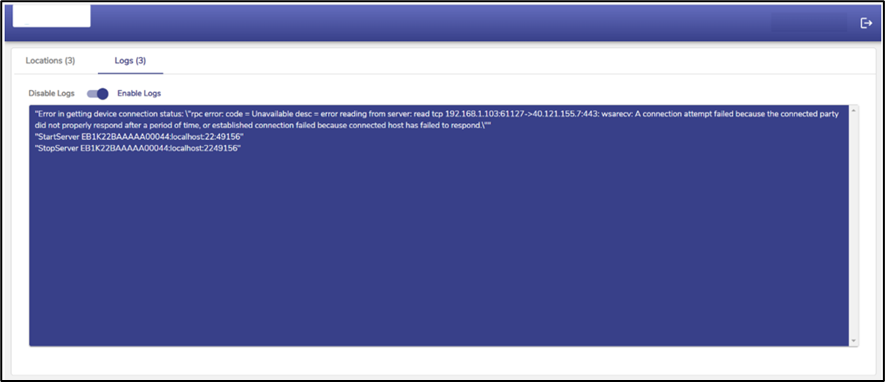
Logs Enabled
When the user opts for Disable Logs, the actions performed by the user won’t be shown in the Logs tab.
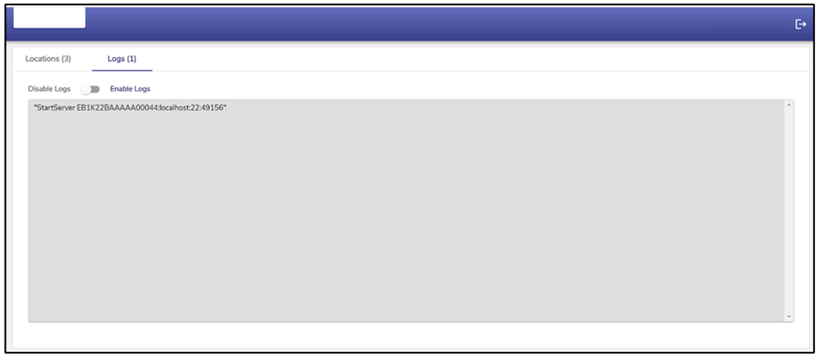
Logs Disabled
Version
Every new release will result in the version update, and the same will be shown here. Currently the latest version of KonnectRM application is 4.0.17.
If the user is working on an older version of the application, the following message is displayed on the Landing page.

New Upgrade Available
The user can click Download button to directly download and use the latest KonnectRM application.
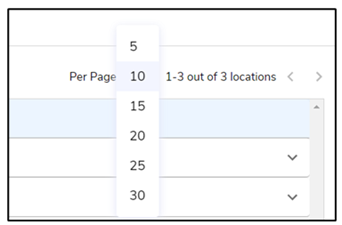
Pagination
When the user adds many sites under the Locations tab, the pagination helps the user navigate to each page by using the < > buttons. User can also choose the number of sites to be seen in a single page. By default, the count will be 10. The minimum count is 5. Users can display up to 30 devices in one page.
Pagination
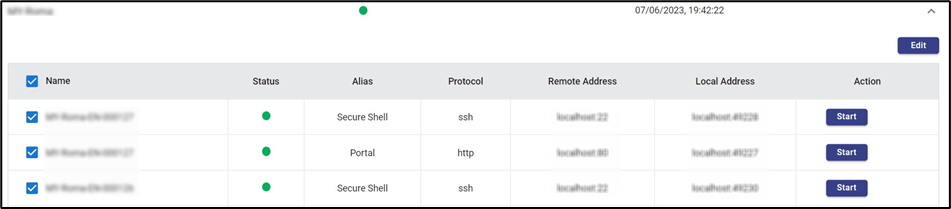
Location Detail Table
Location details added by user
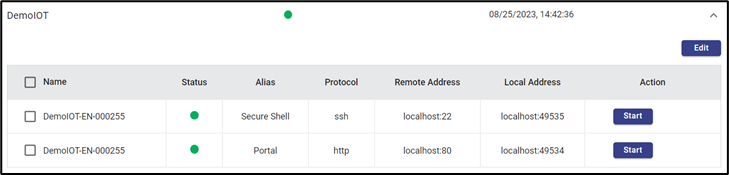
User can see all the added site here. The site Name and the Connection status will be visible for the user.
On clicking the site name, user can expand each site and see the devices under them.
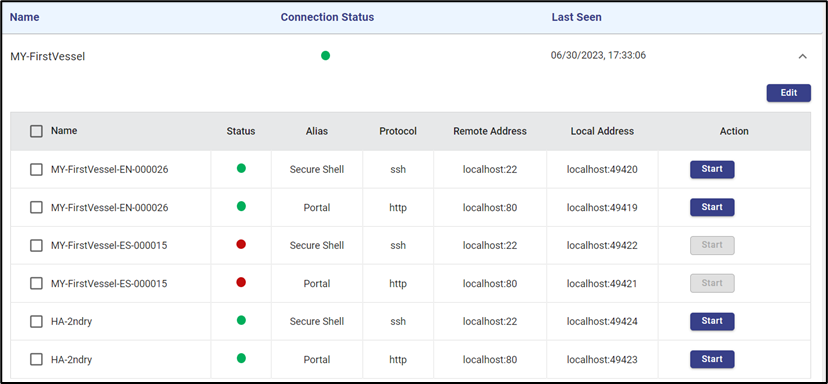
Location and device details on expansion
The table shows the Device Name, Connection status of each device, Aliases of the devices, Protocol used (ssh, http, https, telnet), Remote Address, Local Address and Actions the user can perform for each of the devices.
Status – Connection status of the device.
Green circle indicates that the device is online.
Red circle indicates that the device is down.
User can delete the devices by clicking the checkboxes, click on Actions and click Delete selected devices.
Start button under the Action column enables the user to start the connection of that device. On clicking it the connection will be established given that the Device is online.
The Start button will be blue and clickable only when the device is online.
When the device is Offline, the Start button will be disabled and grey in colour.
After the successful connection user can open the server by clicking the Open button and can close the connection by clicking the Stop button. On clicking Open, the system redirects to the portal asking for the user credentials to access the server. For SSH connection a command line interface will open and for http/https, a new browser tab will open.

Enabled Open button after a successful connection
When the user tries to open any non-Lan SSH devices, a pop is shown asking the user to enter SSH Username. Otherwise, it directly opens a terminal and asks for admin password to be entered.
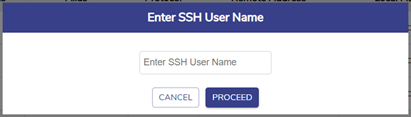
Pop-up to enter SSH username when for LAN devices
Editing Device Details
Click the Edit button to edit the details of existing devices or also add a new device.

Location and device details on click of edit
Click the Pencil icon to make the details of the device editable.

Edit Device Details
When a site has multiple nodes, the user can add connections under each applicable node by using the Name field dropdown.
The user can edit the Name, Alias, Protocol, Remote Address and Local Address of the device.
Make the required changes to and click Green tick icon to save the changes.
Click the Save button next to Add connection.
User can copy the device local address by clicking the Copy icon and create a duplicate or similar device with different protocol or aliases.
Adding New Connection
+ Add Connection button allows the user to create and configure a new device. Clicking + Add Connection creates a duplicate of the parent device.
After adding it can be edited and changed to any of the child device according to the user’s needs.
Adding a VSAT Modem (https) Connection
Click + Add Connection button.
A duplicate of the parent device is created.
Click Pencil icon of the newly added connection.

Parent Device Duplicated
In the Name field, select the required device from the dropdown menu.
Enter an Alias name for the connection.
In the Protocol field, select https from the dropdown menu.
Enter the IP Address of the VSAT Modem:443 in the Remote Address field.
Click Green tick icon to save the changes.
Click the Save button next to Add connection.
The VSAT Modem connection is added.

Add VSAT Modem Connection
Adding a LAN Switch (http) Connection
Click + Add Connection button.
A duplicate of the parent device is created.
Click Pencil icon of the newly added connection.

Parent Device Duplicated
In the Name field, select the required device from the dropdown menu.
Enter an Alias name for the connection.
In the Protocol field, select http from the dropdown menu.
Enter the IP Address of the LAN Switch:80 in the Remote Address field.
Click Green tick icon to save the changes.
Click the Save button next to Add connection.
The LAN Switch connection is added.

Add LAN Switch Connection
Adding a Putty or WinSCP (ssh) Connection
Click + Add Connection button.
A duplicate of the parent device is created.
Click Pencil icon of the newly added connection.

Parent Device Duplicated
In the Name field, select the required device from the dropdown menu.
Enter an Alias name for the connection.
In the Protocol field, select ssh from the dropdown menu.
Enter the IP Address of the ssh connection:22 in the Remote Address field.
Click Green tick icon to save the changes.
Click the Save button next to Add connection.
The SSH connection is added.

Add SSH Connection
Adding an RDP/VNC Connection
Click + Add Connection button.
A duplicate of the parent device is created.
Click Pencil icon of the newly added connection.

Parent Device Duplicated
In the Name field, select the required device from the dropdown menu.
Enter an Alias name for the connection.
In the Protocol field, select http from the dropdown menu.
Enter the IP Address of the http connection:3389 in the Remote Address field.
Click Green tick icon to save the changes.
Click the Save button next to Add connection.
The RDP/VNC connection is added.

Add RDP/VNC Connection