
EdgeFocus - Quick Start Guide
1 EdgeFocus
The EdgeFocus system is a compact IoT/Embedded server designed for edge computing, networking, and firewall applications. This guide provides step-by-step instructions to help you set up and access the system efficiently.
The Primary components of EdgeFocus system are:
EdgeFocus appliance
200W 80Plus Gold AC power supply
Rackmount kit (rails or brackets)
Power cord
Drive trays for 2.5" SATA/PCIe SSDs
Optional: SATA cables, riser card, fan tray, I/O shield
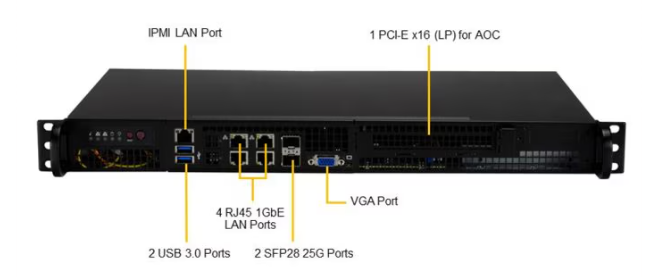
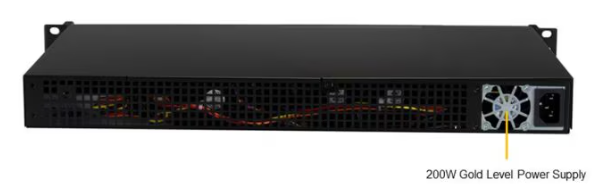
Figure 1 EdgeFocus Front Panel (top) and Back Panel (bottom)
1.1 Hardware Overview
Front Panel:
4x 2.5" SATA/PCIe drive bays
Power and system status LEDs
USB 3.0 ports
VGA port
Rear Panel:
4x 1GbE RJ45 LAN ports
2x 25GbE SFP28 ports
1x Dedicated BMC/IPMI LAN port
1x PCIe Gen4 x16 FHHL expansion slot
Power supply input
Internal Components:
Intel Xeon D-1700 series processor
4x DDR4 DIMM slots (up to 256GB ECC RDIMM)
M.2 slots:
1x M-Key (NVMe/SATA)
1x B-Key (SATA/USB)
1x E-Key (USB)
3x 40x28mm PWM cooling fans
1.2 Initial Setup
1.2.1 Mounting the Server
Install the server into a standard 19" rack using the provided rackmount kit.
Ensure adequate ventilation around the server for optimal cooling.
1.2.2 Connecting Power
Connect the AC power cord to the server's power supply.
Plug the other end into a reliable power source or UPS.
Press the power button on the front panel to turn on the server.
1.2.3 Network Connections
Connect the desired LAN ports to your network infrastructure.
For remote management, connect the BMC/IPMI LAN port to your management network.
1.3 Accessing the System
1.3.1 IPMI Web Interface
Determine the IP address assigned to the BMC/IPMI port via DHCP or consult your network administrator.
Open a web browser and navigate to the IPMI IP address.
Log in using default credentials:
Username:
ADMINPassword:
ADMIN
Change the default password upon first login for security.
1.3.2 BIOS/UEFI Access
Connect a monitor to the VGA port and a keyboard to a USB port.
During boot-up, press the
DelorF2key to enter the BIOS/UEFI setup.Configure system settings as needed.
1.4 Operating System Installation
Connect a bootable USB drive or use virtual media via IPMI to install your preferred operating system.
Follow the OS installation prompts to complete the setup.
Ensure all necessary drivers are installed for optimal performance.
1.5 Troubleshooting
No Power: Verify the power cord is securely connected and the power source is active.
No Display: Ensure the monitor is connected to the VGA port and powered on.
Network Issues: Check network cable connections and verify IP settings.
Overheating: Ensure fans are operational and airflow is unobstructed.