
Guide: Configuring VPNs
Keywords: EdgeOS, VPN, Wireguard VPN, IPSec VPN
1 VPN - Use Cases
EdgeOS VPN services are useful for connecting Remote to Centralized Sites/Systems. For example, connecting remote EdgeOS sites to a more centralized office with EdgeOS system that is hosting corporate services (VOIP, File Services). The EdgeOS supports this via Wireguard VPN endpoints, and some use cases are discussed here.
For EdgeOS 6.5.4 systems the VPN services will not operate over Advanced Bonding or POP Dropoff WAN links. VPN when being routed over an Internet Link with POP Dropoff OR Advanced Bonding, the client traffic will go native via the Advanced Bonding or POP PEP tunnel – and NOT use the VPN.
Therefore, when using VPN services, configure the VPN Client EdgePro/Fit SDWAN with “Standard Bonding” or “Priority WAN” for WAN/Internet link selection; with this the client traffic will utilize the VPN and WAN links as intended.
Note - The EdgeOS 7 will support VPN services with Advanced Bonding usage.
1.1 Use Case 1 - Single Remote Site using Multiple Hub-Side VPN EdgeServers
It is common for remote sites to require point to point VPN connections to various centralized sites. A common example would be a EdgeServer at a remote site that requires:
Local Internet access,
Local Media System requires Internet access from a specific home location, &
Local Management Network requires connectivity to an Operations Centre.
A visual for this is provided here:
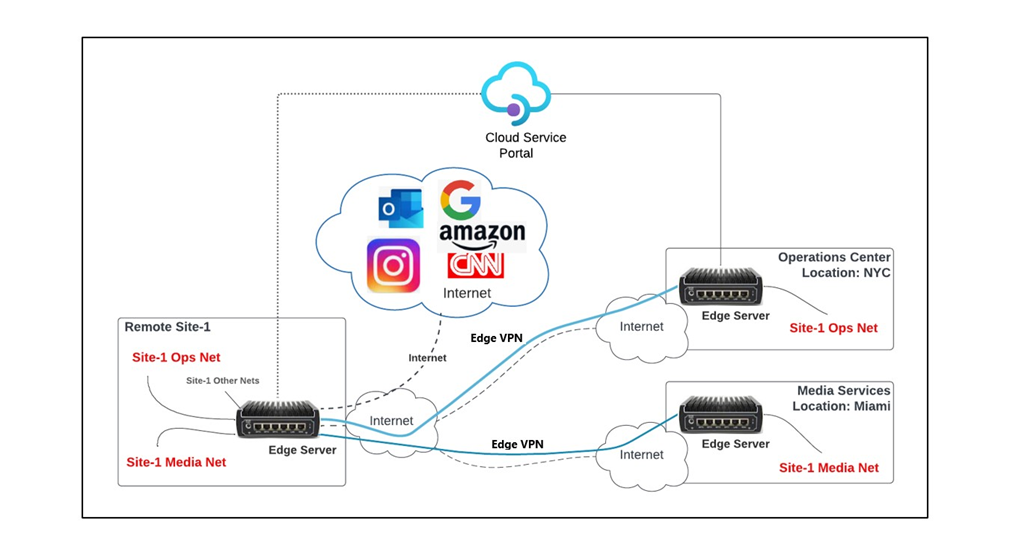
Figure 1 VPN Use Case 1
The VPN User Guide will define the steps to build a VPN from remotes sites to centralized centers. At the time of the current release (6.5.4) – Enterprise VPN supports:
Site - 1 can select an Access Networks to utilize a specific VPN instance Configured.
Above Example: all of the Site-1 Ops Net Access Network will utilize VPN to the Operations Centre.
VPN will utilize the WAN profile configured for that Access Network, including transport over PEP/Advanced Bonded WAN interfaces.
Access Networks using VPN will egress the Centralized VPN server natively – NO NAT.
Access Networks not selected to use VPN will egress via the defined WAN Profile rulesets.
1.2 Use Case 2 - Multiple Remote Sites Using a Common Hub-Side VPN EdgeServer
It is common for multiple remote sites to VPN to a common centralized site or Hub. A common example would be an EdgeServer at a remote site that requires:
Local Internet access,
Remote Media System requires Internet access from a Hub-side location, &
Remote Management Network requires connectivity to a Hub-side Operations Centre.
A visual for this is provided here:
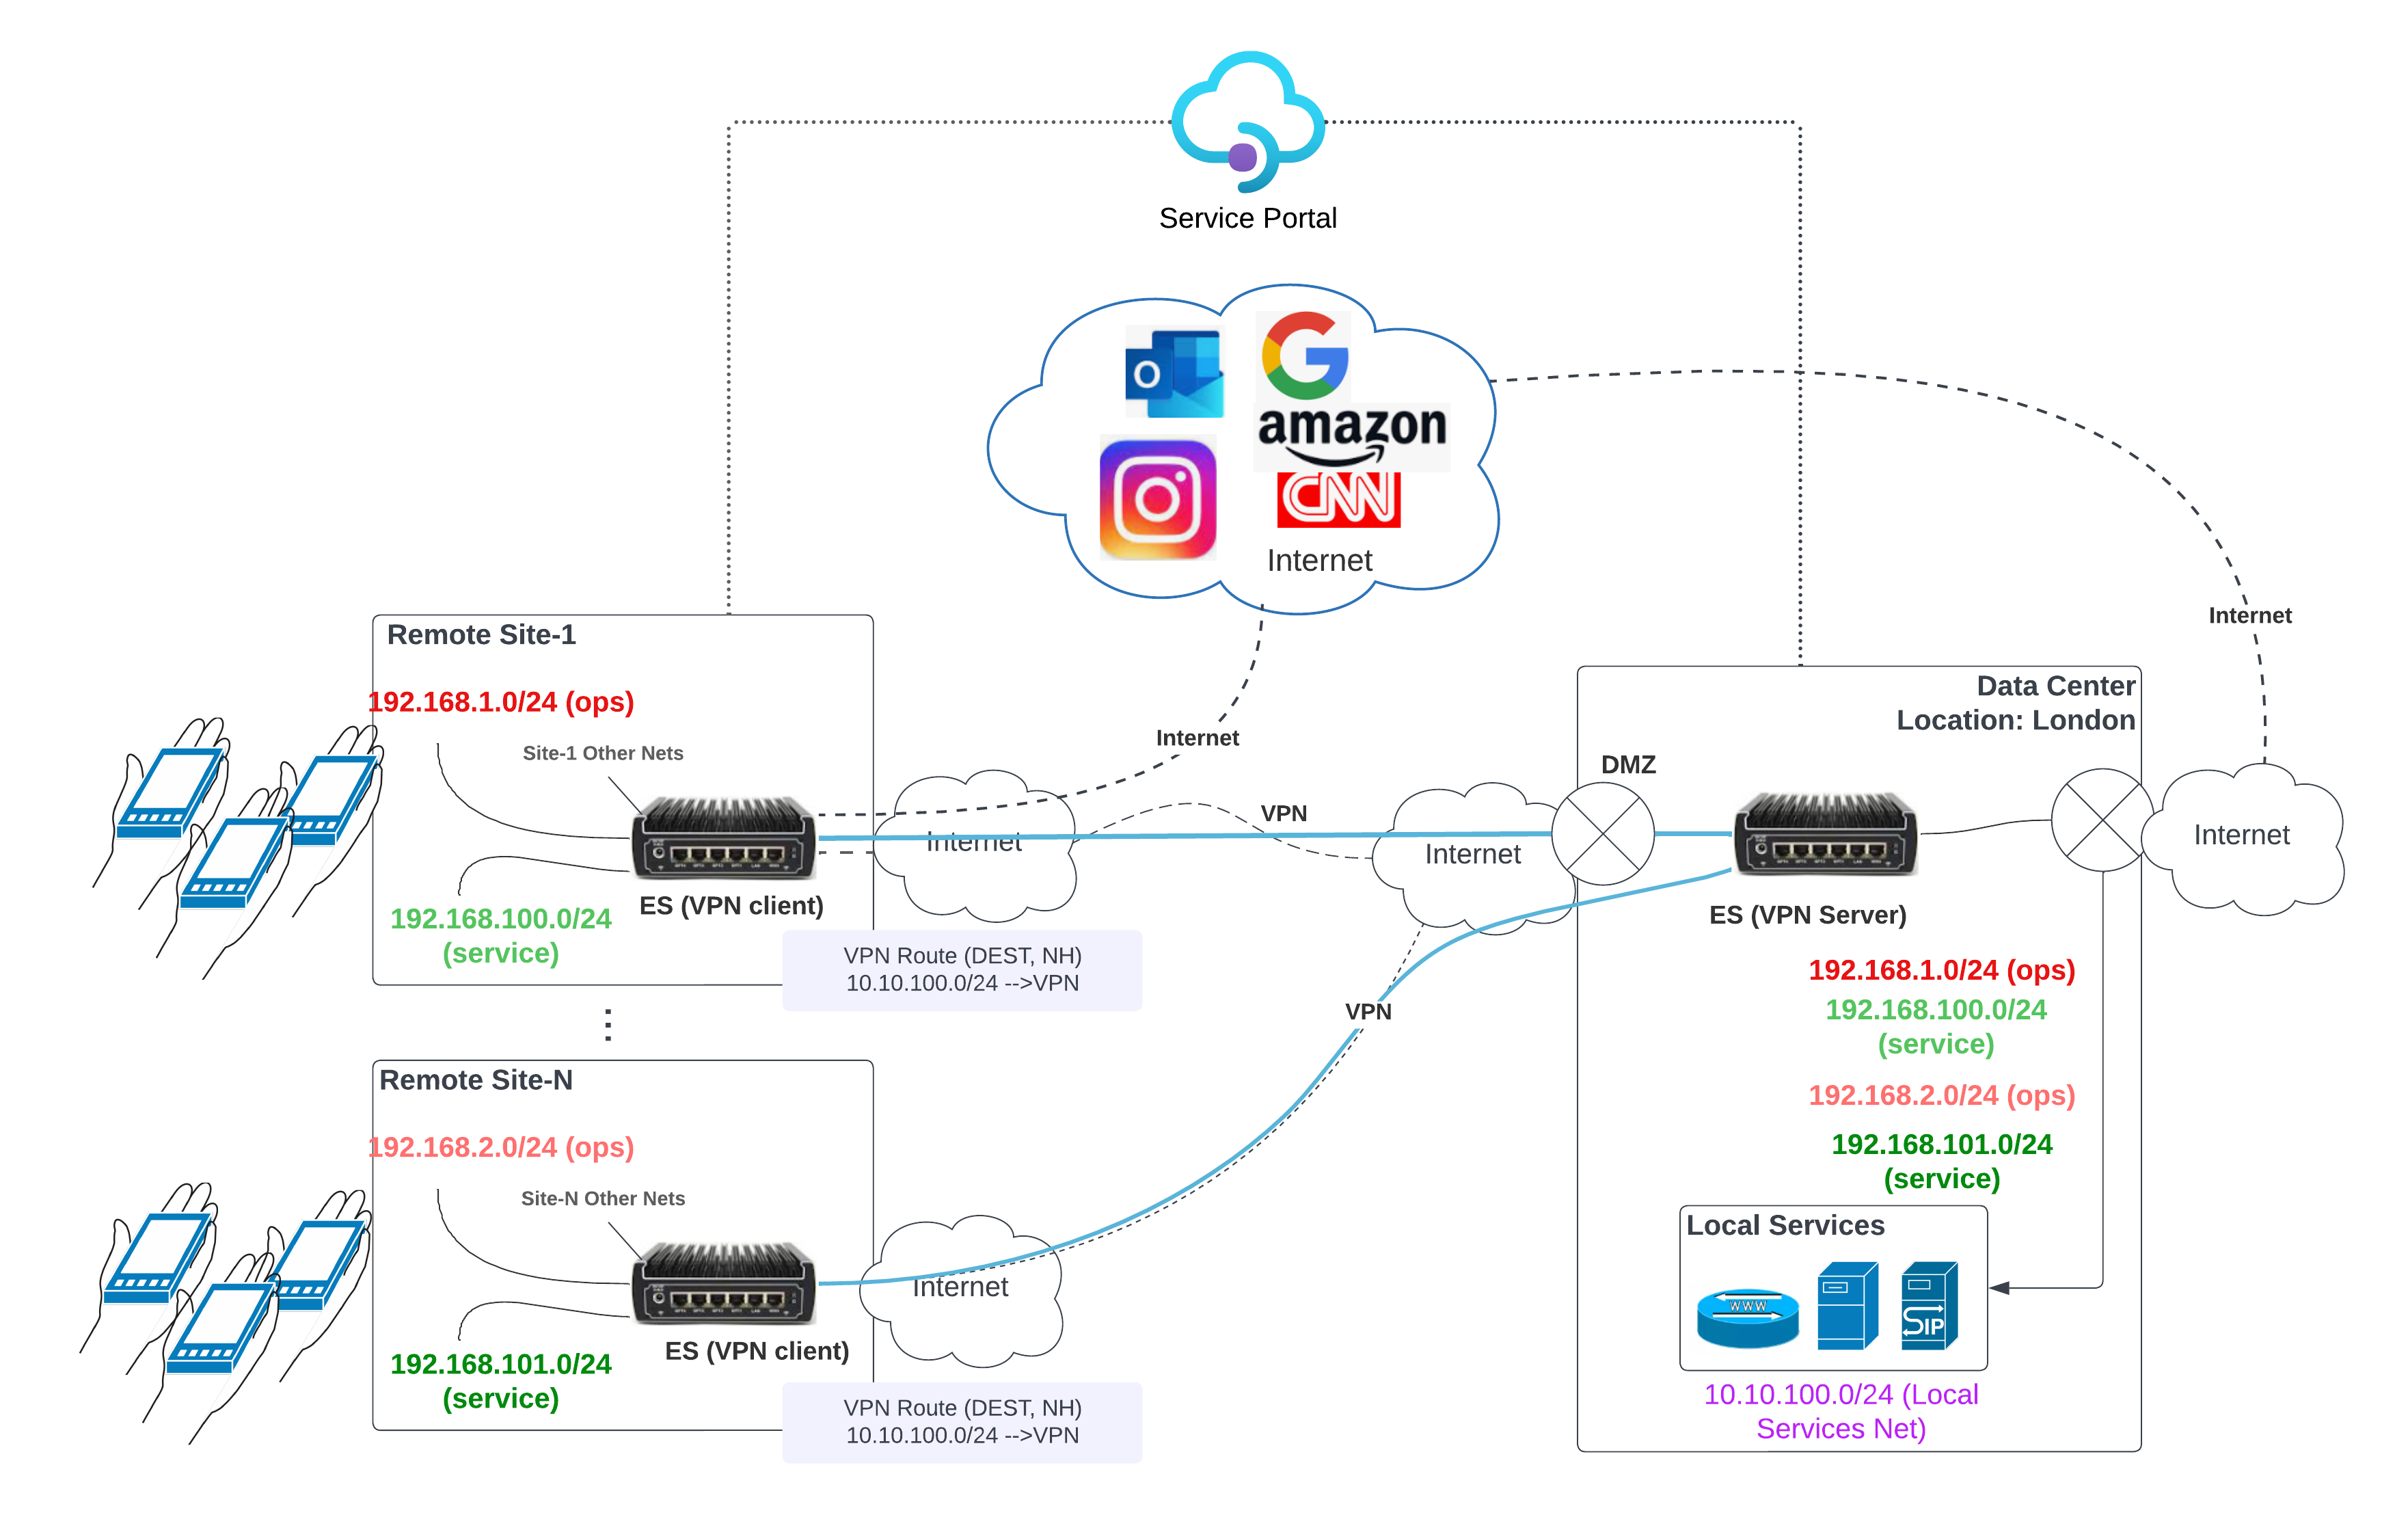
Figure 2 VPN Use Case 2
The VPN User Guide will define the steps to build a VPN from remotes sites to centralized centers. At the time of the current release (6.5.4) – Enterprise VPN supports:
Hub-Side EdgeServer VPN Server “configures” VPN Server.
Public Listening IP/Port (from DMZ).
Configures a VPN Client profile for each remote EdgeServer.
Load Specific VPN Client profile on target remote EdgeServer.
Each remote EdgeServer can select/create Access Network to utilize a specific VPN profile loaded.
As well Set Destination Routes that will use the VPN profile (can be all, or targeted Networks) – split tunnel.
Now, Access Networks (and target routes) will use VPN, and this will traverse the WAN link defined by the WAN profile configured for that Access Network, including transport over PEP/Advanced Bonded WAN interfaces.
Access Networks using VPN will egress the Centralized VPN server natively – NO NAT.
Access Networks not selected to use VPN, or destination networks not routing over VPN will egress via the defined WAN Profile rulesets.
2 Wireguard VPN
The Wireguard VPN feature allows the creation of VPN tunnels between EdgeServers – with one EdgeServer being a VPN Client (Remote site) and another being a VPN Server (Operations Center).
To configure the Wireguard VPN feature, follow the below steps:
Login to the EdgeServer.
Menu -> Configuration Wizard
Select ‘General Settings’.
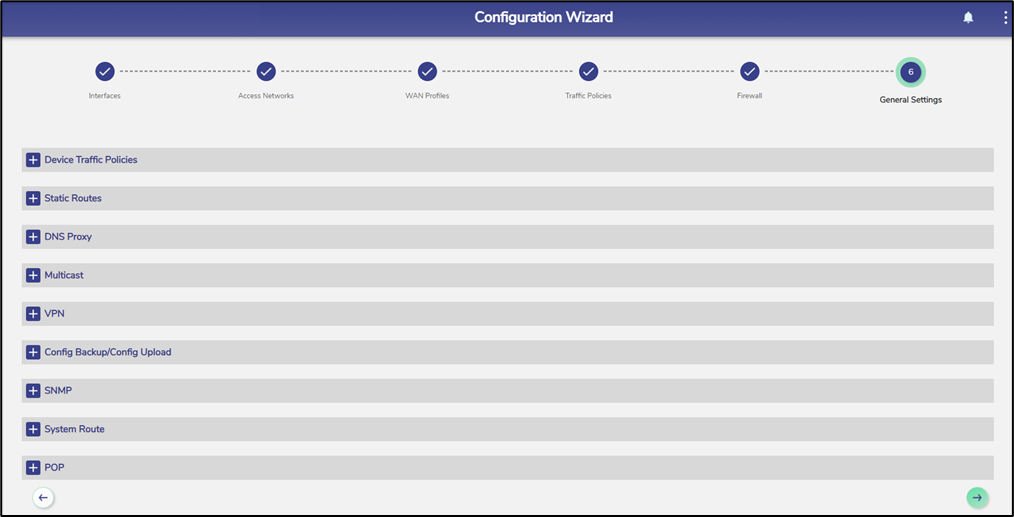
Figure 2 General Settings
Clicking on the '+' next to the ‘VPN’ option expands it to the following:
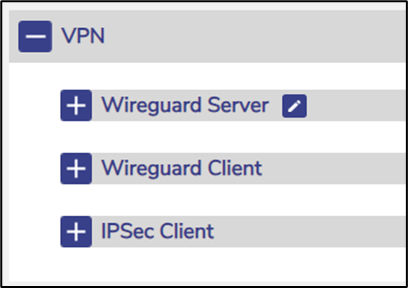
Figure 3 VPN
At this point it is possible to access configuration of the EdgeServer as a Wireguard VPN Server or VPN Client, expanding each via the corresponding '+'. The following sections will define the primary sequential steps to configure a Wireguard VPN between two EdgeServer devices.
2.1 Configure Wireguard VPN Server
To run as a Wireguard VPN server, an EdgeServer configures a listening IP (or FQDN) and UDP port number that is reachable by the Wireguard VPN Client – in most cases the VPN Server IP needs to be a public IP and reachable. To do that, click on the icon next to the ‘Wireguard VPN Server’ label. The following dialog opens.
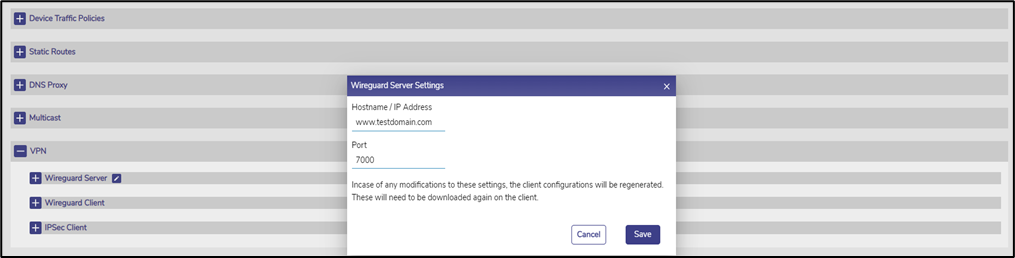
Figure 4 Wireguard Server Settings
Enter the appropriate hostname/IP and the appropriate port. Then press ‘Save’. The Wireguard VPN Server is now running and listening on the given IP:port.
Caution: It is suggested to not use/configure a Virtual IP for the EdgeServer WAN Interface. Starlink Virtual IP (VIP) interface on the EdgeServer PRO (Wireguard Server) might inhibit inbound connections and cause the inbound requests to fail.
2.2 Create Wireguard VPN Client Profile on VPN Server
Next, the user must create a Wireguard VPN Client Profile, and let’s resume from the same location as Step 1.
Expand the + Wireguard Server icon to access the configuration of the EdgeServer.
If a Client Configuration were built, the user will see a list of Wireguard VPN client profiles as shown in the below figure:

Figure 5 Wireguard Server
To add a new Wireguard VPN client connection, click ‘+ New Client’ button. The following dialog opens.

Figure 6 Add New Client
Set a unique ‘Client Alias Name’ – this is for local reference only.
Set the subnet(s) that will be routed through the Wireguard VPN tunnel from the Client.
Caution: Please make sure that a Route is added, e.g. 10.0.0.0/24 and NOT a host IP or similar - e.g. 10.0.0.1/24.
This will set the IP Routes on the Wireguard VPN Server to forward these IP via the VPN tunnel back to the Remote VPN client.
Overlap with the subnet specified in any other profile, or w/ IP space on the EdgeServer hosting the VPN server functions will cause routing conflicts.
Save Wireguard VPN Client Profile when complete.
Note that the new Alias will be listed in the Wireguard VPN Server.
2.3 Download Client Profile
To allow for Wireguard VPN Client configuration on the remote EdgeServer, download the VPN Client ‘profile’. This is done by clicking the ‘DOWNLOAD’ folder icon for the created VPN connection. The downloaded profile will be used to configure the Wireguard VPN client connection on the remote EdgeServer. The VPN Client profile download will take the Alias Name “.json” at the end; for the example below test.json would be the default name.

Figure 7 Download Client Profile
A Wireguard VPN Client Profile must be created for every VPN Client connecting to the Wireguard VPN Server.
2.3.1 Delete Client Connection
To delete a Wireguard VPN client connection, click on the Delete icon on the entry. At this time, it is not possible to edit a client connection - the connection must be deleted and re-created.

Figure 8 Delete Client Connection
2.4 Configure Wireguard VPN Client
An EdgeServer Wireguard VPN Client service can have multiple VPN Clients configured. Thus, for example, an EdgeServer can have a unique Wireguard VPN tunnel for each Access network on the EdgeServer. All of the Wireguard VPN Clients can terminate on a common EdgeServer VPN Server, or can utilize different EdgeServer VPN Servers.
In any case, each EdgeServer Wireguard Client must be configured using the Wireguard VPN client profile downloaded from a Wireguard VPN Server.
To access the configuration of the EdgeServer as a Wireguard VPN Client (different server usually).
Login to the Remote (Wireguard VPN Client) EdgeServer.
Menu -> Configuration Wizard
Select ‘General Settings’.
Select/Expand ‘VPN’.
Expand ‘+ Wireguard Client’.
The client configuration opens with the following screen.
If a Wireguard VPN Server was configured, they will be listed here.

Figure 9 Wireguard Client
2.5 Add Wireguard VPN Server Configuration to Remote EdgeServer
To add a server connection,
Click ‘+ New Connection’ in the upper right of this section.
The following dialog box opens.
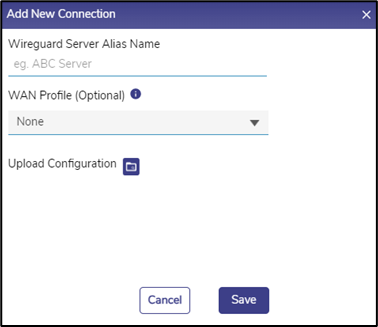
Figure 10 Add New Connection
Choose a unique ‘Wireguard Server Alias Name’, this has local context only.
Select a WAN profile the local Wireguard VPN will utilize egressing the local EdgeServer.
Then click on the ‘Upload Configuration’ folder icon, and select the recently downloaded Wireguard VPN Client profile file (server_alias.json).
This will upload the client profile obtained from the server.
When done, click ‘Save’.
IMPORTANT:
If a WAN Profile is chosen, then that WAN profile should ideally be Priority-based vs. a ‘bonding’ configuration. The Kognitive VPN will utilize one WAN link at a time.
2.5.1 Delete Server Connection
To delete a server connection, click on the Delete icon on the entry. A confirmation dialog will appear.

Figure 11 Delete Server Connection
2.5.2 Edit Server Connection
To edit a server connection, click on the Pencil icon on the entry. The following dialog appears:

Figure 12 Edit Server Connection
Only the Server Connection Name and WAN Profile may be changed. Once done, click the Green tick button.

Figure 13 Confirm Edit Server Connection
The process of setting up the VPN is Done. At this point the VPN between EdgeServer VPN Client and VPN Server are up. However, the use must now associate an EdgeServer VPN Client Access Network to utilize the VPN.
3 IPSec VPN
The IPSec VPN feature allows the creation of VPN tunnels between an EdgeServer and an IPSec VPN server – with the EdgeServer being a VPN Client (Remote Site) and another being an IPsec VPN Server (Operations Center).
The following section will define the primary sequential steps to configure the EdgeServer device as an IPSec VPN Client.
3.1 Configure IPSec VPN Client
An EdgeServer IPSec VPN Client service can have multiple VPN Clients configured. Thus, for example, an EdgeServer can have a unique IPSec VPN tunnel for each Access network on the EdgeServer.
In any case, each EdgeServer IPSec Client must be configured using the IPSec VPN client profile downloaded from an IPSec VPN Server.
To access the configuration of the EdgeServer as a IPSec VPN Client, follow the below steps:
Login to the Remote (IPSec VPN Client) EdgeServer.
Click Menu -> Configuration Wizard.
Select General Settings.
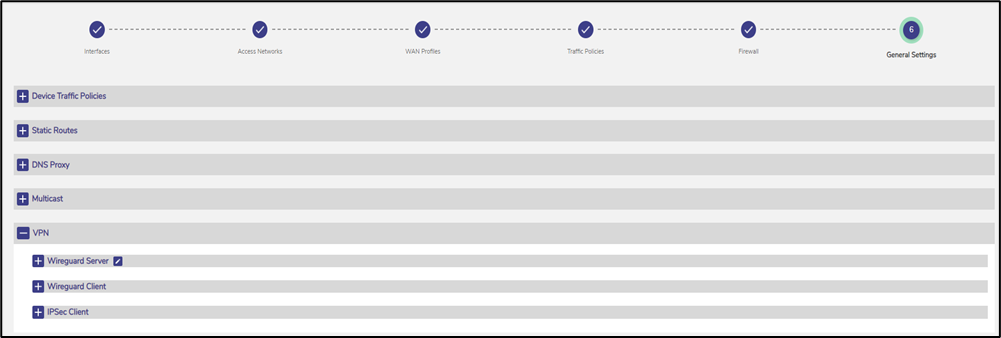
Figure 14 General Settings
Click on the + VPN section.
Expand + IPSec Client.
The client configuration opens with the following screen.
If a IPSec VPN Server was configured, they will be listed here.
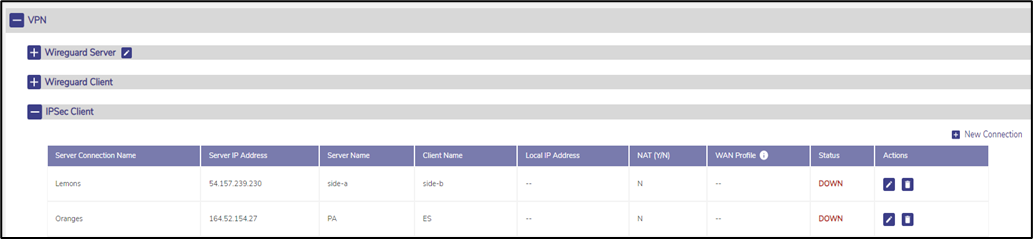
Figure 15 IPSec VPN Client
3.2 Add IPSec VPN Server Configuration to Remote EdgeServer
To create a new IPSec VPN server connection,
Click + New Connection in the upper right of this section.
The following dialog box opens.
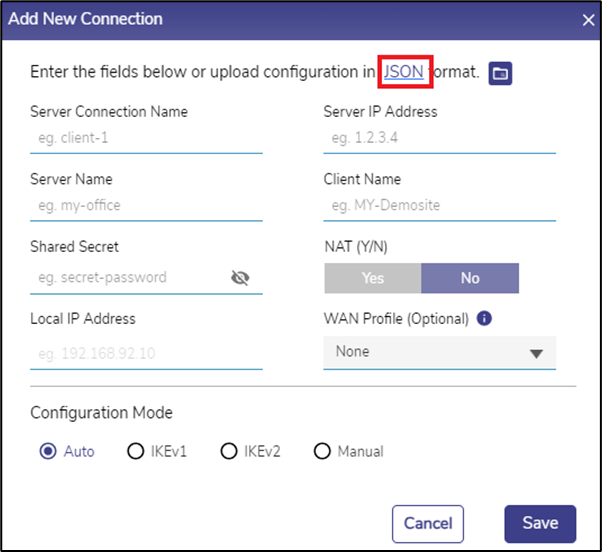
Figure 16 Add New Connection
Enter the Server Connection Name. It will be used to refer to this connection in the rest of the user interface. It must be unique among all VPN connections configured in the system (IPSEC & Wireguard).
Enter the Server IP Address. It is the IP address of the IPSec Server that this connection will connect to. Do note that unlike a Wireguard VPN, there can only be a maximum of one IPSec VPN Connection to any given Server IP.
Enter the Server Name & Client Name. These are the identifiers to be used by the Server and this client to mutually authenticate each other.
Enter the Shared Secret. It is a password shared between the server & client.
If the client will be assigned a single IP address, then select Yes for NAT, and enter that IP address in the Local IP Address field – If not, select No for NAT.
If the NAT field is selected as No, the Local IP Address field will be disabled.
Select a WAN Profile from the dropdown menu for this connection. This field is optional.
The user can also create a new connection by entering the required details in a Sample JSON file and uploading it.
Click the JSON button to download the Sample JSON file.

Figure 17 Sample JSON File
Enter the required details in the sample file and save it.
Click the Upload Configuration Folder icon to select and upload the sample file with the required details. All the required fields will be taken from the sample file and auto populated in the dialog box.
The Configuration Mode controls the details of the IPsec configuration. By default, Auto is chosen, which causes the client to try auto-negotiation of security algorithms with the server – it will set itself to use IKE version 2 and propose a reasonable subset of algorithms that it supports.
If that does not work, a more advanced configuration is required. The actual protocol and algorithms must then be known by the user. If the user knows that the server requires IKE version 1, then choose IKEv1. The following options then appear.
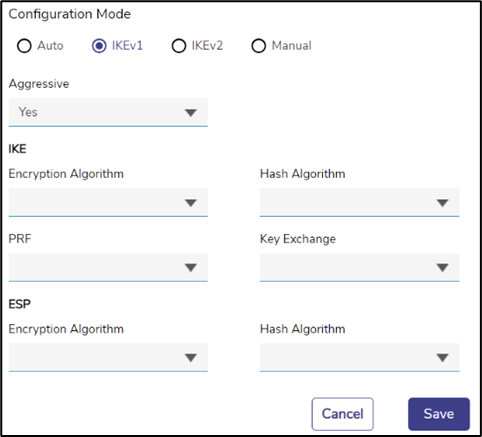
Figure 18 IKEv1 Mode

Figure 19 IKEv2 Mode
For IKEv1, the user must specify if the server requires the Aggressive Mode, or will it use the Main Mode. Specify it by selecting Yes/No in the Aggressive dropdown.
The user must then enter the details of the algorithms to be used for the IKE Phase (also called ‘Phase 1’) and ESP (also called ‘Phase 2’). Select the correct algorithms from the drop downs. Note that the PRF drop down allows a None option.
If the server requires IKE version 2, select IKEv2. The configuration workflow for that is similar to that of IKEv1, except that there is no Aggressive/Main mode distinction.
If none of the above Configuration Mode works, there is an option for a Manual mode of configuration, wherein a configuration file snippet (consisting of ‘<whitespace> <name> ‘=’ <value> entries in the StrongSWAN ‘ipsec.conf’ configuration file format) may be specified. Choose Manual mode to do it.
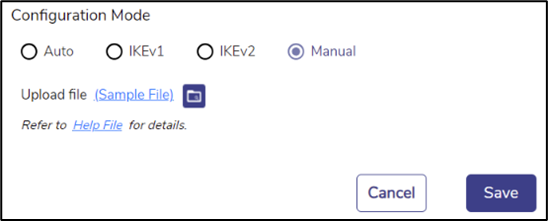
Figure 20 Manual Mode
Click Sample File to download the sample file.
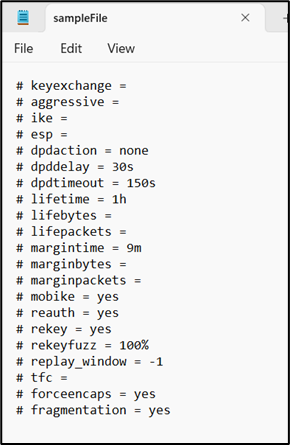
Figure 21 Sample File
Enter the required details in the sample file and save it.
Click the Upload Configuration Folder icon to select and upload the sample file with the required details.
Click Save to create the VPN connection.
3.2.1 Delete Server Connection
To delete a server connection, click on the Delete icon on the entry. A confirmation dialog box will appear.
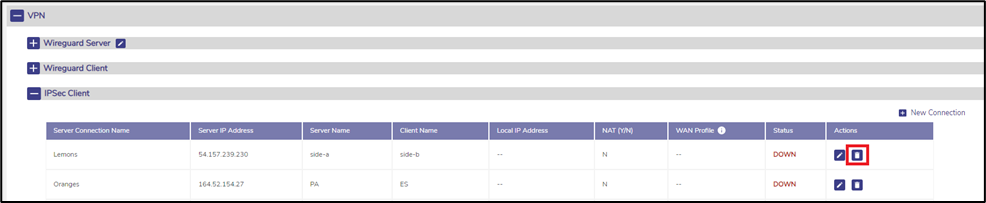
Figure 22 Delete Server Connection
3.2.2 Edit Server Connection
To edit a server connection, click on the Pencil icon on the entry.
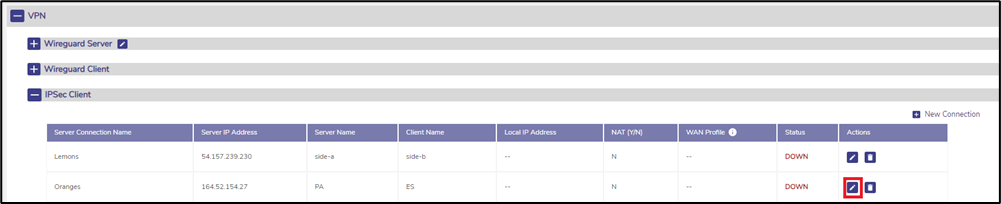
Figure 23 Edit Server Connection
4 Assign Access Networks (VLAN) to VPN
The remote EdgeServer running the VPN Client can now associate an Access Network(s) (or VLANs) to the VPN. Once this step is done, all traffic from that Access Network or VLAN will flow through the corresponding VPN tunnel to the VPN server specified in the client profile (where it can be further routed as desired).
To configure this;
Login to the Remote (VPN Client) EdgeServer.
Menu -> Configuration Wizard
Select ‘Access Networks’.
For an existing Access Network, Select the Pencil icon for the Network to use the VPN.
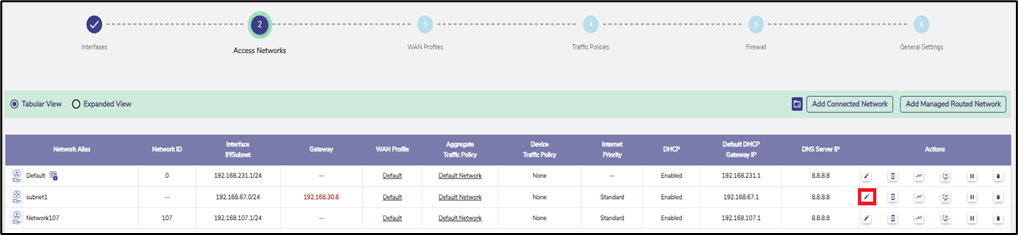
Figure 24 Access Networks
In the ‘Access Networks’ configuration for any Connected Network, the server connection to associate with can be selected from the VPN Section. The selection can be done at the time of creating an Access Network or by editing it as shown below.
Scroll down to the VPN section.
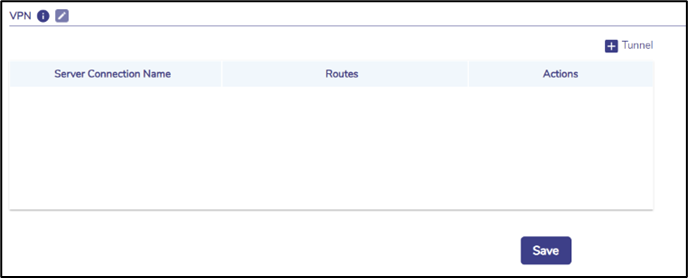
Figure 25 Create VPN Tunnel
Click + Tunnel button to associate any route with any configured VPN connection – route ‘0.0.0.0/0’ is the ‘default’ route. Multiple such routes may be defined – making ‘split tunnel’ configuration possible. Any route not caught by this table will be routed over the default routing of the EdgeServer using the WAN Profile configured.
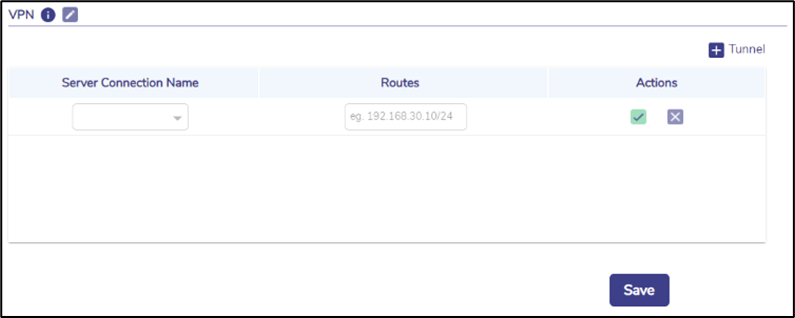
Figure 26 Select VPN Connection
Choose the VPN Connection from the Server Connection Name dropdown.
Enter the Routes in the CIDR format.
Click the Green tick icon to confirm.
Click X to cancel the operation.
IMPORTANT: Please ensure that the subnet used in the access network matches the subnet specification of the server connection used (routing).
Note that if the VPN goes down for any reason, the Access Network associated with this VPN will be down as well. Now, if this VPN is associated with a WAN Profile that uses Ethernet (priority 1) and Cellular (priority 2) – if the Ethernet goes down, the VPN will be moved to Cellular – VPN/Access Network keep Internet connectivity. However, if the VPN has a single link (e.g. Ethernet only), or for some reason the VPN cannot be established – the Access Network using the VPN will be down.
5 Internet Dashboard Page
An overall view of the VPN status can be obtained from the EdgeServer Web UI Internet Status screen, as shown below. The VPN status can be seen at the bottom left of the screen. A VPN Server section will be present if there is at least one client connection configured. Likewise, a VPN Client section will be present if there is at least one server connection configured.
Hover the cursor on the icon given to the left of the Connection Name under the VPN Client section to view the type of VPN connection (Wireguard/IPSec).
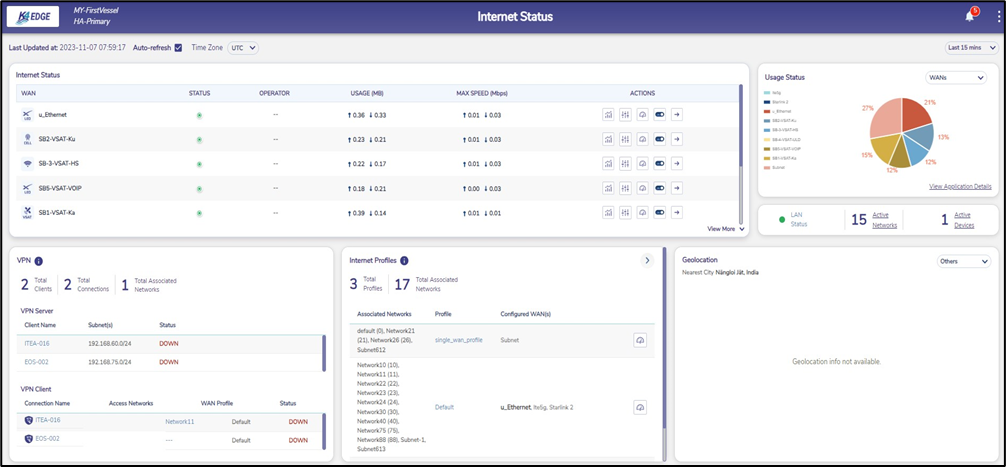
Figure 27 Internet Status
If there are server connections but no client connections:
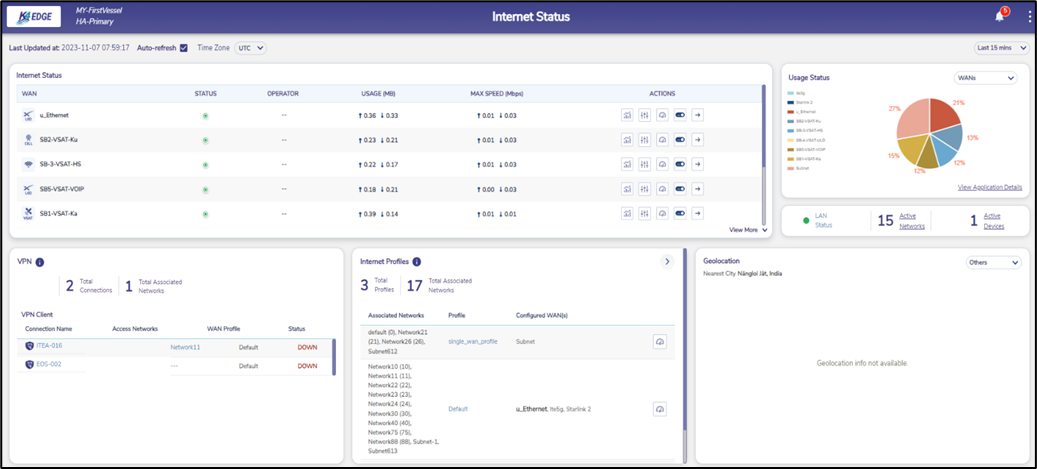
Figure 28 View VPN Status
If there are client connections but no server connections:
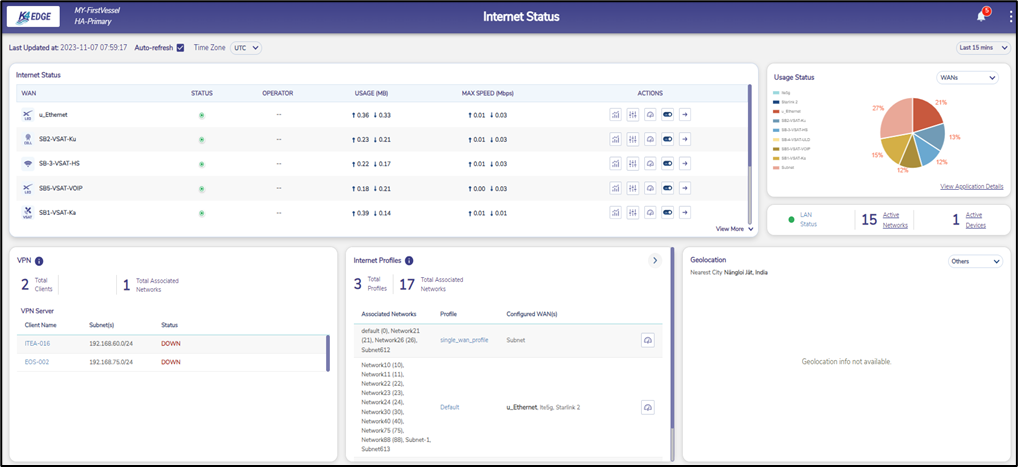
Figure 29 View VPN Status
6 Firewall Settings
When the VPN tunnels are established, one can then set Firewall rules to block remote Access Networks from reaching each other and/or reaching VPN Server Side Access Networks just the same.
6.1 Blocking Remote Networks from each other
For example, using Figure 2 VPN Use Case 2, one can set a Firewall rule on EdgeServer (VPN SERVER) to restrict network reachability between Remote Site-1 Access Network 192.168.1.0/24 and Remote Site-2 Access Network 192.168.2.0/24.
To do this:
From the EdgeServer (VPN Server) User Interface:
Menu --> Configuration --> Firewall
Click “+” sign in upper right corner to add a Firewall rule.
Pop-Up configuration dialog appears.
Configure the following rule and Save.
Key points
Notice that "No Network" (interfaces) are selected, thus the IP data flow is blocked irrespective of interface. This must be set to "No Network" - so unchecked all interfaces.
The Source and Destination Networks on the Remote EdgeServer are entered, and Deny is set to block this traffic.
There is no protocol or port of interest. It just blocks all. However, the user can add that level of detail if needed.
The user can also set the IP space to a single host or subnet of /24 similarly if needed.
When the rule is saved it will appear in the Firewall rules page.
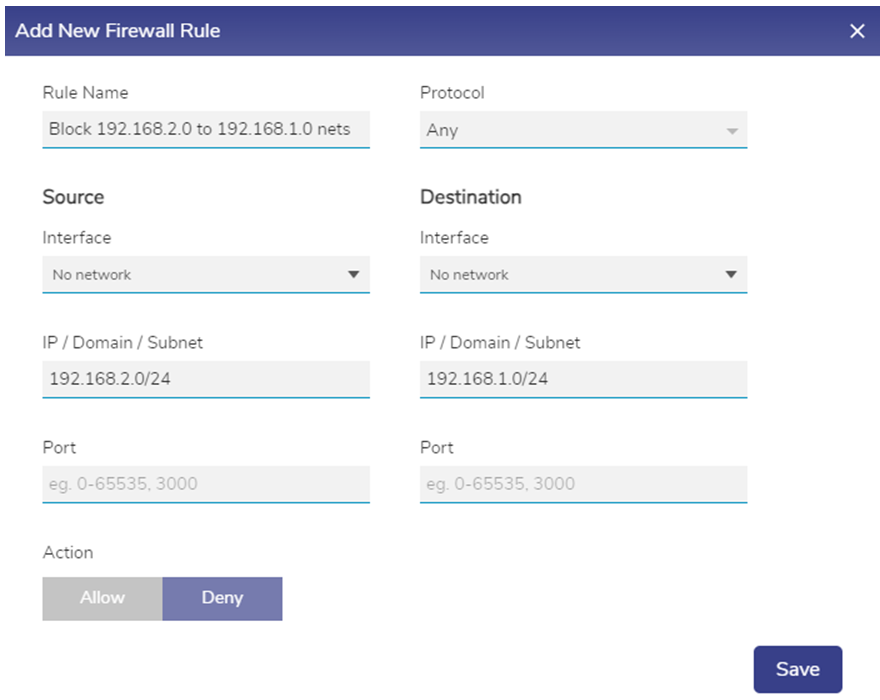
Figure 30 Add New Firewall Rule
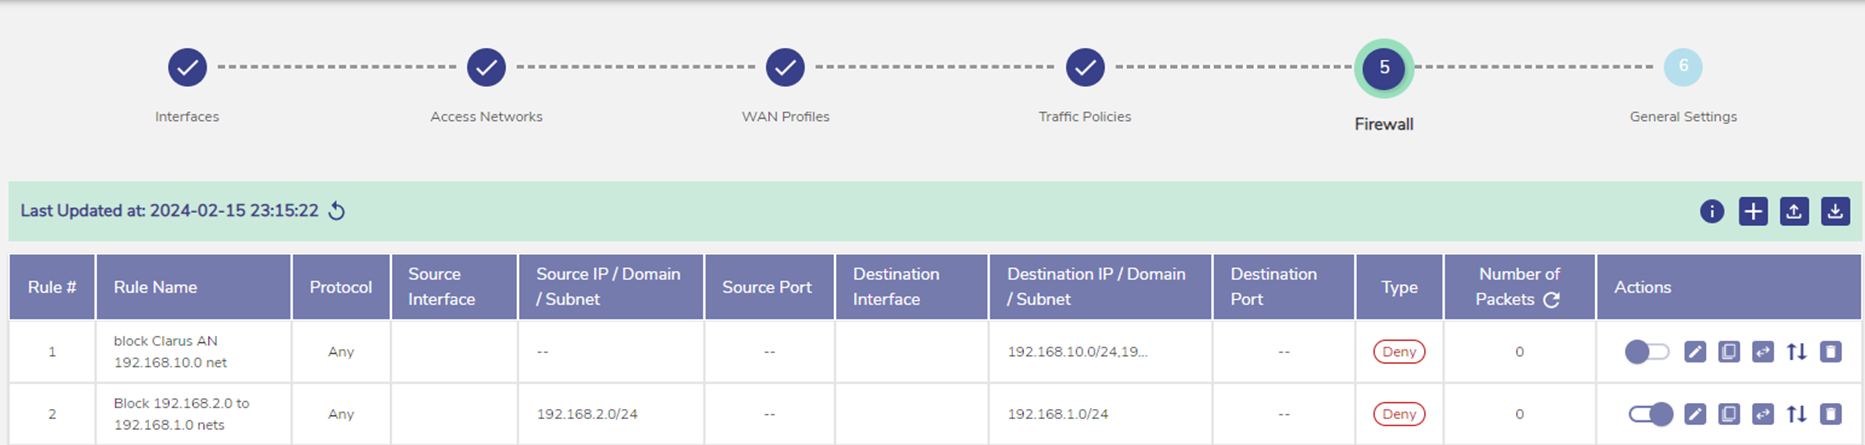
Figure 31 Firewall
The order of operation for the rule can be changed, and can have mirror/reverse rules by clicking the additional Action buttons to the right.
Now, if the user wants to block Remote Networks from reaching the EdgeServer (VPN Server) local networks, then the user must set a rule on the Remote Site EdgeServer. The methodology is the same, however the rule is set/saved on the Remote Site EdgeServer.
Appendix: Wireguard VPN Client Usage with EdgeServer Wireguard VPN Server
Another consideration to leverage the Wireguard VPN services, would be to setup a VPN Client on one’s Laptop (windows, macos) or mobile (android, ios). The VPN Client is “Wireguard” and is available at: Installation - WireGuard. The EdgeServer Wireguard VPN Server configuration is no different for this option, thus follow those steps. The Laptop VPN Client configuration is outlined here for windows:
Install the Wireguard for Windows.
Note that the EdgeServer Wireguard VPN Server will not assign an IP address’ or set routes for the Wireguard VPN client at this time.
What the Wireguard VPN client can provide, is a simple way to validate the End2End VPN configuration, and Internet reachability.
Click on ‘Add Tunnel’ Lower left, select ‘Add empty tunnel’.
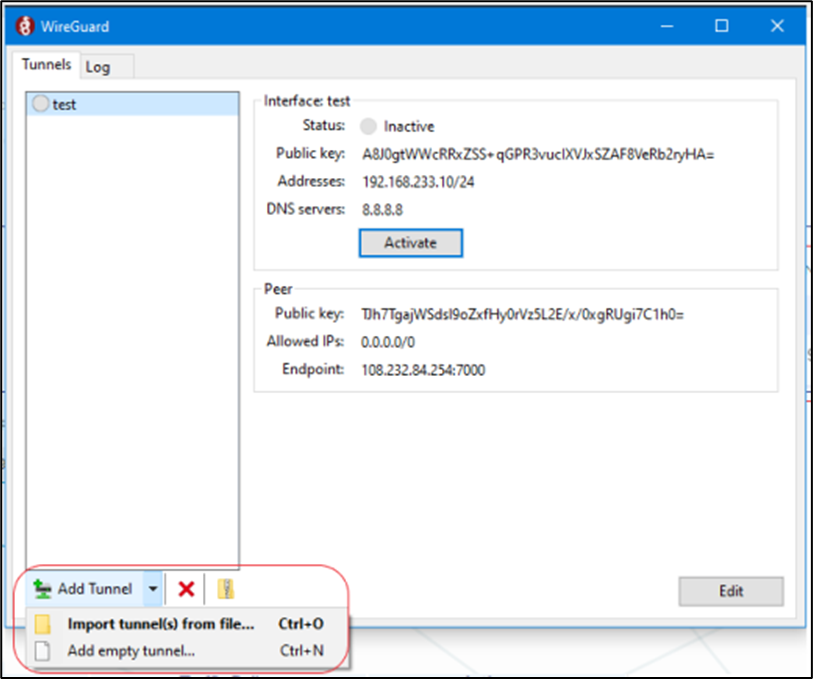
Figure 32 Install Wireguard
This provides a dialogue to configure the Wireguard VPN Client.

Figure 33 Create New Tunnel
Note that the following fields will need to be added:
At Top:
Name – set a local “alias name” for the VPN profile – likely the EdgeServer connecting too.
PublicKey -> Cannot change this.
In Working Space:
[Interface] – Wireguard VPN Client configuration
PrivateKey -> Utilize client_private Key value from client.json file
Address -> Utilize network value from the client.json – this was defined on the EdgeServer Wireguard VPN server.
DNS -> DNS server – optional.
[Peer] – Wireguard VPN Server configuration
PublicKey -> Utilize server_public key from client.json file
AllowedIPs -> Set to 0.0.0.0/0 to allow all IP.
Endpoint -> Set to public IP (name) and listening port of Wireguard VPN Server – this is within client.json file.
When done – click Save, and the final tunnel file will look similar to:
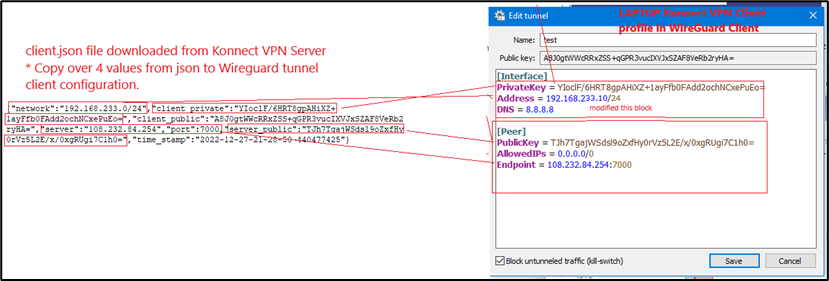
Figure 34 Edit Tunnel
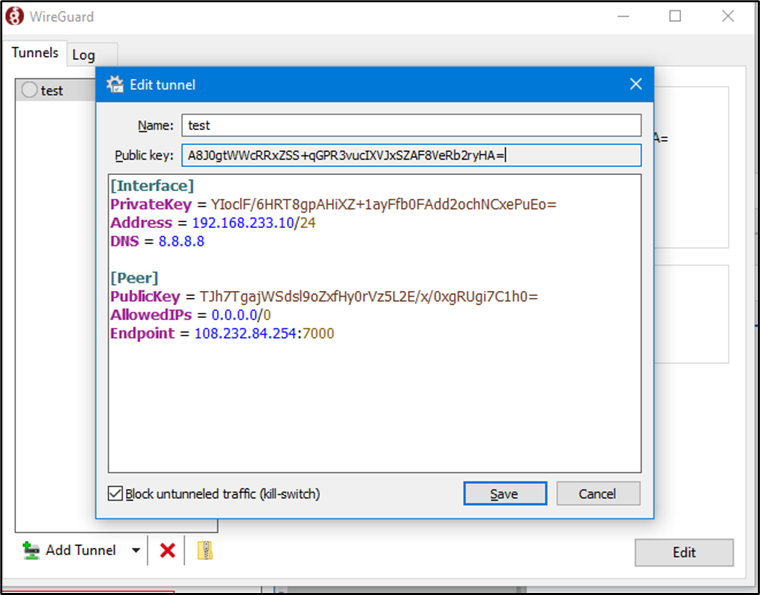
Figure 35 Edit Tunnel
Now, to test the connection simply highlight the client profile created in the Wireguard VPN Client, “test” here, and click “Activate”. It will state “Active” if connected or NOT. Thus to test if internet is available, open a browser to verify if the Internet is available. If yes, one can verify the internet IP by doing a whatismyip check.