
Cellular Controller
Overview and Requirements
A compatible external USB modem can be used with the EdgeOS system, and the associated Cellular Controller page will only be available when a compatible external modem is connected.
Once connected and with a powered up EdgeServer running EdgeOS 6.5.1 or above, the External USB Modem will be automatically added to the system and will appear as shown below in Figure Interfaces.
Physical Configuration of Interface
To manually configure the modem or make changes after installation:
Login to the EdgeServer -> Menu -> Configuration Wizard -> Interfaces
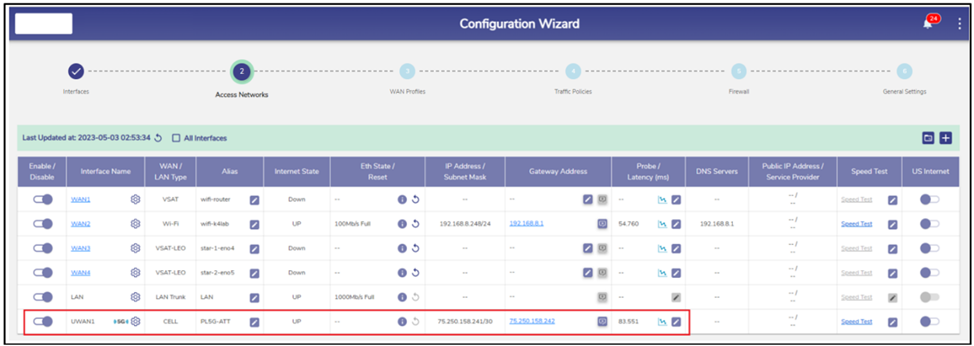
Interfaces
To configure the UWAN1 Interface as Ext5G, perform the following steps:
Click on the Toggle icon and disable the UWAN1 Interface.
Click the Gear icon next to the Interface. A popup appears.
Select the Interface Type as WAN from the drop down, see Figure Interface - EXT5G.
Select the WAN type as CELL from the dropdown menu.
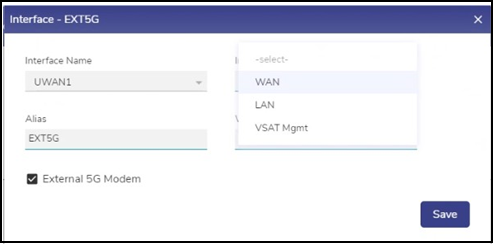
Interface – EXT5G
Cellular Controller Management
Once the Ext5G is configured on the EdgeOS System, user can view analytics from the modem.
Cellular Controller
To view the Ext5G controller, perform the following steps.
Login to the EdgeServer -> Menu -> Cellular Controller
For the example shown here, there are two tabs, first for CELL 1 (an external cellular source) and a second for Ext5G (the External USB Modem).
The reference images are in the EdgeOS User Guide.
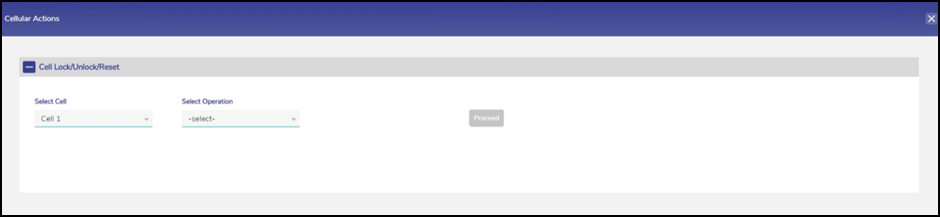
Click Cell Lock/Unlock/Reset. The cell lock/unlock becomes available, see Figure Cellular Actions in the EdgeOS User Guide.
In the Select Cell list, click a cell whose modem is to be reset.
In the Select Operation list, click Reset Modem. The Proceed button becomes available.
Click Proceed. The Alert pop-up window appears.
Click OK.

Cellular Controller Management Page (map not shown)
Detailed Functions
Software Version - The version of the Ext5G Modem Firmware.
IMEI - IMEI of the modem.
Status - Displays the status of the modem. Additionally, specifies the SIM Priority Configuration (Auto or Manual) and the number of SIMs.
Green square indicates that the modem is active and in use.
Red square indicates that the modem is inactive and not in use.
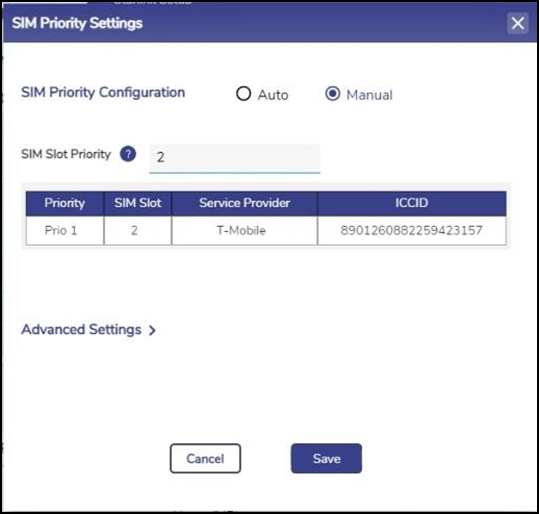
SIM Priority Configuration is set to ‘Auto’ by default.
To update SIM Priority Configuration, perform the following steps:
SIM Priority Configuration is set to ‘Auto’ by default.
To update SIM Priority Configuration, perform the following steps.
Click next to status field. The SIM Priority Configuration popup appears.
Click radio button next to Manual. The SIM Slot Priority field becomes enabled.
Enter the SIM Slots in priority order of the preference, see Figure SIM Priority Settings - Manual.
Click Save.
User can click Advanced Settings to update the remaining fields such as SIM Connection Retry Count and Network Performance Thresholds, see Figure SIM Priority Advanced Settings.
SIM Priority Settings - Manual
Click Save.
User can click Advanced Settings to update the remaining fields such as SIM Connection Retry Count and Network Performance Thresholds, see Figure SIM Priority Advanced Settings.

SIM Priority Advanced Settings
Operator/PLMN - The name of the service provider and slot number of the SIM in which the SIM of that service provider is inserted is displayed in the following format.
The name of the service provider [Number of the SIM slot in which the SIM is inserted]. For example: T-Mobile[2].
Additionally, PLMN is specified.
Strength - The strength of the signal (RSSI, RSRP, RSRQ) is displayed on hover.
To view the signal strength of the cell, point the mouse to the signal corresponding to the Strength field.
To lock the modem, perform the following steps:
Click Pencil icon corresponding to the Cellular Indicators. The Cellular Actions page appears, see Figure Cellular Actions.
Click Cell Lock/Unlock/Reset. The cell lock/unlock becomes available, see Figure Cellular Actions Options.
In the Select Cell list, click a cell whose modem is to be locked.
In the Select Operation list, click Lock Modem. The Proceed button becomes available.
Click Proceed.
Click OK.
The cell locking process starts, see Figure Cell Lock in Progress.
Once the modem is locked, a successful message is displayed, see Figure Cell Lock Successful.
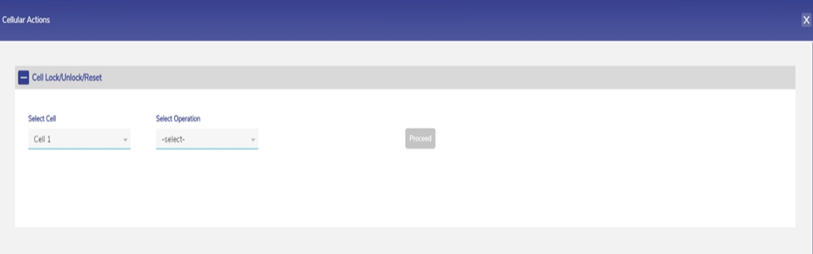
Cellular Actions
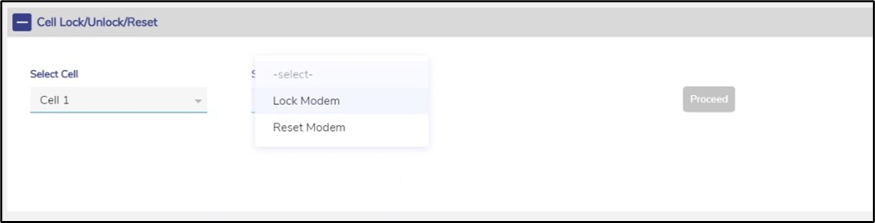
Cellular Actions Options

Cell Lock in Progress

Cell Lock Successful
To unlock the modem, perform the following steps:
Click Pencil icon corresponding to the Cellular Indicators. The Cellular Actions page, appears, see Figure Cellular Actions.
Click Cell Lock/Unlock/Reset. The cell lock/unlock becomes available, see Figure Cellular Actions Options.
In the Select Cell list, click a cell whose modem is to be unlocked.
In the Select Operation list, click Unlock Modem. The Proceed button becomes available.
Click Proceed.
Click OK.
The cell unlocking process starts, see Figure Cell Unlock in Progress.
Once the cell is unlocked, a successful message is displayed, see Figure Cell Unlock Successful.

Figure Cellular Actions
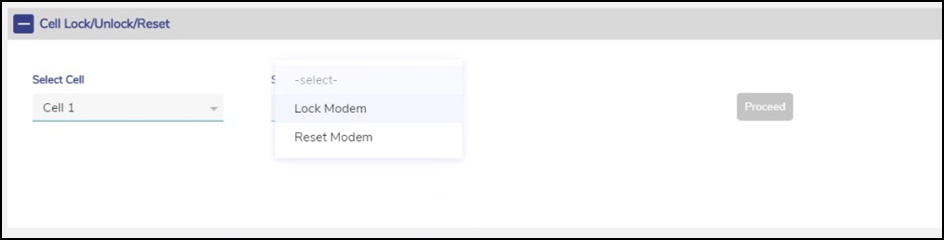
Figure Cellular Actions Options
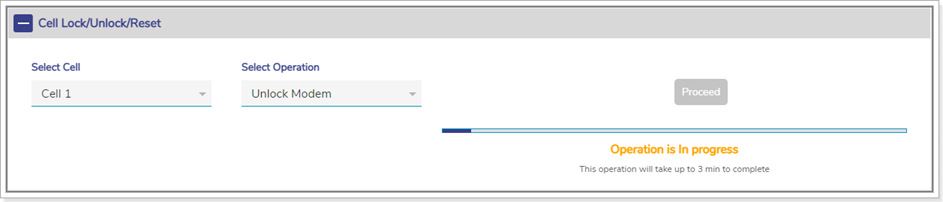
Figure Cell Unlock in Progress
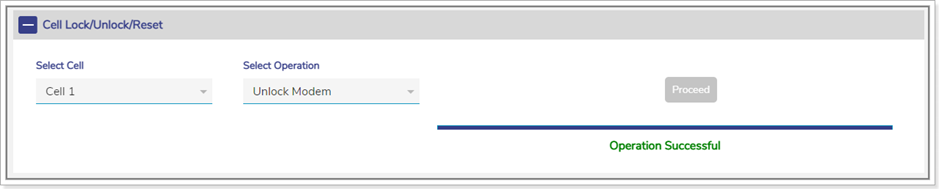
Figure Cell Unlock Successful
To reset the modem, perform the following steps:
Click Pencil icon corresponding to the Cellular Indicators. The Cellular Actions page appears, see Figure Cellular Actions.
Click Cell Lock/Unlock/Reset. The cell lock/unlock becomes available.
In the Select Cell list, click a cell whose modem is to be reset.
In the Select Operation list, click Reset Modem. The Proceed button becomes available.
Click Proceed. The Alert pop-up window appears, see Figure Ext5G Connectivity Alert.
Click OK.
Cellular Actions
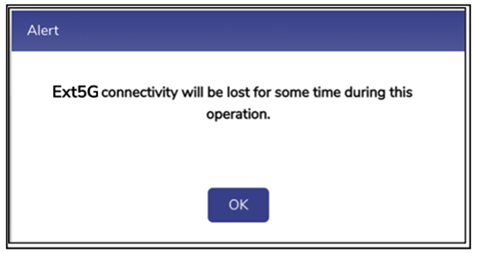
Ext5G Connectivity Alert
Modem reset starts, see Figure Cell Reset In Progress. The modem will be down, and the status of the cell is reflected by the red square.
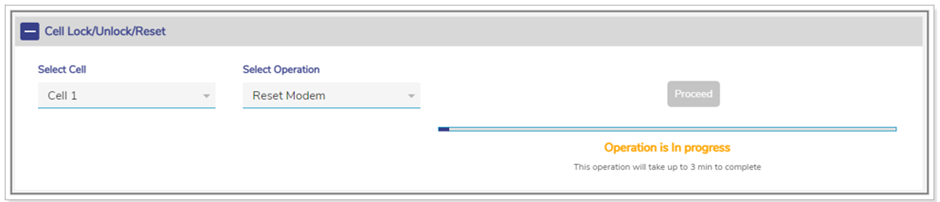
Cell Reset In Progress
Therefore, the Cellular connectivity will be down. Once the modem resets a successful message is displayed, see Figure Cell Reset Successful.

Cell Reset Successful
In addition to this, the Cellular controller will again scan and select the operator to connect for the Cellular connectivity.
Tech/ Band/ Bandwidth - The technology, band and bandwidth of the signal is displayed.
Details - If the modem is active, then the data consumed with duration is displayed. Else the status of the operator is displayed.
Cell ID - The ID of the Ext5G Modem is displayed.