
How To: Create a Captive Access Network
Keywords: EdgeOS, Captive Access Network, CAN, Admin Portal, User Portal, Self Sign Up
Captive Portal: Create A Captive Access Network
This guide details how to create a new Captive Portal with steps on EdgeOS and using Kognitive Cloud.
1. Create a Network Traffic Policy
Enable Captive Access Functionality in an Access Network
Login into the EdgeOS Portal.
Click the icon at the top right corner of the homepage.
Click Configuration Wizard.
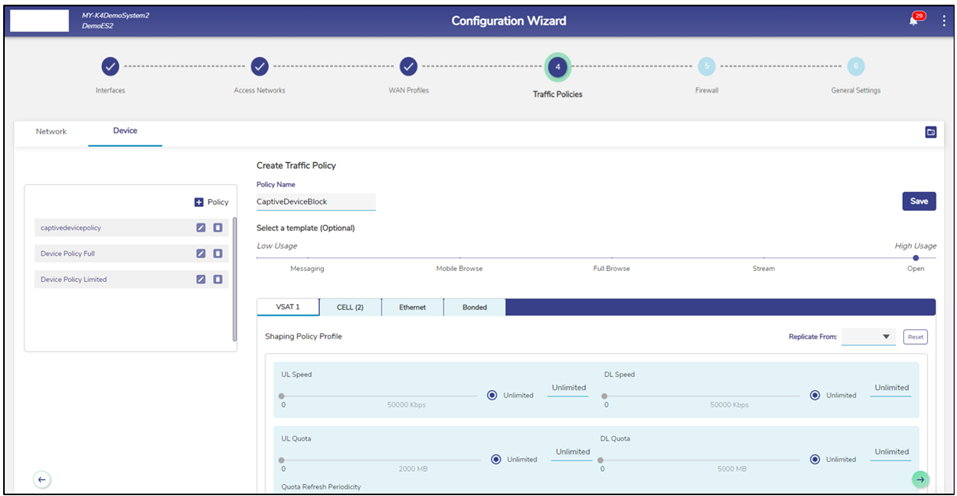
Click Step 5 Traffic Policies in the Configuration Wizard.
By default, the Network tab is selected.
Click + Policy button to create a new network traffic policy. The Policy Name field becomes available under the Create Traffic Policy section.
Enter the Policy Name. For example, “CaptiveNetworkBlock”.
Click Save button.
The above policy should be left empty. All traffic will be redirected to the Captive Portal login page.
2. Create a Device Traffic Policy
A Device Traffic Policy must be created for the devices that will access the CAN. This Device Policy must match with the Plan/Policy configured in CAN admin portal.
Device Traffic Policy
3. Enable Captive Access Network
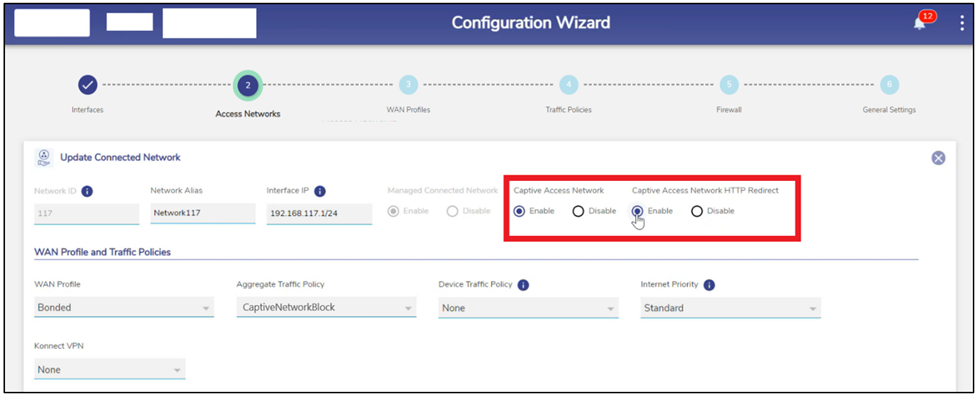
Open the Configuration Wizard in the EdgeOS Portal.
Click step 2 Access Networks.

Access Networks
Select the Add Connected Network button to add a new network and configure it as Captive.
Or Click the Pencil icon of the Access Network that the user wants to make Captive.
Add Connected Network
Select the Enable radio button under the Captive Access Network field to enable the Captive Access Network functionality.
The Captive Access Network HTTP Redirect field is automatically set to Enable. This is done in order to automatically redirect all HTTP requests from the user to the Captive Access Network User Portal. The user needs to enter their valid credentials to log in and access the internet.
Note: If auto redirection is enabled, HTTPs traffic will be blocked and the HTTP traffic will be redirected to the Captive Access Network User Portal.
In the Aggregate Traffic Policy field, select CaptiveNetworkBlock from the dropdown menu.
Set the Device Traffic Policy to None.
Click Save button. The Captive Access Network will be created. This will show up with a Captive Access Network icon next to it on the Access Network list.
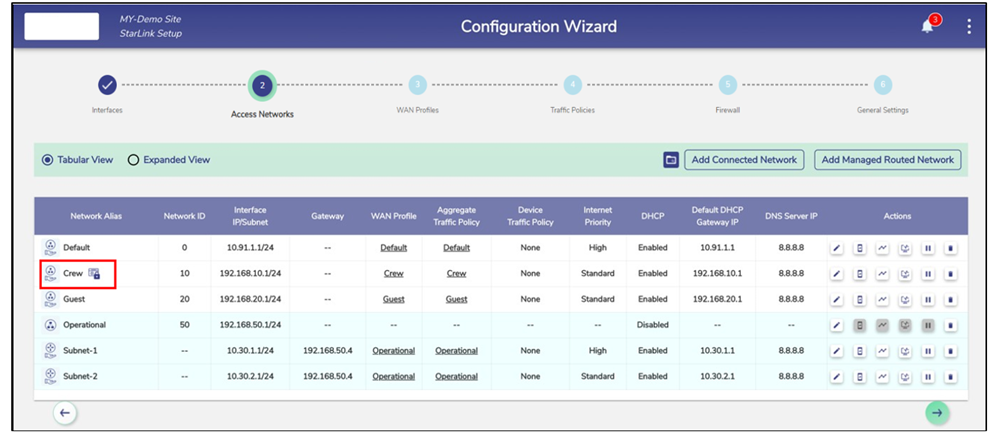
Captive Access Network Icon
4. Assign the Network Traffic Policy
The Network Traffic Policy needs to be assigned to the access network on which captive access is enabled.
5. Create A Plan in the CAN Admin Portal
Click Add New Plan icon to add a new plan. The Add New Subscription Plan dialog box opens.
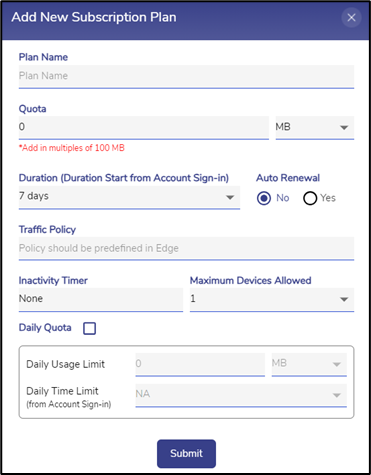
Add New Subscription Plan
Enter a name for the plan in the Plan Name field.
Enter the Quota. The quota should be entered in multiples of 100MB. Select the unit of data as either MB or GB using the dropdown menu. The value of quota cannot be less than 100MB.
Enter the Duration. By default, the validity is set to 7 days. User can choose from the dropdown menu [7, 15, 30, 60, 120 days] or enter a custom days value. Plan Validity is applicable from start of service.
In the Auto Renewal field, select the Yes radio button to enable auto renewal of the plan. Select No to disable auto renewal.
Enter the Traffic Policy. Device policy should be predefined on EdgeOS Portal and must match the name exactly.
Select the duration of Inactivity Timer from the dropdown menu. If the user selects None, their ongoing sessions will not time out.
Select the number of Maximum Devices Allowed from the dropdown menu. The drop down consists of options from 1 to 5 and unlimited. Specify the maximum number of devices from which users can login at a time the with same credentials.
Daily Quota is an optional field. On selecting the checkbox, user can set the Daily Usage Limit and Daily Time Limit.
Daily Usage Limit – Amount of data entered by user should be less than the entered Quota. By default, it is populated with Quota / Duration.
Daily Time Limit – By default, daily time limit is set to NA which is 24 hrs. User can choose 1 hr to 23 hrs from the dropdown menu.
Select Submit button to save the plan.
Note: All the fields except Daily Quota are mandatory to create a plan.
6. Create A User Account for Test
Link the plan to the new user account. First, create a new User
Click Add User Account icon to add a new user.
The Add New User dialog box opens.
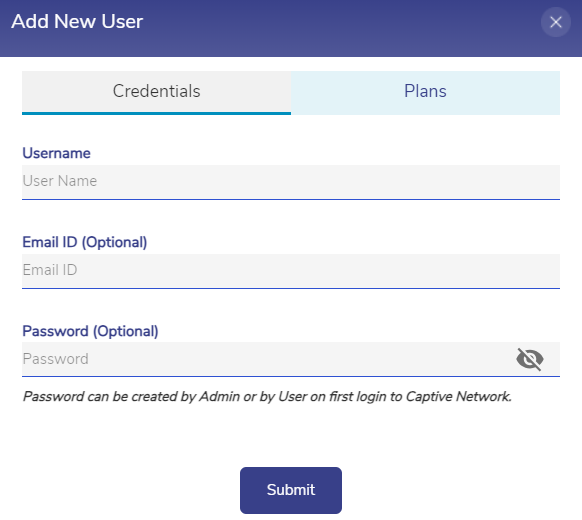
Add New User - Credentials
Enter the Username. This field is mandatory and should be unique.
Enter the Email ID. This is an optional field.
The Admin can create a new user account with or without providing a password.
If the Admin wants to create an user account with password, enter it in the Password field. The Admin must then share this password with the user.
If the Admin wants to create an user account without password, skip the Password field and move to the next step. These user accounts can create their own password when logging into the User Portal for the first time.
Click on Plans tab.
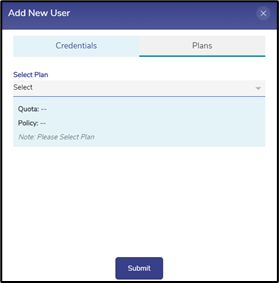
Add New User - Plans
In the Select Plan field, select a plan from the dropdown menu.
Description of selected plan contains the Quota, Policy and Validity of the plan.
Click Submit button to create the user.
7. Test Login
The User can then login into the User Portal using their credentials.

User Portal