
The Policy Routes page allows the user to use the Split Tunnel and Application-Based Routing feature in the SD-WAN interface. This feature is used to route traffic through specific WAN Profiles based on source networks, destination IPs, domain names, applications, or protocols.
From this screen, users can define custom routing policies that send selected traffic through a preferred WAN Profile or VPN tunnel. Each policy can match traffic based on the Source Networks (where the traffic originates), Destination IP ranges, Domain / FQDNs (Fully Qualified Domain Name), Applications (e.g., Zoom, Office 365, Social Media), Protocols (TCP/UDP).
This gives granular control over how different traffic categories are routed across available WAN links.
Overview
Traditionally, routing decisions were made based only on the source network—meaning every device or VLAN could be tied to a single WAN profile.
With the new Policy Routing / Split Tunnel capability, routing can now be controlled based on:
-
Source Network (where the traffic originates)
-
Application (e.g., YouTube, Zoom, Office 365)
-
Destination IP/Subnet
-
Destination Domain / FQDN
-
Protocol (TCP / UDP)
Accessing the Policy Routing Page
-
Select SD-WAN from the left menu bar.
-
Select Policy Routes tab. The user will see a table listing all existing policy routing rules.

Policy Routes Table
The table contains the following columns:
-
Policy # – The rule number in order of priority
-
Policy Name – Name given to the route
-
WAN Profile / VPN – The WAN or VPN through which selected traffic will be routed
-
Source Network(s) – Networks that this policy applies to
-
Destination – IPs, Domains, or Applications targeted
-
No. of Packets – Counters showing how many packets matched the rule
-
Actions – Enable/Disable, Edit, and More Options
This allows admins to quickly see which routing rules are active and what WAN links they affect.
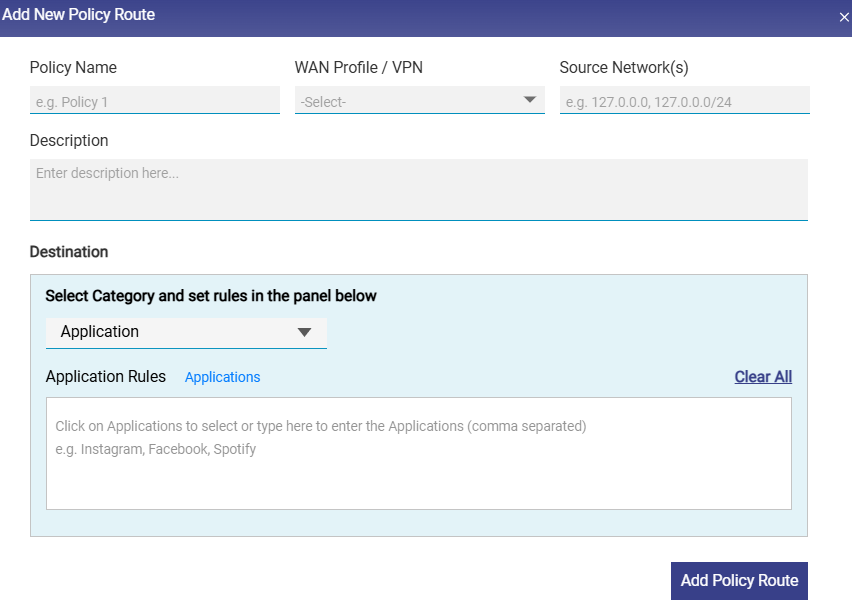
Adding a New Policy Route
-
Click Add Policy Route on the top right of the Policy Routes screen. A configuration window opens with several fields.
-
Enter the Policy Name. It is recommended to give a descriptive name.
-
Select the WAN Profile or VPN tunnel that the traffic should use.
-
Enter one or more source subnets in the Source Network(s) field. Only traffic originating from these networks is evaluated against this policy.
-
Enter any Description if needed.
Destination
This section enables the user to define the destination type. Choose the category from the dropdown menu.
Available Categories:
-
Application
-
Domain
-
IP Subnet
-
Protocol (TCP/UDP)
Application-based routing
-
By default, the Application category is selected. Therefore, the Application Rules field becomes available.
-
Click the Application button to to view and select from predefined apps (e.g., Instagram, Facebook, Spotify, Google Meet, Zoom, AWS, Office 365).
-
The user can also type application names manually (comma-separated) in the text box of the Application Rules section.
-
Select the Add Policy Route button to save the policy route. This allows routing specific applications through a chosen WAN.
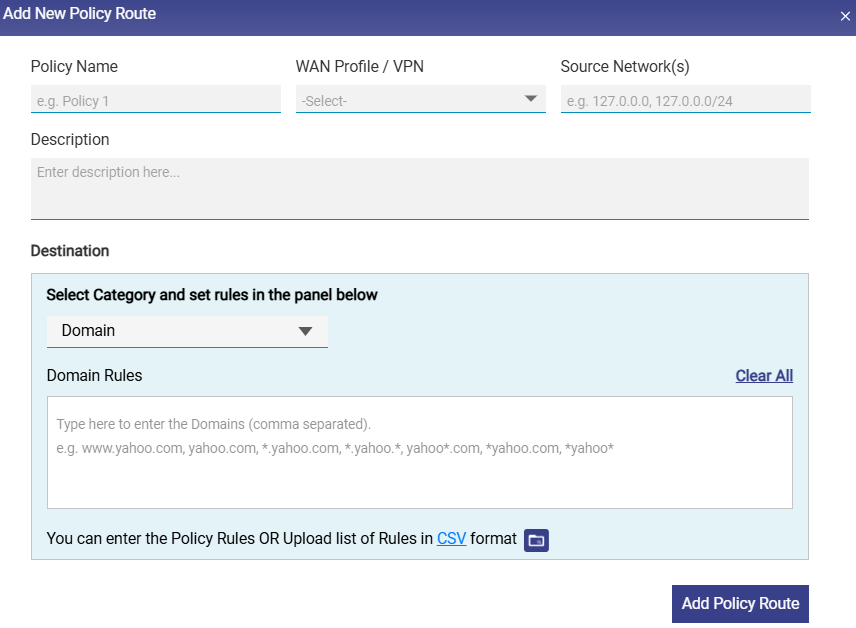
Domain routing
-
Select the Domain category from the dropdown menu to set domain based routing. The Domain Rules field becomes available.
-
Click under the Domain Rules section.
-
Enter the name of the domain in one of the following formats.
-
*.domain.com, where, * Can be any value.
-
The user can enter multiple domain names.
-
The user can also upload the rule list in CSV format. Click the CSV button to download the sample file.
-
Enter the name of the domains in the subsequent rows in the sample file.
-
Click the

-
Upload the CSV file. The Domains entered in the file will be validated by the system and valid domains will be added in bulk.
-
Select the Add Policy Route button to save the policy route.
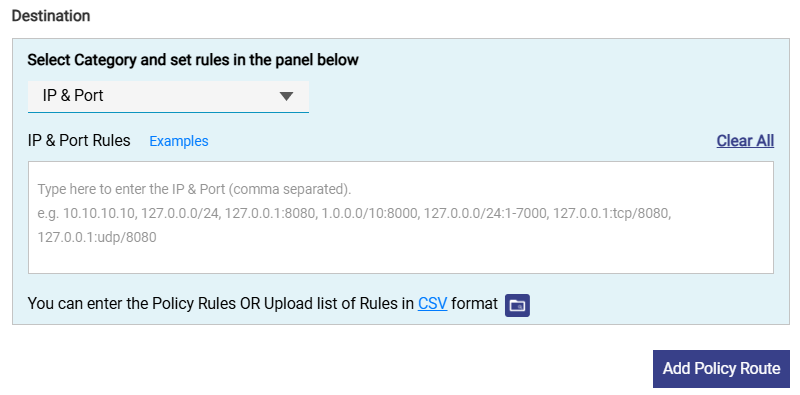
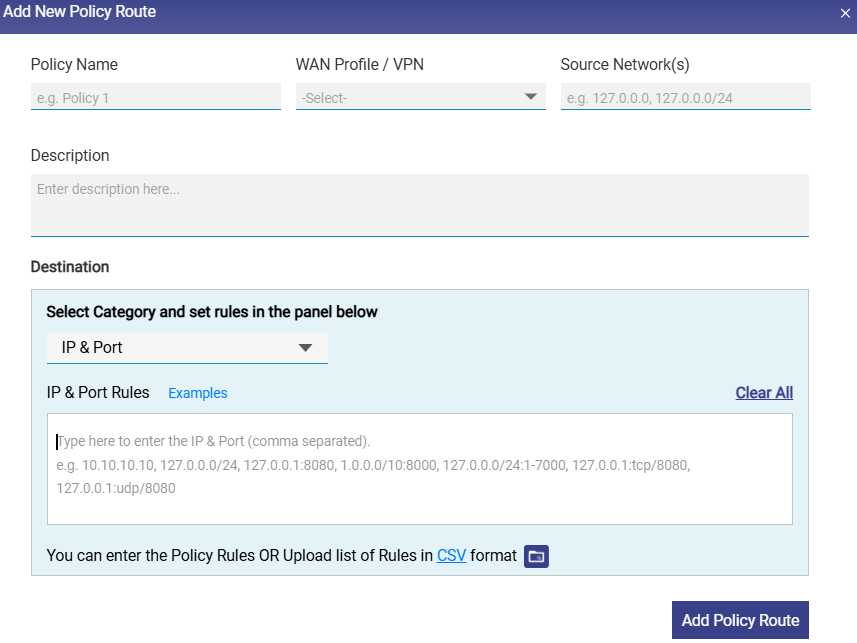
IP & Port routing
-
Select the IP & Port category from the dropdown menu to set IP & Port based routing. The IP & Port Rules field becomes available.
-
Click under the IP & Port Rules section.
-
Enter IP and port destination networks in one of the following formats.
-
a.b.c.d
-
a.b.c.d/x
-
a.b.c.d:/x:y
-
a.b.c.d/x:y-z
-
a.b.c.d:y-z
-
a.b.c.d:y
Where,
x is a subnet, and its value can be from 0 (zero) to 32.
y and z are port numbers, and its value can be from 0 (zero) to 65535.
a/b/c/d are IP, and its value can be from 0 (zero) to 255.
-
-
The user can enter multiple IP and ports.
-
The user can also upload the rule list in CSV format. Click the CSV button to download the sample file.
-
Enter the IP & Port in the subsequent rows in the sample file.
-
Click the
-
Upload the CSV file. The IP & Ports entered in the file will be validated by the system and valid IP & Ports will be added in bulk.
-
Select the Add Policy Route button to save the policy route.
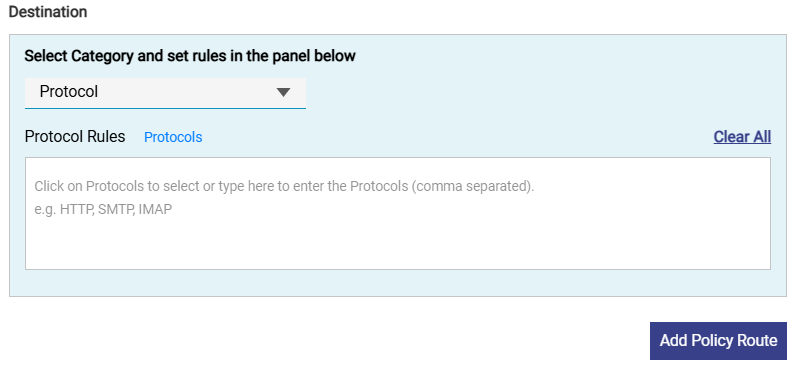
Protocol routing
-
Select the Protocol category from the dropdown menu to set Protocol based routing. The Protocol Rules field becomes available.
-
Click the Protocols button to to view and select from predefined protocols.
-
The user can also type protocol names manually (comma-separated) in the text box of the Protocol Rules section.
-
Select the Add Policy Route button to save the policy route. This allows routing specific protocols through a chosen WAN.
-
The rule will appear in the Policy Routes table.
-
Use the toggle switch in the Actions column to Enable/Disable the rule.
-
Policy Routes are evaluated from top to bottom.
-
Traffic matches the first applicable rule, similar to a firewall rule chain.
-
The user can reorder the policies using the

Configuration Guide for Scenarios Where Microsoft Teams Traffic Does Not Follow Application-Based Policy Routes
In certain scenarios, application-based policy routing for Microsoft Teams may not function as expected due to limitations in traffic classification.
This occurs due to limitations in application detection and the dynamic nature of Microsoft Teams traffic.
Problem Description
Even after configuring a policy route using the Application as Microsoft Teams, traffic may:
-
Not match the policy route
-
Continue to follow default routing
-
Only partially route (e.g., signaling works, but audio/video does not)
Workaround: Use Port-Based Policy Routing
Instead of relying on application detection, you can configure Policy Routes using IP & Port rules to ensure that all Microsoft Teams traffic is routed through the desired WAN Profile. This article provides step-by-step instructions to configure these rules from the Policy Routes screen. This ensures that all Teams-related traffic is matched and routed correctly.
-
Select the SD-WAN option from the left menu bar.
-
Select the Policy Routes tab.
-
Click Add Policy Route button.
-
The Add New Policy Route window appears. Configure the fields as described below.
-
Enter a meaningful Policy Name. Example: Teams Messaging, Teams Audio UDP.
-
Select the WAN Profile through which Teams traffic should be routed. Example: Starlink.
-
Enter the Source Network(s) / subnet(s) from where Teams traffic originates. Example: 192.168.34.0/24
-
Enter a short Description for clarity.
-
Now configure the Destination details.
-
From the dropdown, select IP & Port.
-
In the IP & Port Rules box, enter the rules in the following format - IP/Protocol/Port. Since Teams uses dynamic IPs, enter 0.0.0.0/0
-
This means, match traffic to any destination, filtered by port and protocol.
-
Follow further steps to create policy routes for each traffic type.
Policy Configuration for Microsoft Teams
Create separate policy routes for each traffic type as shown below.
-20260417-091224.png?cb=9c06ab49cdd739c05ee212f35c0d2297)
Policy 1: Teams Messaging (Signaling)
-
Policy Name: Teams Messaging
-
WAN Profile: Starlink
-
Source Network: 192.168.34.0/24
-
Category: IP & Port
-
Rule: 0.0.0.0/0:tcp/443
Policy 2: Teams Audio (UDP)
-
Policy Name: Teams Audio UDP
-
Rule: 0.0.0.0/0:udp/50000-50019
Policy 3: Teams Audio (TCP)
-
Policy Name: Teams Audio TCP
-
Rule: 0.0.0.0/0:tcp/50000-50019
Policy 4: Teams Video (UDP)
-
Policy Name: Teams Video UDP
-
Rule: 0.0.0.0/0:udp/50020-50039
Policy 5: Teams Video (TCP)
-
Policy Name: Teams Video TCP
-
Rule: 0.0.0.0/0:tcp/50020-50039
Policy 6: Teams Media
-
Policy Name: Teams Media UDP
-
Rule: 0.0.0.0/0:udp/3478-3481
Policy 7: Teams Screen Sharing
-
Policy Name: Teams Sharing TCP
-
Rule: 0.0.0.0/0:tcp/50040-50059
Policy 8: Teams Screen Sharing (UDP)
-
Policy Name: Teams Sharing UDP
-
Rule: 0.0.0.0/0:udp/50040-50059
-
Click Add Policy Route button to save each rule.
-
Repeat the steps for all required policies.
-
After applying these configurations, Microsoft Teams traffic will reliably follow the selected WAN Profile.
-
When application-based routing does not correctly classify Microsoft Teams traffic, configuring IP & Port-based Policy Routes provides a stable and effective alternative for traffic steering.
Important Notes:
-
Ensure all policies are enabled after creation
-
Policies are evaluated top-down, so maintain proper order
-
These rules apply to all destinations (0.0.0.0/0) but are restricted by ports
-
This configuration is based on Microsoft Teams recommended port ranges
-
This approach ensures complete coverage of Teams traffic, including audio, video, and screen sharing